1. Welcome to Tacoma World!

    You are currently viewing as a guest! To get full-access, you need to register for a FREE account.

    As a registered member, you’ll be able to:
    • Participate in all Tacoma discussion topics
    • Communicate privately with other Tacoma owners from around the world
    • Post your own photos in our Members Gallery
    • Access all special features of the site

My experience with Relentless Fab - Adding Armor to my 2000 Tacoma

Discussion in '1st Gen. Tacomas (1995-2004)' started by turbodb, Sep 1, 2016.

  1. Sep 1, 2016 at 7:33 AM
    #1
    turbodb

    turbodb [OP] AdventureTaco

    Joined:
    Feb 9, 2016
    Member:
    #177696
    Messages:
    7,820
    Gender:
    Male
    First Name:
    Dan
    PNW
    Vehicle:
    2000 Tacoma Xcab 4x4 SR5 V6 TRD
    AdventureTaco
    My experience with Relentless Fab - Adding armor to my 2000 Tacoma
    (An excursion from Seattle WA to Sparks NV)

    The trip was a long awaited one. But first, some background.

    The lead up
    Six months ago (Feb 2016), I'd decided it was finally time to get a winch on my Tacoma - to allow me to get out of jams (if I get in one); to increase safety on certain trails when we're out solo, and to open up new trails where a blow-down may need to be moved out of the way (for instance).

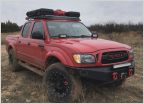
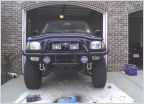
    Initially I was going to go with a hidden front hitch, and a winch that I could move to the front or back of the truck, but I soon found that there aren't really any hidden front hitches for 1st Gen Tacoma's, so I looked at a few different plate bumper options. Once I saw the Predator from @RelentlessFab on @cmj's build, I knew that was the bumper I wanted.

    [​IMG]

    So, I sent a few emails to the good folks at Relentless (which really means Brittony, since she handles that side of things) and a whole bunch of questions later - I really felt like I was bugging her with tons of questions - measurements, etc. - I knew I was going to get what I wanted, and we'd arranged an install date - August 23rd.

    Now I had six months (and a whole summer's worth of camping) to wait.

    Six months of anticipation
    As we all know, when you have six months anticipating your new armor, and you read TW on a relatively regular basis, there's a lot more you end up wanting. Knowing that a trip to Sparks (from Seattle) wasn't going to be a regular occurrence for me, I decided in May that I should also get some sliders. With only a three-month lead time, it was going to be tight, but Brittony came back with the good news - they could be welded on the same day.

    Of course, I was now on the slippery slope and at the beginning of August I just knew that the right thing to do was to replace my stock skids with a full set from Eric and his guys so I added that to my order as well. With the skids though, I'd just be picking them up (bare) and rattle-canning them myself once I got back. No need to get those finished since they'll need regular refreshing anyway. :)

    Oh, and of course I needed a winch for the bumper, and I got a great deal on a Warn M8000-S before I headed down for install day.

    Oh, and I needed some new suspension for all that weight. (That's another story.)

    Install day
    With install day just around the corner we packed up the truck (I was combining this trip with delivery of a display case I'd built and some camping in northern California) and headed out. We'd stop and deliver the display case, do a bit of camping and hiking, and then end up at Relentless Fab on August 23rd.

    [​IMG]

    We got to the shop bright and early on the 23rd, just as Brittony was pulling up in her new(er) T4R. She hopped out with the dogs, greeted us (@mrs.turbodb was there too) like we were family and had us pull into the shop where the guys were already there and clearly raring to go. A quick round of intros and in no time flat they had the hood up and were prepping to do both the slider and bumper install at the same time.

    [​IMG]

    [​IMG]

    Through the intros and first few minutes I was wondering if Eric or Brittony would want me to stick around and take pictures but after about 10 minutes I realized that it's probably pretty normal for us Taco owners to stick close by our trucks as grinders, welders and hammers are taken too them. In fact, looking back on it now, I think there was an expectation that I was going to stick around - sweet.

    From the beginning, Eric was super hands-on in the work. Laying out for the sliders, he called me over to ask if I wanted the body pinch weld notched in order to move the slider up another half-inch. He was great - talking through the pros and cons (I couldn't really think of any cons, and he didn't really have any either :) and then taking the time to carefully mark and notch the pinch weld to move the sliders up for just a bit more clearance over obstacles. Sweet.

    [​IMG]

    [​IMG]

    Brittony popped out throughout the day as well to keep tabs (and learn about!) what was going on - as we all know, Relentless is highly sought after (hence the long wait times) but from conversations I had with each of the guys and Brittony throughout the day, it sounds like most of it's mail order - there just aren't that many install days.

    Now, my specific install situation was a bit unusual. Generally, I'd guess that if you buy a bumper from Relentless and you're going to install a winch, you'd buy the winch from them as well. As it turned out, I got a pretty amazing deal on my M8000-S, and Brittony came through again saying that they would install it as long as I had it wired up when I brought it in. So that's what I did, and in talking to Eric about where to put the solenoid, I mentioned that I would eventually mount the solenoid to the bumper using a bracket. As it turned out, he had Danilo build a bracket while the rest of the guys were installing armor, and I left the shop with the solenoid mounted (at no extra charge!) Wow.

    "Slower is faster." - my favorite part of the day
    As the prep for the bumper install proceeded, Eric kept a close eye, and at what became my favorite point of the day he came out of a quick break he'd taken to talk to Brittony in the office to find something not quite up to his standards. Totally respectfully, but also firmly he pulled the team together and said "Go slower. You're rushing. Slower is faster." As a craftsman (woodworking, not metal) and perfectionist myself – that was music to my ears. And it was great to see him get hands on again, taking measurements, marking exactly where he wanted a few additional cuts made, and then handing the reigns back to the guys - again, showing his confidence in them as well.

    [​IMG]

    The home stretch
    From there, work proceeded pretty much without a hitch. All the preparation was completed quickly and efficiently with Weston grinding the frame to prep for the sliders, Tyler prepping the front of the frame for the bumper, and Chad helping to get the winch installed in the bumper for install. As each step progressed, Eric would come in to do the welding (these are beautiful welds) - welding on the sliders and frame end caps that would hold the bumper in place.

    [​IMG]

    [​IMG]

    In no time at all, the bumper was ready to be installed. As I looked at the time, I noticed it was still before noon - amazing, when we'd planned that just the bumper would take us to mid-afternoon, and the guys had already installed the sliders! Well, there was a bit of a hiccup with the bumper install - a minor frame alignment issue (that took about 15 minutes of grinding by Tyler to remedy) but that was quickly resolved and the guys moved on to connecting the winch to the battery, installing the solenoid bracket right where I wanted it, and getting the winch spooled up - using the Relentless Runner as an anchor point - all while clearly having a great time.

    [​IMG]

    [​IMG]

    Done
    By 12:15 or so, it was done. I had the bumper, winch, and sliders I wanted and half a set of skids in the bed. Yeah, half a set - because Eric took a look under the truck and realized that the t-case (mid) skid wasn't going to fit. Being a California Tacoma, mine apparently has an extra Cat which means the skid needs to be 10 inches longer than normal. A true pro, Eric didn't hesitate to tell me about the issue, and offered to send the skid up to me in Seattle once he was able to fab one up a few days later. Top notch.

    [​IMG]

    So, what can I say, but thanks? Eric, Brittony, Danilo, Tyler, Chad and Weston - you were all awesome. The workmanship in the shop was great, the email communication was always quick, and I'm thrilled with the results. I've already got my front skid painted and ready to install, and I hear from Brittony that my mid-skid should be here in just a few days.

    [​IMG]
     
    Last edited: Feb 7, 2018
  2. Sep 1, 2016 at 8:20 AM
    #2
    RelentlessFab

    RelentlessFab Eric @Relentless Fab Vendor

    Joined:
    Feb 17, 2008
    Member:
    #4772
    Messages:
    15,724
    Gender:
    Male
    First Name:
    Eric
    Sparks, NV
    Vehicle:
    07 AC 6mt>03 SR5 >08 Sport and 17 6MT TRD OR
    Relentless Armored! Too many others to list.
    Thanks for posting about your experience with us Dan. Really love hearing from our customers that are happy with their service and products and appreciate what we do! :)
     
  3. Sep 2, 2016 at 12:38 AM
    #3
    Wyoming09

    Wyoming09 Well-Known Member

    Joined:
    Apr 24, 2015
    Member:
    #153833
    Messages:
    14,277
    Gender:
    Male
    New Tripoli Pa
    Vehicle:
    2000 Work truck 5 speed 4x4 3.4
    Super Springs
    I just love that Shirt Fabricator I need to get one
     
  4. Sep 2, 2016 at 5:15 AM
    #4
    turbodb

    turbodb [OP] AdventureTaco

    Joined:
    Feb 9, 2016
    Member:
    #177696
    Messages:
    7,820
    Gender:
    Male
    First Name:
    Dan
    PNW
    Vehicle:
    2000 Tacoma Xcab 4x4 SR5 V6 TRD
    AdventureTaco
    Yeah, that was pretty awesome. There were a few nice "quotes" around the shop like that :)
     
  5. Sep 12, 2016 at 9:07 AM
    #5
    turbodb

    turbodb [OP] AdventureTaco

    Joined:
    Feb 9, 2016
    Member:
    #177696
    Messages:
    7,820
    Gender:
    Male
    First Name:
    Dan
    PNW
    Vehicle:
    2000 Tacoma Xcab 4x4 SR5 V6 TRD
    AdventureTaco
    Mid-skid is due to arrive Thursday, but I couldn't wait (have a trip planned Friday-Sunday, so may not get it installed), so I went ahead and installed the front skid. Clearly a well-made piece of armor, and is covers more than the two factory skids by itself. Went on without a hitch, thanks again guys!


    [​IMG]

    [​IMG]

    [​IMG]
     
    Last edited: Feb 7, 2018
  6. Oct 3, 2016 at 5:06 PM
    #6
    turbodb

    turbodb [OP] AdventureTaco

    Joined:
    Feb 9, 2016
    Member:
    #177696
    Messages:
    7,820
    Gender:
    Male
    First Name:
    Dan
    PNW
    Vehicle:
    2000 Tacoma Xcab 4x4 SR5 V6 TRD
    AdventureTaco
    October 2, 2016.

    The day before we left for Crater Lake, the mid-skid had arrived - but I didn't have time to paint and install it before we took off. Not a big deal, since the IFS skid covers just as much as both stock plates. But of course, I wanted to get the mid-skid on just as soon as possible, so upon our return I figured some after-work cleanup and painting was in order.

    As expected, the unpainted skid had a bit of surface rust and dirt on it, so my first task after unboxing was to give both sides a bit of a grind. I'm no fabricator, but with my grinder, a pad, and half an hour, I got the skid plate functionally cleaned up. Functionally, but not pretty.

    [​IMG][​IMG][​IMG]

    Paint was easy - just like the IFS skid, a couple coats of Rustoleum primer and a couple of flat black left the skid looking great, and left me happy - now I just needed a few minutes to get it installed. So I waited for a weekend morning.

    Sunday rolled around and I headed out to plonk the skid on. My thinking was: I'll do this just like the front skid - put it on the floor jack; maneuver it into position; bolt it on; carry on with the rest of my day (part of which was a 3pm appointment to get the truck aligned after a summer of dirt roads).

    I made the 3pm appointment, but without a skid.

    (Slow down bucko, we're getting ahead of ourselves.)

    Getting the skid onto the floor jack and jacked up into place was going well until I realized that the second catalytic converter wasn't done giving me trouble (you may recall that Relentless had to extend the skid, which is why I didn't take it home the same day as the IFS skid).

    Anyway, on my truck the cat was positioned an inch or two closer to the passenger side of the car than Relentless had planned for. I don't know if this is common to all California model Tacoma's or if there's something special with mine, but it resulted in the skid hitting the cat - enough that there was no way it was going to fit.

    [​IMG]

    So a bit of measuring and down came the skid.

    The plan: cut off a bit (about 1") of the skid along the step up, so it'll clear the catalytic converter.

    The problem: I don't do a lot of metalwork, so the cutting disk I had was mostly used up, and this is some thick steel plate. This did end up being a real problem, so while I was getting the truck aligned at Sears Auto, I also made a pit stop to pick up a few more cutting disks, and a couple other supplies I knew I'd need in the near future.

    Back from the alignment, I set to work marking the skid (thank goodness for sidewalk chalk), trimming the offending bits (it turned out that I also had to trim a couple other tabs to clear the middle cross member), rounding over all the fresh cuts, and repainting the now bare spots to prevent rust.

    All that taken care of, and a mere six hours after I'd started (albeit with a break for that alignment), I got the skid raised up on the floor jack and bolted into place on the bottom of the truck.

    Whew.

    [​IMG]

    [​IMG]

    [​IMG]

    Pay attention man. There are sparks hitting your truck.

    [​IMG]

    [​IMG]

    [​IMG]

    [​IMG]

    Modification complete. This belly armor is sure to improve gas mileage. Or something. Right?

    Seriously though - love it!
     
    Last edited: Feb 7, 2018
    2002Tacoma4x4 likes this.
  7. Oct 3, 2016 at 5:28 PM
    #7
    Mack83

    Mack83 Well-Known Member

    Joined:
    Jan 21, 2011
    Member:
    #49646
    Messages:
    615
    Gender:
    Male
    First Name:
    Ryan
    Orlando
    Vehicle:
    2014 TRD OR DCSB Silver Streak Mica
    Dang man, are you a writer? That's a well-told story.

    You just don't hear about hear about pride in craftsmanship like this anymore. Well, you hear about it because every shmuck says they have it, but you never see it anymore. I wish they weren't on the other side of the country, or I'd be paying them a visit too.
     
  8. Oct 3, 2016 at 8:08 PM
    #8
    turbodb

    turbodb [OP] AdventureTaco

    Joined:
    Feb 9, 2016
    Member:
    #177696
    Messages:
    7,820
    Gender:
    Male
    First Name:
    Dan
    PNW
    Vehicle:
    2000 Tacoma Xcab 4x4 SR5 V6 TRD
    AdventureTaco
    Thanks. Not a writer per-se, but had fun putting this together. Now I'm wondering if I want to do a full build thread, even if just so I've got something around for myself. We'll see.
     

Products Discussed in

To Top