1. Welcome to Tacoma World!

    You are currently viewing as a guest! To get full-access, you need to register for a FREE account.

    As a registered member, you’ll be able to:
    • Participate in all Tacoma discussion topics
    • Communicate privately with other Tacoma owners from around the world
    • Post your own photos in our Members Gallery
    • Access all special features of the site

2016 CBI front bumper install

Discussion in 'Armor' started by SalmonTaco, Sep 3, 2016.

  1. Sep 3, 2016 at 4:25 PM
    #1
    SalmonTaco

    SalmonTaco [OP] Well-Known Member

    Joined:
    Mar 22, 2011
    Member:
    #53488
    Messages:
    2,895
    Gender:
    Male
    First Name:
    Andrew
    Naches
    Vehicle:
    08 Silver TRD Sport
    Brute Force bumpers, TRD FauxLocks, 5100s & 885s, Falken Wildpeaks, SnugTop MVP Shell, Tuffy Bed Box, Console Vault, Fogs anytime, ImMrYo mirror bracket, Wet Okoles, aFe Pro Dry S, PowerStop Z36 pads & drilled/slotted rotors, more shit I can't remember
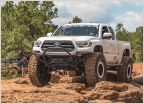
    I am helping a friend install an aluminum CBI front bumper on Monday (9/5). I will do my best to take pics along the way and make this a helpful thread if possible. Here is a pic of the bumper as it was delivered to him:

    If anybody has installed a '16 CBI and has advice feel free to chime in.
     
    rlx02 and Honeybadger like this.
  2. Sep 4, 2016 at 12:53 PM
    #2
    SalmonTaco

    SalmonTaco [OP] Well-Known Member

    Joined:
    Mar 22, 2011
    Member:
    #53488
    Messages:
    2,895
    Gender:
    Male
    First Name:
    Andrew
    Naches
    Vehicle:
    08 Silver TRD Sport
    Brute Force bumpers, TRD FauxLocks, 5100s & 885s, Falken Wildpeaks, SnugTop MVP Shell, Tuffy Bed Box, Console Vault, Fogs anytime, ImMrYo mirror bracket, Wet Okoles, aFe Pro Dry S, PowerStop Z36 pads & drilled/slotted rotors, more shit I can't remember
    Install is tomorrow - tips for taking the '16 front end apart are welcome.
     
  3. Sep 5, 2016 at 9:45 PM
    #3
    SalmonTaco

    SalmonTaco [OP] Well-Known Member

    Joined:
    Mar 22, 2011
    Member:
    #53488
    Messages:
    2,895
    Gender:
    Male
    First Name:
    Andrew
    Naches
    Vehicle:
    08 Silver TRD Sport
    Brute Force bumpers, TRD FauxLocks, 5100s & 885s, Falken Wildpeaks, SnugTop MVP Shell, Tuffy Bed Box, Console Vault, Fogs anytime, ImMrYo mirror bracket, Wet Okoles, aFe Pro Dry S, PowerStop Z36 pads & drilled/slotted rotors, more shit I can't remember

    BAM- we installed the aluminum CBI T3 Front Bumper with Center Grill Guard on my friend's '16 TRD OR today. The end result looks awesome - the build quality of the bumper itself is excellent, it lined up well, and feels super solid on the front of his rig.

    The install on his '16 was tougher than on my '08 by quite a bit, and part of that was due to the CBI instructions (or lack of them). Their instructions simply weren't complete. Here are some of my thoughts on the process:

    1. For this CBI T3 you have to cut a straight line into the existing bumper :sawzall:(above the fog lights) and fender flares so it mates up with the new metal bumper. We ended up with about 1/4" gap per side (not bad). For some odd reason CBI recommends you cut the fender flare higher by 1/4" - I wouldn't cut it that high again, I'd make it even with the bumper cut.
    2. We cut the tiny OEM skid plate "hooks" off to make it possible to remove it without pulling the bumper off. Guess you have to remove the skid to change the oil on the 3rd gen.
    3. The holes in the "side plates" lined up under the sway bar, so we mounted them using the existing hardware and through the side of the frame (with the included 4" bolts) - you have to pop out the rectangular plastic frame plugs above the sway bar brackets to get the 4" bolts in place.
    4. You have to re-install the grill BEFORE you put the bumper on. Trust me - I found this out the hard way. :frusty:

    The rest of it wasn't too bad - it re-uses the stock fog lights (with included brackets) and has some spacers to relocate the power steering cooler that were pretty simple to figure out.

    :headbang:
     
    Last edited: Sep 5, 2016
    bax and ChadsPride like this.
  4. Sep 23, 2016 at 7:03 PM
    #4
    transworldmoto

    transworldmoto Well-Known Member

    Joined:
    Aug 6, 2014
    Member:
    #135540
    Messages:
    995
    Gender:
    Male
    First Name:
    Ben
    California Coast
    Vehicle:
    2016 Access Cab TRD OR 4X4
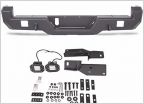
    Thanks for the advice and the write up. I'll be installing this soon. Installed, or mostly installed my CBI T3 rear today and was disappointed to find the license plate mounting holes drilled incorrectly, the lack of holes drilled for the rear parking sensors like I ordered, and the inability to get one of the frame mounting bolts to line up. That and the trailer wiring harness is too short to plug into the new mounting location on the bumper. They really lost some cred with me on the rear. Hopefully the front changes my mind.
     
  5. Sep 24, 2016 at 9:23 AM
    #5
    SalmonTaco

    SalmonTaco [OP] Well-Known Member

    Joined:
    Mar 22, 2011
    Member:
    #53488
    Messages:
    2,895
    Gender:
    Male
    First Name:
    Andrew
    Naches
    Vehicle:
    08 Silver TRD Sport
    Brute Force bumpers, TRD FauxLocks, 5100s & 885s, Falken Wildpeaks, SnugTop MVP Shell, Tuffy Bed Box, Console Vault, Fogs anytime, ImMrYo mirror bracket, Wet Okoles, aFe Pro Dry S, PowerStop Z36 pads & drilled/slotted rotors, more shit I can't remember
    That is a bummer that your rear bumper has issues - I'd be pissed about the parking sensor oversight. Maybe they will give you some $$$ back or a discount on your front bumper? Might be worth a call to CBI.

    My friend waited 4 months for his aluminum front and install instructions were incomplete - it never mentioned the sway bar mount or the stacks of spacers/bolts you use on the bottom of the bumper. On the positive side the oem fog lights and wiring worked great on the included brackets.
     
  6. Sep 25, 2016 at 7:51 AM
    #6
    transworldmoto

    transworldmoto Well-Known Member

    Joined:
    Aug 6, 2014
    Member:
    #135540
    Messages:
    995
    Gender:
    Male
    First Name:
    Ben
    California Coast
    Vehicle:
    2016 Access Cab TRD OR 4X4
    Haha I doubt they'd give anything back. They're the ones who told me to "figure out the size of parking sensor holes myself".

    Anyways, out of curiosity, how'd you go about figuring how much of the stock bumper to cut? I was thinking about pulling it, mounting the CBI, then measuring the gap and cutting that much. What method do you use?
     
    the.sight.picture likes this.
  7. Sep 25, 2016 at 9:13 PM
    #7
    SalmonTaco

    SalmonTaco [OP] Well-Known Member

    Joined:
    Mar 22, 2011
    Member:
    #53488
    Messages:
    2,895
    Gender:
    Male
    First Name:
    Andrew
    Naches
    Vehicle:
    08 Silver TRD Sport
    Brute Force bumpers, TRD FauxLocks, 5100s & 885s, Falken Wildpeaks, SnugTop MVP Shell, Tuffy Bed Box, Console Vault, Fogs anytime, ImMrYo mirror bracket, Wet Okoles, aFe Pro Dry S, PowerStop Z36 pads & drilled/slotted rotors, more shit I can't remember
    They tell you where to make the cut in the instructions - basically you remove the lower plastic bumper covet - you have to pull out on the sides of the bumper (near the wheel well) a bit to get it to pop free, then tape a straight line from the fog light to 1/4" above (I think) the corner, cut it, and pop the plastic part back on. We used a dremel tool and it worked pretty well. That melted plastic shit is hot and sticky, I burned the crap out of a couple fingers on it. Be careful.
     
  8. Sep 26, 2016 at 11:08 AM
    #8
    transworldmoto

    transworldmoto Well-Known Member

    Joined:
    Aug 6, 2014
    Member:
    #135540
    Messages:
    995
    Gender:
    Male
    First Name:
    Ben
    California Coast
    Vehicle:
    2016 Access Cab TRD OR 4X4
    Right on, I'll take a look at the instructions again. Like yours, mine are incomplete as well. Did you buy some edge trim for the bumper after you made the cuts?
     
  9. Sep 27, 2016 at 12:28 AM
    #9
    SalmonTaco

    SalmonTaco [OP] Well-Known Member

    Joined:
    Mar 22, 2011
    Member:
    #53488
    Messages:
    2,895
    Gender:
    Male
    First Name:
    Andrew
    Naches
    Vehicle:
    08 Silver TRD Sport
    Brute Force bumpers, TRD FauxLocks, 5100s & 885s, Falken Wildpeaks, SnugTop MVP Shell, Tuffy Bed Box, Console Vault, Fogs anytime, ImMrYo mirror bracket, Wet Okoles, aFe Pro Dry S, PowerStop Z36 pads & drilled/slotted rotors, more shit I can't remember
    No edge trim, just sanded the plastic flat & clean and called it good.

    The instructions I had showed where to make the cuts on the plastic (be sure to cut your fender flares 1/4" longer than they say) then after that it seemed you were just supposed to know what to do. I was glad I had done my bumper on my '08 as I sorta knew what to expect.
     
  10. Oct 7, 2016 at 3:50 AM
    #10
    Soccer Mom

    Soccer Mom Well Endowed Member

    Joined:
    Oct 3, 2016
    Member:
    #198886
    Messages:
    369
    Gender:
    Male
    Vehicle:
    2017 MGM SR5 DCSB
    METHOD | SOS | C4 | RIGID | PRINSU | OME | TC
    Any tips for making a straight and accurate cut on the bumper? What cutting device did you use?
     
  11. Oct 7, 2016 at 8:35 AM
    #11
    SalmonTaco

    SalmonTaco [OP] Well-Known Member

    Joined:
    Mar 22, 2011
    Member:
    #53488
    Messages:
    2,895
    Gender:
    Male
    First Name:
    Andrew
    Naches
    Vehicle:
    08 Silver TRD Sport
    Brute Force bumpers, TRD FauxLocks, 5100s & 885s, Falken Wildpeaks, SnugTop MVP Shell, Tuffy Bed Box, Console Vault, Fogs anytime, ImMrYo mirror bracket, Wet Okoles, aFe Pro Dry S, PowerStop Z36 pads & drilled/slotted rotors, more shit I can't remember
    We used a Milwaukee rotary tool (basically a Dremel) with a cutoff blade to make the cut, then a sanding block and some 150 grit sandpaper to smooth the edge. The melted plastic is crazy hot and sticky, be careful - I burned the shit out of a couple fingers when it got on me.
     
    agent_rad likes this.
  12. Oct 8, 2016 at 9:37 AM
    #12
    mauidogg

    mauidogg Well-Known Member

    Joined:
    Dec 28, 2015
    Member:
    #173272
    Messages:
    502
    Gender:
    Male
    Vehicle:
    16 DCSB TRDOR
    Where did you guys get instructions from. I got nothing with the bumper and was hoping for some pics or something of the install
     
  13. Oct 8, 2016 at 6:14 PM
    #13
    SalmonTaco

    SalmonTaco [OP] Well-Known Member

    Joined:
    Mar 22, 2011
    Member:
    #53488
    Messages:
    2,895
    Gender:
    Male
    First Name:
    Andrew
    Naches
    Vehicle:
    08 Silver TRD Sport
    Brute Force bumpers, TRD FauxLocks, 5100s & 885s, Falken Wildpeaks, SnugTop MVP Shell, Tuffy Bed Box, Console Vault, Fogs anytime, ImMrYo mirror bracket, Wet Okoles, aFe Pro Dry S, PowerStop Z36 pads & drilled/slotted rotors, more shit I can't remember
    CBI emailed the instructions - they didn't come with the bumper.
     
    mauidogg[QUOTED] likes this.
  14. Oct 8, 2016 at 10:36 PM
    #14
    mauidogg

    mauidogg Well-Known Member

    Joined:
    Dec 28, 2015
    Member:
    #173272
    Messages:
    502
    Gender:
    Male
    Vehicle:
    16 DCSB TRDOR
    Ok thanks. Gonna check some email. Hopefully they sent me some
    Edit: not in any email from them. I will call them Monday and ask for some instructions.
    Thanks
     
  15. Oct 10, 2016 at 6:19 PM
    #15
    warmitupchriss

    warmitupchriss Well-Known Member

    Joined:
    Mar 13, 2016
    Member:
    #181108
    Messages:
    54
    Gender:
    Male
    Orange County, California
    Vehicle:
    2016 Tacoma
    You guys got a lot more help from cbi than I did. My bumper came with no instructions AND was missing pieces.
     
  16. Oct 10, 2016 at 8:16 PM
    #16
    mauidogg

    mauidogg Well-Known Member

    Joined:
    Dec 28, 2015
    Member:
    #173272
    Messages:
    502
    Gender:
    Male
    Vehicle:
    16 DCSB TRDOR
    Did you get them to email instructions? I meant to call today but the time difference always messes me up. I will email them and hope they can get it to me quickly
     
  17. Oct 11, 2016 at 3:59 PM
    #17
    mauidogg

    mauidogg Well-Known Member

    Joined:
    Dec 28, 2015
    Member:
    #173272
    Messages:
    502
    Gender:
    Male
    Vehicle:
    16 DCSB TRDOR
    Well I emailed them and they responded with some instructions. They show you the parts list and the instructions as far as cutting the bumper and the brackets to relocate the power steering cooler. The do not show where the side support brackets go. They do not show how to mount the fog lights. They also do not show any installation steps.
     
  18. Oct 12, 2016 at 8:51 AM
    #18
    SalmonTaco

    SalmonTaco [OP] Well-Known Member

    Joined:
    Mar 22, 2011
    Member:
    #53488
    Messages:
    2,895
    Gender:
    Male
    First Name:
    Andrew
    Naches
    Vehicle:
    08 Silver TRD Sport
    Brute Force bumpers, TRD FauxLocks, 5100s & 885s, Falken Wildpeaks, SnugTop MVP Shell, Tuffy Bed Box, Console Vault, Fogs anytime, ImMrYo mirror bracket, Wet Okoles, aFe Pro Dry S, PowerStop Z36 pads & drilled/slotted rotors, more shit I can't remember
    Yeah - that sounds just like the instructions I had to work with. The side supports mount under the sway bar and thru the frame. The fog light brackets were pretty straight forward and bolted up pretty easily - still would have liked a couple of pics of the process in the instructions.
     
  19. Oct 13, 2016 at 1:31 AM
    #19
    mauidogg

    mauidogg Well-Known Member

    Joined:
    Dec 28, 2015
    Member:
    #173272
    Messages:
    502
    Gender:
    Male
    Vehicle:
    16 DCSB TRDOR
    They sent me the instructions for the Moab bumper for the older Tacoma because it more or less the same. I installed mine today. The damn thing is off center by about 3/16" I thought I had to wait so long because they were working out fit issues they had with the aluminum bumpers. And I got the same issue. Really annoying.
     
  20. Oct 13, 2016 at 1:33 AM
    #20
    mauidogg

    mauidogg Well-Known Member

    Joined:
    Dec 28, 2015
    Member:
    #173272
    Messages:
    502
    Gender:
    Male
    Vehicle:
    16 DCSB TRDOR
    I also did not get the correct bolts. I got one 4" bolt. And one 3-1/2" bolt.
     

Products Discussed in

To Top