1. Welcome to Tacoma World!

    You are currently viewing as a guest! To get full-access, you need to register for a FREE account.

    As a registered member, you’ll be able to:
    • Participate in all Tacoma discussion topics
    • Communicate privately with other Tacoma owners from around the world
    • Post your own photos in our Members Gallery
    • Access all special features of the site

All Pro Slider Install

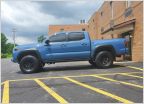
Discussion in '3rd Gen. Tacomas (2016-2023)' started by erok81, Dec 8, 2016.

  1. Dec 8, 2016 at 5:12 PM
    #1
    erok81

    erok81 [OP] Well-Known Member

    Joined:
    Aug 15, 2016
    Member:
    #194699
    Messages:
    5,713
    Gender:
    Male
    Vehicle:
    Imposter
    Has anyone installed a set of all pro's sliders. I'm doing mine and ran into an issue with this little bracket that holds a couple of plugs.

    The two existing bolt holes line up perfectly with the slider holes. But as you can see in the picture one of the square tubes interferes with the bracket. I thought no big deal. This only holds a couple wires. I'll just shift the bracket over and use one hole for it. That works but the cover doesn't fit anymore.

    Or anyone with sliders other than all pro, did you run into this?

    IMG_5138.jpg
     
    TacoPandaTRD likes this.
  2. Dec 8, 2016 at 5:20 PM
    #2
    CERTIFIABLE

    CERTIFIABLE Well-Known Member

    Joined:
    Jun 3, 2016
    Member:
    #188651
    Messages:
    78
    Gender:
    Male
    Georgia
    Vehicle:
    DCLB SR5 4x4 AT
    Level 8 Tracker Pro 265/75/16 Falken Wild Peak AT 3W, 6112@1.59,ICON AAL, ICON 2" VS series
    No, but mine are on the way. I'm watching this thread for sure.
     
  3. Dec 8, 2016 at 5:53 PM
    #3
    erok81

    erok81 [OP] Well-Known Member

    Joined:
    Aug 15, 2016
    Member:
    #194699
    Messages:
    5,713
    Gender:
    Male
    Vehicle:
    Imposter
    Save this thread for sure. I couldn't find any instructions or others who have done this on a 2016. I'm not going to do an install thread, but I'll post a list of stuff I wish I did. As I've got a good list already. :rofl:
     
  4. Dec 8, 2016 at 5:56 PM
    #4
    MTNHABITOVERLAND

    MTNHABITOVERLAND Well-Known Member

    Joined:
    Feb 4, 2016
    Member:
    #231542
    Messages:
    1,594
    Gender:
    Female
    Vehicle:
    2016 Tacoma Camper Build Instagram: @mountainhabit
    Vagabond Outdoors Camper
    @allpro any assistance here?
    Thx
     
  5. Dec 8, 2016 at 6:03 PM
    #5
    CERTIFIABLE

    CERTIFIABLE Well-Known Member

    Joined:
    Jun 3, 2016
    Member:
    #188651
    Messages:
    78
    Gender:
    Male
    Georgia
    Vehicle:
    DCLB SR5 4x4 AT
    Level 8 Tracker Pro 265/75/16 Falken Wild Peak AT 3W, 6112@1.59,ICON AAL, ICON 2" VS series
    You mean you'll let me learn from some one else's mistakes other than my own ?!! :popcorn:
     
    Joe23 likes this.
  6. Dec 8, 2016 at 6:03 PM
    #6
    CERTIFIABLE

    CERTIFIABLE Well-Known Member

    Joined:
    Jun 3, 2016
    Member:
    #188651
    Messages:
    78
    Gender:
    Male
    Georgia
    Vehicle:
    DCLB SR5 4x4 AT
    Level 8 Tracker Pro 265/75/16 Falken Wild Peak AT 3W, 6112@1.59,ICON AAL, ICON 2" VS series
    Really I wish you well with your install. Sincerely
     
  7. Dec 8, 2016 at 7:10 PM
    #7
    erok81

    erok81 [OP] Well-Known Member

    Joined:
    Aug 15, 2016
    Member:
    #194699
    Messages:
    5,713
    Gender:
    Male
    Vehicle:
    Imposter
    I'm still curious how people solved there install, but I got the cover back on.

    Here's what I did. I left it bolted as seen in the pic but leveled it a little more. Then cut the zip tie holding the rightmost spot. That allowed me to jam all the wires into the cover and get it bolted on. Not the best I'm sure but at least it's together.
     
  8. Dec 8, 2016 at 7:20 PM
    #8
    erok81

    erok81 [OP] Well-Known Member

    Joined:
    Aug 15, 2016
    Member:
    #194699
    Messages:
    5,713
    Gender:
    Male
    Vehicle:
    Imposter
    So some lessons too.

    Driver side:
    Remove all brake line clips poking through the frame. I left mine just in case there were cut outs for them them. Way harder to remove with the sliders in place.

    Both sides:
    The two front most bolts use the plate welded nuts. Inside those holes is some plastic thing that you need to remove. This thing pulls out. I had to just chisel it to pieces from the outside in. On the driver side there is a big ol' wire loom that hooks to these clips too.

    Two more of the plate welded nuts go in the crossmember. Make sure to insert these in the big holes before you mount the slider otherwise you can't get those in with the slider in place.

    The last plate but things go a little further back where the frame hole is larger. Then the rest of the nuts are easy to figure out. I had to use locktite on some of the bolts because they didn't seem long enough so I couldn't fit the lock washers. Maybe if I would have tried harder they would have been okay.

    It's easy with one person. I used a floor jack and a 2x4 and just jacked them up into place. Super easy.

    I didn't have to grind any pinch welds. The farthest back bolt you have a couple options. Either mount up the sliders, mark the hole, remove the sliders, drill, reinstall. I'm just going to go grab a 90* drill extension thing. I still have to drill the four bottom holes but that's for Saturday.

    They look really good i think.

    If anyone has questions or whatever feel free to ask. :)

    IMG_5145.jpg
    IMG_5143.jpg
     
  9. Dec 8, 2016 at 7:21 PM
    #9
    erok81

    erok81 [OP] Well-Known Member

    Joined:
    Aug 15, 2016
    Member:
    #194699
    Messages:
    5,713
    Gender:
    Male
    Vehicle:
    Imposter
    Oh and if you fluid filmed your frame prepare to hate life. I probably used 20 pairs of gloves. I still stink. And all of my tools are greasy.
     
  10. Dec 8, 2016 at 7:24 PM
    #10
    SuperBad

    SuperBad Well-Known Member

    Joined:
    Aug 13, 2016
    Member:
    #194456
    Messages:
    8,817
    Gender:
    Male
    First Name:
    Jason
    Dallas, TX
    Vehicle:
    2017 MGM Tacoma OR DCSB
    Truck stuff
    Love your truck. Sliders look good!
     
    erok81[OP] likes this.
  11. Dec 8, 2016 at 7:27 PM
    #11
    GSHEP4

    GSHEP4 Well-Known Member

    Joined:
    Mar 21, 2015
    Member:
    #151470
    Messages:
    84
    Gender:
    Male
    Lehighton, PA
    Vehicle:
    2014 spruce mica sport
    s/c,fluid film, bug shield, window vents, under hood lights, bed lights, tailgate reinforcement, and more.
    On my 14, I put it back in a close to stock position and drove a self tapping screw into the slider plate, acceptable for me.
     
  12. Dec 8, 2016 at 7:29 PM
    #12
    MeFryRice

    MeFryRice Well-Known Member

    Joined:
    Oct 1, 2008
    Member:
    #9615
    Messages:
    513
    Gender:
    Male
    First Name:
    Steve
    Marietta, Ga
    Vehicle:
    '16 QS Tacoma DCOR4x4
    I have the HD version on my truck. The only irritating thing for me right now is it hitting against the passenger rear when going over a big bump (railroad tracks, potholes, etc). I need to trim the pinch weld an 1/8" or I can replace the factory cab mount bushings with poly units. Still need to decide how much effort I want/need to put into this. Lol

    IMG_2348.jpg

    IMG_2347.jpg
     
    TacoPandaTRD and SilverII like this.
  13. Dec 8, 2016 at 7:31 PM
    #13
    erok81

    erok81 [OP] Well-Known Member

    Joined:
    Aug 15, 2016
    Member:
    #194699
    Messages:
    5,713
    Gender:
    Male
    Vehicle:
    Imposter
    I thought about that too.

    It's too bad the slider companies can't move that one brace to the front by an inch or two and it would fit like stock.

    I looked at a few other companies sliders and they all have interference issues with that box and you have to do something similar to what I did. The braces wouldn't be evenly spaced but I don't think it would impact much that way. Or just move it forward and add another brace after it.
     
    TacoPandaTRD likes this.
  14. Dec 8, 2016 at 7:32 PM
    #14
    erok81

    erok81 [OP] Well-Known Member

    Joined:
    Aug 15, 2016
    Member:
    #194699
    Messages:
    5,713
    Gender:
    Male
    Vehicle:
    Imposter
    Looks good!

    What did you do with that stupid box on the passenger side?
     
  15. Dec 8, 2016 at 7:33 PM
    #15
    MeFryRice

    MeFryRice Well-Known Member

    Joined:
    Oct 1, 2008
    Member:
    #9615
    Messages:
    513
    Gender:
    Male
    First Name:
    Steve
    Marietta, Ga
    Vehicle:
    '16 QS Tacoma DCOR4x4
    Honestly, I don't remember but will take a peek and snap a photo for you tomorrow.
     
    erok81[QUOTED][OP] likes this.
  16. Dec 8, 2016 at 7:53 PM
    #16
    erok81

    erok81 [OP] Well-Known Member

    Joined:
    Aug 15, 2016
    Member:
    #194699
    Messages:
    5,713
    Gender:
    Male
    Vehicle:
    Imposter
    CERTIFIABLE likes this.
  17. Dec 8, 2016 at 8:35 PM
    #17
    TacoRD16

    TacoRD16 Well-Known Member

    Joined:
    Apr 7, 2016
    Member:
    #183536
    Messages:
    912
    Gender:
    Male
    First Name:
    Chris
    Houston, TX
    Vehicle:
    2016 Tacoma TRD Off Road 4x4
    Fox 2.5 RR C/O Fox 2.0 RR Rear Dakar leaf Pack Headstong Brakeline Extension Bracket 16"Konig Countersteer wheels BFG's KO2 285/75r16 All-Pro UCA 1.25" All-Pro APEX Slidders Unided CB w/ Firestick II Lamin-X fog Lens 1" Diff Drop OME 1/2" CB Drip OME Mobtown 3/16" Skid plates: Front, Trans and Transfer case Relentless Hood Brackets AuxBeam Ditch Lights DBCustons Grill "Recolored" Matt Black Relentless High Lift Mount Softopper Diff Breather Mod Tail Gate Inserts HondoGarage Tablet Vent Mount Weather Tech Floor Liner
    I moved the bracket up a hole and had to dremel part of the cover to get it fit properly.
    FB_IMG_1481257506692.jpg
    Trying to install my sliders.20160528_115127.jpgI would recommend a hole saw tooth bit... drilled holes through the double C channel less than 10 sec a hole. Broke 2 bits on one hole trying for 10 mins.
     
    TacoPandaTRD likes this.
  18. Dec 8, 2016 at 8:38 PM
    #18
    erok81

    erok81 [OP] Well-Known Member

    Joined:
    Aug 15, 2016
    Member:
    #194699
    Messages:
    5,713
    Gender:
    Male
    Vehicle:
    Imposter
    For drilling the underside bolts? I'm not looking forward to doing those.
     
  19. Dec 9, 2016 at 5:06 AM
    #19
    SqFt

    SqFt Well-Known Member

    Joined:
    Feb 17, 2016
    Member:
    #178465
    Messages:
    111
    Gender:
    Male
    Vehicle:
    2016 Tacoma TRD Sport
    I put these sliders on back in the summer. Went pretty well except for the above mentioned items. I have a DCLB.

    Here is part of the email I sent to All-Pro:

    Drivers side: There is a bracket holding some electrical connections bolted to the back side of the frame rail and it has two studs that go through to the outside of the frame rail and secured with 2 nuts. They are about 1/4" in diameter. Those had to be drilled out. It would be nice if those were added to the pre drilled holes.

    I drilled these two holes out after the rail was mounted, but it was just a PITA because it should be pre-drilled.

    Passenger side: On the outside of the frame rail there is a box secured to the frame with two studs. The holes are drilled out on the slider to get the studs into, but the slider strut that comes off of the frame (second from front, I think) is about 2-3" too close to where this box used to be. If the strut could be moved towards the back a few inches it would all bolt up perfectly. There is not a lot of slack in the harness to move the box very far. Ive got it temporarily in position for now, but I need to come up with a more permanent solution.

    Its been awhile since I looked at it, but I think I just used one of the two bolts to reattach this electrical connector box. The cover needs some trimming to get it to fit. 7 months later and I havnt gotten around to doing that.

    Other than these two issues, all the pre-drilled holes lined up perfectly. Drilling the holes for the countersink screws was a work out. I even had a new bit. Tough frame.
     
    TacoPandaTRD likes this.
  20. Dec 10, 2016 at 5:52 PM
    #20
    erok81

    erok81 [OP] Well-Known Member

    Joined:
    Aug 15, 2016
    Member:
    #194699
    Messages:
    5,713
    Gender:
    Male
    Vehicle:
    Imposter
    Top tip. Drill those underside bolts like this. Took me about 15 minutes and zero effort. :)

    IMG_5181.jpg
     

Products Discussed in

To Top