1. Welcome to Tacoma World!

    You are currently viewing as a guest! To get full-access, you need to register for a FREE account.

    As a registered member, you’ll be able to:
    • Participate in all Tacoma discussion topics
    • Communicate privately with other Tacoma owners from around the world
    • Post your own photos in our Members Gallery
    • Access all special features of the site

1st gen. Tacoma complete frame swap!!

Discussion in '1st Gen. Tacomas (1995-2004)' started by tacopashka, Jul 5, 2017.

  1. Jul 5, 2017 at 12:54 PM
    #1
    tacopashka

    tacopashka [OP] Well-Known Member

    Joined:
    Feb 25, 2017
    Member:
    #211618
    Messages:
    109
    Gender:
    Male
    Vehicle:
    2000 tacoma
    Hey Taco-World folk!
    I have been a member for 4 months now and I wanted to thank everyone who posts in depth information about what they do to their trucks and also solutions for issues people run into! I have used Tacoma world for almost every issue I had run into with this huge project.

    A few months ago I purchased this truck as a Not running/driving truck, hoping to get the engine and transmission out to put into a 4Runner, but changed my mind when I realized a pickup Yota would be more practical, so I started pulling her apart and putting her back together!
    4 months later, and $4500 now into the project(still not done), I start to wonder if it's worth it!!

    This is a 2000, 4x4 manual 3.4V6 with manual Aisin locking hubs(which im excited about!)
    It has 130K actual miles on it and had a recent timing belt change @ 100K.
    I will post more photos as I see interest in the community. If not, ill just leave it at this.

    This is how I got her to the house from Texas.
    IMG_3493.jpg
    you cannot tell here that the frame is actually bent in a couple spots!! seriously!
    the frame on these trucks is very weak actually! If you start jacking up the front of the frame, you can see it start bending before it actually gets the wheels off the ground. That is, if the cab, and engine are still intact.
    IMG_3502.jpg

    This apron here..is just way to wrinkled to repair!! Gonna have to pull and then drill out the spot welds later and weld in another from a doner truck.
    IMG_3505.jpg


    Where the frame was bent! Right behind the upper control arm. I was upset because, now i had to do 10X more work!! Later i will post a photo of this frame. Do not have one right at the moment.
    IMG_3507.jpg
    Will show a comparison later of how bad this spindle was bent!
    cf38eea9-cceb-40d3-a893-8069e111b046 (1).jpg

    Donor truck i found at a junk yard!! only good part was the frame!! exactly what i needed!!
    had 0 rust and was not bent anywhere. Luckily this place pulled everything off for me and got the frame ready for me to pick up. Also purchased the step rails and stabilizer bar.
    $500.00 in total!!
    IMG_3681.jpg

    Got the frame home and pressure washed her down. Grinded down some surface rust and sprayed the whole thing with bedliner and undercoating spray.


    IMG_3721.jpg

    This was a few days later when everything was complete and i was ready to get the truck to the shop to pull the cab and apron on a frame machine. had my brothers help me move the bed over.
    Note: I immediately went to LKQ to buy a door! it was like $90 for a complete door. well, without the handle.
    $90 +$25ish for spray on bedliner
    IMG_3972.jpg

    took the whole dash apart to get things out of the way for working under where the pedals were. the accident had crunched the cab a little and would need to be hammer and pushed back out. Also, we later welded on the inside as well when we installed a new apron.
    Please comment if you need more photos! I have a bunch of photos of connectors!

    IMG_3957.jpg

    These leafspring bushings were the biggest PITA!! I swear. I bought new poly bushings and when I had the truck already rolled into the shop, I used a drill to tear the crap out of them and then sawsall to cut the rest away. Then, the thin metal casing around needed to be cut in 2 spots to break it loose, and sledge/chisel it out! It needed to be beat out!! heat it up and spray with WD40 to break it loose!
    IMG_4011.jpg

    I got the suspension on so that i could have a rolling frame to get it onto the pulling frame in the shop. This took all day because the control arm bolts are not coming off easy!! and when you still have the motor in.. every little space is tight!! the leaf springs aren't even barely attached here.. It was not easy to push the back diff/ axles into the spots to secure them! the thing is heavy!!

    IMG_4026.jpg

    I cut this out of another LKQ pickup. had to do way to much work to get this out!! but took me 3-4 hours and was really cheap!
    I needed the rocker panel and apron as you can see.
    $95
    IMG_3738.jpg

    Finally got it onto the frame. My buddy owns a shop, so all it costed me was an IOU. I wish I had some more photos of how we had the tower connected but this is how it looked when we had first pulled the apron with the frame machine, and also pulled the rocker panel and spot drilled everywhere and then slapped the doner parts, welded at the spot welds and put the hood, fenders and door on to make sure gaps and measurements were on the dot. A job like this would be way too costly for the average Joe. I made sure to do the welding myself to get a little connection with this baby.
    IMG_4455.jpg

    When i went to put the engine in, i pulled the cab off completely with a fork lift. It is only attached with 4 bolts. I hadn'd welded the radiator support yet just so that I could work easier when putting wiring back.
    The actual bracket that holds the engine mount to the engine was actually bent!! the mount was 3 inches off!! We went and bought a vise from Lowes, used the shop owners torch the heat it red hot and beat on it for a whole day just to get it perfectly lined up! Not something I could read about on the internet, but seriously..the accident didn't bust the rubber in the mount at all! but instead the bracket which as like half inch steel was bent to crap!! This part i couldn't find on Ebay or Amazon, so i decided to fix the original. I can post more photos of the bracket whoever wants to see.
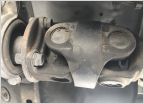
    When i finally mounted the motor/transmission all together, i attached the drive shafts and made sure my bolts were tight.
    IMG_4552.jpg

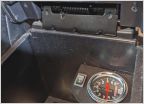
    This computer on the left side of your left foot on the driver side... was the problem when i went to start the truck! my starter would crank and try to turn the motor but it just wouldn't have spark! Plus wierd things were happening like, when i would press the emergency lights, my check engine light would come on. So, my friend told me it was a swapped connector somewhere for sure! I had all these connectors pulled out because I took the fuse box out so we could work on the apron easier.
    Luckily i had taken photos before taking it apart, so when i went to look at photos, i noticed the bottom right connectors were wrong!! how in the world do these connectors both fit in the plugs?? the bottom one is a grey tint and the top one is a white connector. i was so pist! As soon as i swapped these two connectors, all my problems went away and the truck started right up. Guys there is just too much info to type about all the problems i ran into. I want to make it as clear as possible but dont see a point in typing so much if nobody will be doing something like this. I will post a better photo of this computer box ASAP.
    IMG_4630.jpg

    Earlier i thought it was a fuel issue (for some stupid reason) spent a whole day troubleshooting my circuit opening relay and other relays. finally loosened up the bed to get to the tank, and see if my pump was working..and it was! WASTED a whole day! Good experience though.
    IMG_4606.jpg

    This is where that computer box was sitting. This was a photo i had taken after taking fuse box out.
    IMG_3953.jpg

    IMG_4640.jpg
    I barely found info about this on TW!! so this manual locking hub has a locking nut on the back of it. You need a SST (specialty service tool) that the master tech at Toyota acutally tells me is garbage because it breaks easily! this nut has like 210 FT-lbs of torque on it.. so good luck.
    Master tech told me to use an air hammer with a pointed chisel to break it loose. Before you start that though, make sure you bend out that indented part, that is to make sure this nut does not come loose, otherwise, your hub bearing will be destroyed. Also, air hammer it back on. the only way to do it. I have more info about pressing these hubs out. This is the max number of photos i could post right now.
    IMG_4645.jpg

    IMG_4038.jpg
     

    Attached Files:

    Last edited: Jul 5, 2017
    This site contains affiliate links for which the site may be compensated.
    #1
    Bhakti, zztaco, ClevSix and 14 others like this.
  2. Jul 5, 2017 at 12:56 PM
    #2
    SnowFarmer

    SnowFarmer I intend to live forever, or die trying.

    Joined:
    Dec 7, 2016
    Member:
    #204245
    Messages:
    155
    Gender:
    Male
    Corona, CA
    Vehicle:
    '17 TRD Pro
    I can afford Gas.
    That son, is an undertaking. Best of luck with it.
     
  3. Jul 5, 2017 at 1:00 PM
    #3
    Wyoming09

    Wyoming09 Well-Known Member

    Joined:
    Apr 24, 2015
    Member:
    #153833
    Messages:
    14,277
    Gender:
    Male
    New Tripoli Pa
    Vehicle:
    2000 Work truck 5 speed 4x4 3.4
    Super Springs
    Projects are good they keep you out of the house

    Are you keeping track of your time ??
     
  4. Jul 5, 2017 at 1:10 PM
    #4
    tacopashka

    tacopashka [OP] Well-Known Member

    Joined:
    Feb 25, 2017
    Member:
    #211618
    Messages:
    109
    Gender:
    Male
    Vehicle:
    2000 tacoma
    SnowFarmer thanks!
    Wyoming09 absolutely not. If i were to be doing this work for someone else, I would have given up a long time ago. All i can say is..a frame swap is the biggest PITA ever. every bolt is tight and hard to get to, things break, threads get cross threaded. Things that you do not even think about happen. things like, buying a spindle..wasting your time to press it out, and find out that its not even the right one, when it looks exactly identical! the inside bearing was different. Will post more photos if i have of that little BS i ran into. Luckily LKQ had only 1.. only 1!! crazy. Also wasps. wasps like to get in those nice peaceful junk cars. Pressing the ball joints off and installing new ones, i can not even tell you how many hours in total this is taking. probably hundreds for sure. Not worth what the truck is worth in dollars, but for sure out of the house! Im young and dumb for taking on this project, but i think it was a great learning experience. Also, would have broke my bank if i didn't have friends with equipment and people around to help.
    100 friends are better to have then 100 dollars- a russian saying.

     
  5. Jul 5, 2017 at 2:18 PM
    #5
    Wyoming09

    Wyoming09 Well-Known Member

    Joined:
    Apr 24, 2015
    Member:
    #153833
    Messages:
    14,277
    Gender:
    Male
    New Tripoli Pa
    Vehicle:
    2000 Work truck 5 speed 4x4 3.4
    Super Springs
    I agree 120 % with you .

    But I have people tell me all the time How it is so easy swapping a frame

    Myself I would rather build a new one from scratch or at most splice a front section and build a new rear section

    Thing is you will know your truck inside out better then any one else

    Just curious where do you live??
     
  6. Jul 5, 2017 at 2:33 PM
    #6
    tacopashka

    tacopashka [OP] Well-Known Member

    Joined:
    Feb 25, 2017
    Member:
    #211618
    Messages:
    109
    Gender:
    Male
    Vehicle:
    2000 tacoma
    Yes for sure!! I will know it like the back of my hand. Im thinking of sticking with tacomas for awhile. I want to figure them out! they're not as complicated as most modern day vehicles ive seen. Or German cars!!
    Well, I was hoping to do that, but most of these trucks have rust so bad, you cant consider that a frame anymore! Thats why im planning to keep my bend frame because it has a good rear section. Future projects.
    South Carolina.
     
    Jon G likes this.
  7. Jul 5, 2017 at 2:36 PM
    #7
    BartMaster1234

    BartMaster1234 Well-Known Member

    Joined:
    Aug 21, 2016
    Member:
    #195197
    Messages:
    45,854
    Gender:
    Male
    First Name:
    Tyler
    Pittsburgh, Pennsylvania
    Vehicle:
    1998 PreRunner 4x4 2.7l Supercharged
    Flux Capacitor
    Your truck has crank windows? I can see you have the connectors for power doors already present in the kick panel.
     
    mechanicjon and tacopashka[OP] like this.
  8. Jul 5, 2017 at 3:05 PM
    #8
    SnowFarmer

    SnowFarmer I intend to live forever, or die trying.

    Joined:
    Dec 7, 2016
    Member:
    #204245
    Messages:
    155
    Gender:
    Male
    Corona, CA
    Vehicle:
    '17 TRD Pro
    I can afford Gas.
    100 friends are better to have then 100 dollars- a russian saying.

    Love that.
     
    tacopashka[OP] likes this.
  9. Jul 7, 2017 at 1:57 PM
    #9
    tacopashka

    tacopashka [OP] Well-Known Member

    Joined:
    Feb 25, 2017
    Member:
    #211618
    Messages:
    109
    Gender:
    Male
    Vehicle:
    2000 tacoma
    drove her home today yall! Still not done putting front end together.
    I guess when I was pressing in my hub, I ruined my bearing because now its making a strange humming noise.
    What do y'all suggest?
    OEM toyota bearing
    OR
    I have another spindle with timkin bearings still inside, but unaware of how many miles that parts truck had. Maybe i could press those out and press them back into my spindle.

    Interested in your opinions.

    IMG_4706.jpg
    IMG_4707.jpg
     
    Jon G likes this.
  10. Jul 7, 2017 at 1:59 PM
    #10
    tacopashka

    tacopashka [OP] Well-Known Member

    Joined:
    Feb 25, 2017
    Member:
    #211618
    Messages:
    109
    Gender:
    Male
    Vehicle:
    2000 tacoma
    Hey yall interested in an opinon!
    I drove her home today and noticed a sound coming from my wheel hub. I already knew i might have busted that bearing when pressing my hub in.
    should i get a Toyota OEM bearing, or use the bearings out of my parts spindle w unknown miles on it! Its a Timken bearing..which i know last a whole while!

    not done w assembling front end, and still gotta paint the whole darn thing!

    IMG_4706.jpg
    IMG_4707.jpg
     
    patoeknee and SnowFarmer like this.
  11. Jul 7, 2017 at 2:35 PM
    #11
    dgshelto

    dgshelto Well-Known Member

    Joined:
    Apr 19, 2017
    Member:
    #216704
    Messages:
    90
    Gender:
    Male
    First Name:
    David
    Colorado
    Vehicle:
    2002 Tacoma Base
    Dear god this is epic...loving the pictures.
     
    SnowFarmer, FMRAV4 and tacopashka[OP] like this.
  12. Jul 7, 2017 at 3:38 PM
    #12
    Wyoming09

    Wyoming09 Well-Known Member

    Joined:
    Apr 24, 2015
    Member:
    #153833
    Messages:
    14,277
    Gender:
    Male
    New Tripoli Pa
    Vehicle:
    2000 Work truck 5 speed 4x4 3.4
    Super Springs
    Only you know what the bearing feels like once you have it out.

    Timken once was a good bearing manufacture have they been forced to outsource to third world countries
     
    tacopashka[OP] likes this.
  13. Jul 7, 2017 at 3:54 PM
    #13
    RysiuM

    RysiuM Well-Known Member

    Joined:
    Oct 18, 2015
    Member:
    #167004
    Messages:
    2,710
    Gender:
    Male
    First Name:
    Rysiu
    Was Golden State, now Poland EU
    Vehicle:
    1995 4x4 LX Ext Cab, I4 2.7, MT, 335K miles
    DD Deck+backup camera, LED DRL, All LED except H4 Hella
    tacopashka[OP] likes this.
  14. Jul 7, 2017 at 3:57 PM
    #14
    koditten

    koditten Well-Known Member

    Joined:
    Sep 8, 2013
    Member:
    #112077
    Messages:
    19,670
    Gender:
    Male
    First Name:
    Kirk
    Central Michigan
    Vehicle:
    04 trd x-cab 4 x 4 3.4l
    Reserected from the dead.
    Subbed. Looking forward to progress pics.
     
    tacopashka[OP] likes this.
  15. Jul 7, 2017 at 4:54 PM
    #15
    tacopashka

    tacopashka [OP] Well-Known Member

    Joined:
    Feb 25, 2017
    Member:
    #211618
    Messages:
    109
    Gender:
    Male
    Vehicle:
    2000 tacoma
    RysiuM I really appreciate that link!
    Gonna watch it tonight and get this done tomorrow hopefully!
     
  16. Jul 7, 2017 at 5:08 PM
    #16
    tacopashka

    tacopashka [OP] Well-Known Member

    Joined:
    Feb 25, 2017
    Member:
    #211618
    Messages:
    109
    Gender:
    Male
    Vehicle:
    2000 tacoma
    This pic is what was swapped on that computer box. These 2 connectors were swapped.
    FYI for whoever might be doing some kind of frame swap soon

    2nd photo is the lines coming from the gas tank. The top line is your supply, middle is your return and bottom is evap line for charcoal canister.
    I had the 2 clamp on hoses swapped and this was putting fuel into my canister! Like a bunch of fuel! It'd leak nonstop out of the canister, which was obvious something was wrong.
    No clue how, why, but it did that.
    Maybe someone on here could explain.

    IMG_4703.jpg
    IMG_4736.jpg
     
  17. Jul 7, 2017 at 6:05 PM
    #17
    tony2018

    tony2018 Well-Known Member

    Joined:
    Feb 24, 2014
    Member:
    #123866
    Messages:
    5,288
    Gender:
    Male
    Great progress, don't give up! Or I'll come f*c* you over!!!:transformer:
     
    tacopashka[OP] likes this.
  18. Jul 7, 2017 at 6:10 PM
    #18
    FMRAV4

    FMRAV4 Well-Known Member

    Joined:
    Apr 18, 2017
    Member:
    #216601
    Messages:
    60
    Gender:
    Male
    First Name:
    Al
    Detroit, MI
    Vehicle:
    Dreaming
    wow. Nice work OP.
     
    tacopashka[OP] likes this.
  19. Jul 13, 2017 at 4:43 PM
    #19
    tacopashka

    tacopashka [OP] Well-Known Member

    Joined:
    Feb 25, 2017
    Member:
    #211618
    Messages:
    109
    Gender:
    Male
    Vehicle:
    2000 tacoma
    Does anyone have a hub that is for the manual locker? I messed up my threads on the backside of my hub. If I don't find one off of TW, gonna have to look around some more!
    This sucks! Please help! Any info is appreciated! I am pretty sure the hub is specially made for the manual Aisin locker.

    IMG_4799.jpg
     
  20. Oct 30, 2017 at 4:53 PM
    #20
    tacopashka

    tacopashka [OP] Well-Known Member

    Joined:
    Feb 25, 2017
    Member:
    #211618
    Messages:
    109
    Gender:
    Male
    Vehicle:
    2000 tacoma
    As to anyone reading this post in the future, or now. I am getting ready to paint the whole truck with original paint. The last post didnt get any responds unfortunately so i bought the hub from the dude on ebay. The bearing was shot and was all in rust!! I had to use the "timkin" (aka koyo now i guess!!) bearing to install it. After much pain and agony, i had to cut the inner race off, etc etc, too much pointless stuff to tell, but finally like a month later, i got it finished and put back onto the truck!

    I will take photos of the truck how it looks now with primer in some spots where i had dings, and then just progress photos of my painting. Fortunately my brother paints! Should be out of the paint booth and ready to go November 25th the latest!
     
    This site contains affiliate links for which the site may be compensated.
    #20
    patoeknee, rugbypro5 and Jon G like this.

Products Discussed in

To Top