1. Welcome to Tacoma World!

    You are currently viewing as a guest! To get full-access, you need to register for a FREE account.

    As a registered member, you’ll be able to:
    • Participate in all Tacoma discussion topics
    • Communicate privately with other Tacoma owners from around the world
    • Post your own photos in our Members Gallery
    • Access all special features of the site

My 2013 Tacoma Access Cab Chinook build in progress

Discussion in '2nd Gen. Builds (2005-2015)' started by Jaybashant, Oct 1, 2017.

  1. Oct 1, 2017 at 5:28 AM
    #1
    Jaybashant

    Jaybashant [OP] Well-Known Member

    Joined:
    Oct 1, 2017
    Member:
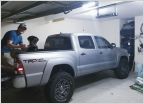
    #231658
    Messages:
    277
    Gender:
    Male
  2. Oct 1, 2017 at 5:45 AM
    #2
    Jaybashant

    Jaybashant [OP] Well-Known Member

    Joined:
    Oct 1, 2017
    Member:
    #231658
    Messages:
    277
    Gender:
    Male
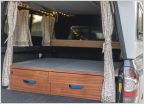
    A few more pics... there is a build thread on ih8mud under expedition vehicles..... I started with a salvage auction truck that was hit in the rear side. Replaced rear end and leaf spring and pulled the bed... Bought a beater 77 Toyota Chinook and modified the fiberglass shell. The photos are a dryfit... I have not built the subfloor yet. Trying to keep it as light and with as low of a center of gravity as possible....
    Systems planned are propane for heat, cooking and
    3kw generater...3 way fridge...solar...AC....canister type porta potty ...full size bedBuilding this truck for a big central and south America trip.
    Thanks for looking and love to hear thoughts...
    Jay

    IMG_5752.jpg
    IMG_5958.jpg
    IMG_5905.jpg
    IMG_5747-1.jpg
    IMG_5704.jpg
     
    RauthBjorn, lynyrd3, Manfred and 19 others like this.
  3. Oct 1, 2017 at 5:52 AM
    #3
    ChadsPride

    ChadsPride Tacoma Owner & Enthusiast

    Joined:
    Nov 26, 2014
    Member:
    #143119
    Messages:
    127,315
    Vehicle:
    Sponsored by TacomaWorld.com
    Very cool!
     
    lynyrd3, Greenbean, Hobbs and 3 others like this.
  4. Oct 1, 2017 at 5:53 AM
    #4
    balljoint

    balljoint Well-Known Member

    Joined:
    Feb 14, 2015
    Member:
    #148680
    Messages:
    1,303
    First Name:
    Dave
    Ontario
    Vehicle:
    '18 DCLB
    Is the intention to be able to pass through from the camper to the cab?
     
    Boatbldr, MarX and Jaybashant[OP] like this.
  5. Oct 1, 2017 at 6:12 AM
    #5
    Mr. Projekt

    Mr. Projekt Well-Known Member

    Joined:
    Oct 23, 2016
    Member:
    #200511
    Messages:
    6,628
    Gender:
    Male
    First Name:
    Caleb
    Harpers Ferry, WV
    Vehicle:
    2021 DCLB TRD-OR 4x4 Army Green
    that thing is badass!!! I'd be curious to see your future plans..... lift? winch? etc...
     
    MarX and Jaybashant[OP] like this.
  6. Oct 1, 2017 at 6:57 AM
    #6
    Jaybashant

    Jaybashant [OP] Well-Known Member

    Joined:
    Oct 1, 2017
    Member:
    #231658
    Messages:
    277
    Gender:
    Male
    Thanks guys! It will be a walk through... most of the roof and the back of the cab will be cut out. We welded a 1"x3" steel frame that will attach to the cab for structure and to give a nice flat surface to mount to... the cab needs the stiffening after its cut. It will be a nervous day when the cut happens!.... you will be able to stand behind the seats when the pop up is open in the access cab space... you will also be able to enter the camper through the suicide doors or the back doors.
    Future plans are to keep it relatively stock. I want to keep it as low a center as possible but am sure that suspension will get revisited. I installed the Body Armor front winch bumper... winch TBD... had fabricated a custom back bumper that was designed to mount a Brophy 3 step aluminum diamond plate scissor ladder and still give me access to hitch reciever... Below the fiberglass camper will be a pair of aluminum diamond plate utility boxes that I bought and then diamond plate fenders will be fabricated to trabsition.
    Pull out Chuck wagon kitchen... 3kw gen plus inverter plus 100w solar to power....3 way fridge... outside shower. A bunch of the design is evolving with the project

    The old chinook was heavily modified. 10" we're cut out of it and then it was laminated back together...in other words, the flat camper front walk through was moved back 10" to put more camper on top of the roof to accommodate the access cab. This put the rear axle in the same place as the old truck.... eliminating a bunch of camper to drag on steep inclines... also modified for new awning windows...Rebuilt the top and pop-up scissor mechanism... Rebuilt back door for a pair of crank out windows... so far so goid!

    IMG_5732-1.jpg
    IMG_5743.jpg
    IMG_5623.jpg
    IMG_5513.jpg
    IMG_5574.jpg
     
  7. Oct 1, 2017 at 7:00 AM
    #7
    Justanotherhemi

    Justanotherhemi Space Cowboy/Ninja

    Joined:
    Dec 7, 2016
    Member:
    #204297
    Messages:
    14,664
    First Name:
    Rick James
    Area 52 (because area 51 was full)
    Vehicle:
    Intelligent Life Exists
    This looks f'n amazing!

    Sub'd for a cool AF build :popcorn:
     
  8. Oct 1, 2017 at 7:04 AM
    #8
    MarX

    MarX Hotdogs, spam and skittles.

    Joined:
    Jun 14, 2013
    Member:
    #106295
    Messages:
    25,406
    Gender:
    Male
    First Name:
    Mark
    NE Kansas
    Vehicle:
    2013 DCLB Tacoma TRD sorta Sport 4X4, 2009 Tundra SR5 workhorse
    RETRAX bed cover, Tailgate lock, TRD exhaust. 887's, LR UCA'S, Bilstein 5100's and Deavers AAL.
    Totally in, very awesome.
     
  9. Oct 1, 2017 at 7:25 AM
    #9
    ChemDawg

    ChemDawg Well-Known Member

    Joined:
    May 15, 2015
    Member:
    #155296
    Messages:
    2,456
    Gender:
    Male
    Maine
    Vehicle:
    2005 sr5 4x4
  10. Oct 1, 2017 at 9:32 AM
    #10
    GTOJim

    GTOJim Well-Known Member

    Joined:
    Feb 20, 2013
    Member:
    #98011
    Messages:
    152
    Gender:
    Male
    First Name:
    Jim
    SF Bay Area
    Vehicle:
    2013 PreRunner TRD OffRoad V6
    Great work. Please post photo's when it's all finished.
     
    Jaybashant[OP] and MarX like this.
  11. Oct 1, 2017 at 11:35 AM
    #11
    Jaybashant

    Jaybashant [OP] Well-Known Member

    Joined:
    Oct 1, 2017
    Member:
    #231658
    Messages:
    277
    Gender:
    Male
    Thanks Jim... it's a long way to done but should have some big progress over the next few weeks...
     
    ChemDawg likes this.
  12. Oct 1, 2017 at 11:48 AM
    #12
    mikalcarbine

    mikalcarbine Well-Known Member

    Joined:
    May 5, 2017
    Member:
    #218236
    Messages:
    493
    Gender:
    Male
    First Name:
    Mike
    Phoenix, AZ
    Vehicle:
    2015 AC TRD OR
    This looks sweet! Looking like a BAMF welding in shorts and t-shirt haha
     
    Darthxtopher and Jaybashant[OP] like this.
  13. Oct 1, 2017 at 12:18 PM
    #13
    Jaybashant

    Jaybashant [OP] Well-Known Member

    Joined:
    Oct 1, 2017
    Member:
    #231658
    Messages:
    277
    Gender:
    Male
    Yes he is Mike... my friend Pat is hard core in every way!
     
  14. Oct 1, 2017 at 12:28 PM
    #14
    solarservant

    solarservant Beersquatch

    Joined:
    Apr 14, 2017
    Member:
    #216196
    Messages:
    255
    Gender:
    Male
    First Name:
    Zach
    Tucson, AZ
    Vehicle:
    ADS/ICON/Dobinson's equipped 2Gen prepped for international overland travel
    ADS front coilovers, ICON rears, Deaver Expedition Pack, CBI Bumpers, RCI skids, Avid sliders, Warn EVO 10S, on 33" Falken Wildpeak MTs, Vagabond Drifter camper & Goose Gear interior.
    Sub'd. Can't wait to see more! Super ambitious build! :thumbsup:
     
    Jaybashant[OP] likes this.
  15. Oct 1, 2017 at 12:29 PM
    #15
    txmxer

    txmxer Well-Known Member

    Joined:
    Jun 20, 2010
    Member:
    #39228
    Messages:
    1,742
    Gender:
    Male
    California and Texas
    Vehicle:
    06 dc tacoma
    - Total Chaos 3.5 Long travel kit - Fox 2.5 coilovers w/ resis -Prerunner bumper -Fiberglass front fenders -Fiberwerx tt bedsides - Dmz Sua - fox 2.5x16 triple bypasses
    Sub'd to your thread on expo but I can actually keep up on here, can't wait to see the rest!
     
    Jaybashant[OP] and MarX like this.
  16. Oct 4, 2017 at 2:10 PM
    #16
    Jaybashant

    Jaybashant [OP] Well-Known Member

    Joined:
    Oct 1, 2017
    Member:
    #231658
    Messages:
    277
    Gender:
    Male
    So there is a bunch of thinking going on... we got started on the steel sub-floor today .., 1x3" steel square tube was cut and drilled to allow them to be bolted using the factory bolts and frame mounting points. Fabricated the spacers and some 4"x4"x3/16" plate that will sandwich a vibration dampening hard rubber like material. It will be quite rigid but allow everything to move a bit.
    The perimeter will be welded 1"×1" steel tube... the floors will be composite foam/fiberglass.... supports will be welded in as necessary to support the generator, batteries water tank etc... I will end up bolting on some aluminum supports to weld in all of the aluminum diamond plate. Utility boxes, fenders etc.
    The floor will drop down to the rear camper door about 7 inches. Just about exactly where the existing trailer hitch reciever is located... I need to relocate it so it will be functional as well as not interfere with my aluminum scissor step. The bumper/step is going to work good. Just have to work out the hitch..
    Need to sleep on it.
    I had built a temp wood flatbed and got all the lights etc installed so I could have my dmv inspection to be issued a rebuilt title. Got all that done so today I stripped it down so the steel work can commence....
    The goal is to get the subfloor in and then set the camper shell back on it and then fabricate the floors and fiberglass them in.

    IMG_5957.jpg
    IMG_5990.jpg
    IMG_5988.jpg
    IMG_5989.jpg
    IMG_5977.jpg
     
    lynyrd3, RogueTRD, markelhof and 6 others like this.
  17. Oct 4, 2017 at 2:13 PM
    #17
    Toyko Joe

    Toyko Joe Here for the pictures

    Joined:
    Sep 19, 2014
    Member:
    #138654
    Messages:
    5,007

    I wish I had more time and money to do projects like this!
     
  18. Oct 4, 2017 at 2:14 PM
    #18
    Jaybashant

    Jaybashant [OP] Well-Known Member

    Joined:
    Oct 1, 2017
    Member:
    #231658
    Messages:
    277
    Gender:
    Male
    Also have a bunch of fairing to do on the camper shell to get it ready for installing on the Tacoma. Using the factory taillights on the camper which is turning out to be a bigger job than I planned on but it will look pretty awesome. I also have the factory back up camera to install... location TBD....

    IMG_5980.jpg
     
    stealthmode and highriserkaiser like this.
  19. Oct 4, 2017 at 2:17 PM
    #19
    Toyko Joe

    Toyko Joe Here for the pictures

    Joined:
    Sep 19, 2014
    Member:
    #138654
    Messages:
    5,007
    Maybe look at s-10's tail lights they are much smaller?
    https://www.walmart.com/ip/Chevy-S1...9959&wl11=online&wl12=384131489&wl13=&veh=sem
     
  20. Oct 4, 2017 at 2:27 PM
    #20
    Jaybashant

    Jaybashant [OP] Well-Known Member

    Joined:
    Oct 1, 2017
    Member:
    #231658
    Messages:
    277
    Gender:
    Male
    Thanks for the thought Toyko Joe but the factory one's will work great. Got most of the sculpting done already and it is nice to have all the lights plug and play!
     
    Toyko Joe likes this.

Products Discussed in

To Top