1. Welcome to Tacoma World!

    You are currently viewing as a guest! To get full-access, you need to register for a FREE account.

    As a registered member, you’ll be able to:
    • Participate in all Tacoma discussion topics
    • Communicate privately with other Tacoma owners from around the world
    • Post your own photos in our Members Gallery
    • Access all special features of the site

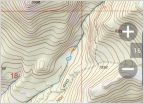
How-To: Planning a Trip/Route (with Google Earth, GPX, KML, and more)

Discussion in 'Off-Roading & Trails' started by turbodb, Jun 12, 2018.

  1. Jun 12, 2018 at 1:49 PM
    #1
    turbodb

    turbodb [OP] AdventureTaco

    Joined:
    Feb 9, 2016
    Member:
    #177696
    Messages:
    7,787
    Gender:
    Male
    First Name:
    Dan
    PNW
    Vehicle:
    2000 Tacoma Xcab 4x4 SR5 V6 TRD
    AdventureTaco
    Table of Contents:
    [Part 1] [Part 2] [Part 3]


    How-to: Planning a Trip/Route Part 1 (with Google Earth, GPX, KML, and more)


    Route planning for an offroad adventure can be daunting to say the least. Just finding a geographical area to explore is often time consuming, and that doesn't even take into account the time spent figuring out the cool things to visit in that area and how exactly to get to those things (i.e. the actual route). Oh, and then there's navigating that route when you're out in the wild - often without any type of internet connectivity.

    Because of this, two of the most common questions I see on the interwebs are:

    Usually when these questions are asked, there are no meaningful answers in the rest of the thread - for good reasons:
    1. Most have no idea how to answer, because they are in the same boat.
    2. People who do know how to route plan, and who have discovered amazing routes don't necessarily want to share those routes with others. Well, not "others" so much as "everyone," which is what answering a question like that on the internet would be. If the route were shared with the internet, it would quickly get overrun, and no longer be the majestically beautiful place previously was.
    3. Route planning is complicated and time consuming. Explaining it is also complicated and time consuming. And frankly, it would just be too much work to constantly write up every time the question was asked.
    So then, here's what I'm going to try to do: I'm going to try to give a sense of my personal route planning process. This isn't the only process (or set of tools) out there - everyone who has figured out route planning has their own process - but it's one that mostly works for me (so far). I'm going to do this by walking through planning part of an actual route that I've run. It's not going to be a complicated route, or a remote route (because I don't want to give those away to the internet), but it will have all the elements of any route one would create.

    Hopefully it's helpful. If it's not, well - I definitely encourage you to figure out a route planning process that works for you!

    What are we going to cover?

    There's a ton to cover in route planning, so I'm going to break the topic into two posts (each of which will be too long themselves)! In them, I'll cover:
    1. Planning and building a route
      • Where to go and an initial list of what to see (points of interest)
      • Building a route using Google Earth to create tracks
      • Adding route detail, iterating on the route and points of interest
      • Planning distances and camp site
    2. Using the route on your adventure
      • Setting up a tablet for navigation
      • Exporting a route to the tablet for in-vehicle use
      • Prepping the tablet for offline use when you're on the trail
    So let's get started.

    Planning and building a route

    Before we get started actually planning and building a route, let me state right up front that planning is tedious and time consuming. If you've ever painted a house, then you know that prepping for paint takes 75% of the time. That's the same with an adventure - the route planning can take longer than the trip itself (at least for me). The nice thing is that it happens in the comfort of your own home, allowing you to take breaks, get distracted, etc.!

    Where to go and an initial list of what to see (points of interest)

    The first step in planning a route is deciding on the general area you want to visit, and the type of trip you want to have - i.e. are you looking for something that's on mostly paved roads, gravel, or unmaintained dirt? Do you want to camp in campgrounds with bathrooms, or are you looking for a secluded spot with a private view? These things are often but not always intertwined - if you're looking for something "more civilized" then you want to look at state or national parks, and you're generally looking at "more mainstream attractions" in those types of places. On the other hand, if you want dirt roads and solitude, that can inform the fact that you should be looking away from national parks, or at least away from their main attractions.

    As I mentioned previously, to make this more real I'm going to plan part of an actual route throughout this post. I think a great general area to plan that route would be Death Valley National Park. It's a great option because it's a relatively well known place (so I'm not giving away any secrets) while still having many points of interest (with varying remoteness) to explore.

    So now we have our general area: Death Valley.

    [​IMG]

    The next step in route planning is to find some points of interest for your trip (places to go, things to see). There are two main resources that I take advantage of at this point:
    1. The internet via search engines
    2. People I know who have gone to the general area
    #2 should be pretty obvious, so I'll touch on it only briefly. If you have friends who have been to - people you physically talk to or correspond with 1:1 (i.e. not "friends on the internet in some forum or on facebook") - then ask them what they recommend seeing. Just get a list of points of interest from them. You can then search for those things online to get more details.

    For #1, start by searching for generic terms about the place you want to visit - "Death Valley" and maybe "Death Valley trails" in this case. From there, click on links that peak your interest. Perform additional searches for those interesting items, and don't just limit yourself to "normal" search results. Look at "image" and "video" search results as well - if you click on an image, Google will show you more info about the image, including the page that contains that image. Clicking through to that page can get you more information about a place you may want to go.

    [​IMG]

    [​IMG]

    There are several types of results you are looking for when you're searching. In the order of most-to-least valuable (usually):
    1. GPS tracks for a route you're interested in - sometimes you'll "get lucky" and find an actual track, or a web site with a bunch/set of tracks.
    2. A trip report - a blog, photo journal, etc. from someone who's to the same place before, and written about it, ideally with landmarks you can follow on a map.
    3. Names of places - just a name or photo that you can us to search for more information, or look for on a map.
    As you find interesting places, catalog and bookmark them; you'll come back to those bookmarks when you're done - and if they are well categorized, you may come back to them for years to come. Spend as much time as you need, over several days until you've built up a bunch of bookmarks.

    [​IMG]

    For Death Valley, with a bit of searching, let's say that we came up with the following list of bookmarks for places we wanted to see:
    • Teakettle Junction
    • Ubehebe Crater
    • The Racetrack
    • Titus Canyon
    • Goler Wash
    • Eureka Dunes
    • Saline Valley
    • Badwater Basin
    but, as anyone who has visited Death Valley will know, while the places above are all technically in Death Valley, they are quite a long distance apart - you'd likely need more than a week to visit them comfortably.

    Building a route using Google Earth to create tracks

    So, the next step is to create a set of routes that will get us to the places we've gathered, so we can see how they relate to each other spatially (on a map), and which ones we can visit over the course of a trip. There are many ways to do this, but the tool I use is Google Earth - mostly because it's got a good set of maps (being Google), and because I figure it will be around for a while (again, Google).

    I should note that Google Earth can be a bit daunting the first several times you use it, but if you master a few of the basics, it's not that bad (and you can learn more over time). For the purpose of this post, I'll walk through creation of just one route; obviously you could create the others in exactly the same way.

    Since it's so beautiful and since it's "on the way into Death Valley," the route I'll cover here is Titus Canyon.

    [​IMG]

    So let's get started.
    1. Start by opening Google Earth; then right-click on My Places and choose Add > Folder. Name the folder Death Valley.
    2. Next, navigate the map to Death Valley by typing Death Valley, CA into the Search box.

      [​IMG]

    3. Next, in the Search box, enter Titus Canyon Road, and let Google Earth zoom in on the road for you. You can see that Google Earth recognizes the road because a white line is shown "over" the road.
    4. Using your mouse, pan the map view to the beginning of Titus Canyon Road (to the east) until you hit the first major road it crosses (Hwy 374).

      [​IMG]

      At this point, it's time to start creating a track. First I'm going to walk through manual track creation using the Path tool, since it will "always" work regardless of Google's knowledge of the road; then I'll show you a shortcut that will work when Google Earth knows about a road (i.e. a white line is shown "over" the road).

    5. With the starting point of your track in view, click on the Add Path tool in the toolbar.
    6. In the New Path dialog that opens, name your path Titus Canyon Road, but don't close the dialog.
      Note: Whenever the Path dialog is open, any clicks on the map will add to the path, so be careful! At this point, use the keyboard arrow keys to pan the map (vs. using the mouse).

    7. Left click the mouse at the intersection of Titus Canyon Road and Hwy 374, to create a point. Then, left click again (and again) to the west along Titus Canyon road, creating a path. When you run out of room in the view, using the arrow keys on the keyboard to pan west. Continue this process until you reach the end of Titus Canyon Road, in Death Valley.
      Note: This will take a while, and takes patience. That's part of why it's hard to find good tracks, and why people don't often share tracks with others.

      [​IMG]

      When you're done, you can zoom out a bit, and your track will look similar to this:
      [​IMG]

      As I mentioned above, there is a quicker way to do this for roads that Google Earth "knows" about. Instead of manually creating a path, Google Earth will do it for you, if you give it a start point and end point. Let's give it a try.

    8. Uncheck the Titus Canyon Road track you already created to hide it from view.
    9. Find the beginning of Titus Canyon road (intersection with Hwy 374) and click on the Add Placemark button on the toolbar.
    10. A placemark dialog will be shown, and a placemark icon will be added to the center of the view. In the dialog, name the placemark Start and then leave the dialog open; drag the placemark icon to the beginning of Titus Canyon Road; then close the dialog.

      [​IMG]

    11. Create another placemark named End, at the very end of Titus Canyon Road, in Death Valley, so you have two placemarks.
    12. Right click on the Start placemark in the Places pane, and choose Directions from here in the context menu.
    13. Immediately right click on the End placemark in the Places pane, and choose Directions to here in the context menu.
    14. Google Earth will determine a route from one placemark to the other, and draw it on the map.
      Note 1: In some cases (like this one), Google Earth will draw a path that uses "main roads" rather than the dirt path you're likely after. In this case, click on the Walk/Hike icon in the Search pane, to see if there are alternate paths.

      Note 2: In some cases, you may never get the route you want. In those cases, create placemarks along the route, and get directions from/to those intermediate placemarks. You'll end up with several paths, but that's fine - it'll look like one track on your GPS.

      [​IMG]

    15. To save the generated path, click the Copy the current search results to My Places button at the bottom of the Search pane.
    16. Scroll to the bottom of the Places pane and find the folder that contains the route that was created.
    17. Expand the folder until you find the path named Route.
    18. Right click on Route and choose Cut
    19. Right click on the My Places > Death Valley folder, and choose Paste.
    20. At the bottom of the Places pane, delete the folder that was created for the route (to delete extraneous waypoints and other routes).
    21. Delete the Start and End placemarks you created earlier to generate the route.

      You've now successfully created a path much more quickly than manually clicking each point along the path. Not that it was easy, but it was easier.

      [​IMG]

      With the path created, it may seem like we're done - but we're far from it. It's now time to iterate on the path and add route detail.

      Adding route detail, iterating on the route and points of interest

      What does it mean to add detail and points of interest? For me it means:
      • Finding any interesting points of interest along the route and marking them, so I don't miss them when driving the route.
      • Doing more research about the route (online and in books from the library) to add interesting points.
      • Marking any fuel locations along the route, so I know where I can fill up.

      Let's tackle these one at a time. First, finding interesting points along the route.

    22. In Google Earth, zoom in along the route looking for points of interest. You can find these by looking at the terrain for lakes, mountain peaks, etc., as well as looking for photos left by previous visitors. Also, look for places that look like they would be good to camp (dead end roads with a clearing, etc.)!
    23. For any of these that you think are worth noting, create a placemark along the route at that location, using the Add Placemark button. Make sure to give it a good name (and description).

      [​IMG]

      For Titus Canyon Road, using only Google Earth, I'd likely create placemarks for:
      • Leadfield Ghost Town
      • Red Pass
      • Thimble Peak
      • Nevada/California border
      • No Camping (this just isn't the right place to camp)

      Next, it's time to do more research (using the internet and old books at the library). It's amazing what you can find in books about a location - ghost towns, amazing vistas, and mines just to name a few. These are all things that are often hard to spot on satellite imagery (at least, in a way that you know what they are), but that when called out in a book are cool to visit. In the case of Titus Canyon Road, there is a ghost town worth adding that I found in a library book: Ryolite.

    24. Add a placemark for Rhyolite to the map, and also add a path to get there (likely before you get to Titus Canyon Road, on your way from Beatty).

      Lastly, it's time to add fuel placemarks. Generally I like to fill up with fuel whenever I pass a station and I've got 3/4 or less of a tank. That said, it's always nice to know where fuel is, so if you do start running low, you can make a run for the station.

    25. Using your favorite web browser, go to gasbuddy.com
    26. Search for Death Valley, California, and then when the results are shown, click on the Map button.
    27. Scroll around until you find Titus Canyon Road, and you'll notice that towns with gas are called out on the map. In this case, the closest gas is available in:
      • Beatty, NV
      • Stovepipe Wells, CA
      • Furnace Creek, CA
    28. Create placemarks in Google Earth named Fuel for each of these locations.

      [​IMG]

      [​IMG]

      We're getting close. Once you've created all of your routes, and iterated on those routes to add points of interest, one of the last things you'll want to do is to add possible camp sites along the route - or at least get a sense of where you will want to start looking for camp sites as you drive the route.

      Planning distances and camp sites
      There are a few strategies I'd recommend when it comes to planning possible camp sites and distances for a trip.

      First - I highly recommend planning camp sites when planning routes - that is, many routes have one or more amazing views/points of interest along their length. If you can camp at or near that location, it will make camp much more enjoyable, since you'll have something awesome to look at in the evening and morning. Of course, sometimes this means you'll stop "early" in the day (or at least earlier than you might need to stop). That's OK. The point of one of these adventures is to enjoy the adventure - so don't turn it into a race to finish.

      Second - I highly recommend being flexible when you are looking for a camp site - if you've planned a specific spot, but it's clear that you aren't going to make it to that spot before dark, or if someone else is already in the spot when you get there, just keep driving your route and look for spurs off of the route that could work for camp. Investigate some. You'll almost always find something within just a few tries. It might not have the view you were expecting, but it'll be great. And maybe it will have an epic view you never expected.

      Third - when it comes to planning distances, there's no clear-cut, always-applies rule for how far you'll make it each day. But here's a rule of thumb that sort of seems to work, and can help you look along your route to see if possible camp sites you've marked are approximately the right distance apart (i.e. will you be able to make it to the next site each day).
      • Mostly paved roads, and some graded gravel - if you're travelling on the equivalent of mostly paved roads, plan on travelling up to 300 miles per day.
      • Mostly dirt roads, with varying level of maintenance - if you're travelling on dirt roads that are require mostly 2WD but where you may have to engage 4WD every now and then (but very rarely 4Lo), where some of the roads aren't well maintained, and/or where there are gates you need to pass through, plan on travelling around 100 miles per day, or maybe 150 miles at the extreme.
      • All dirt, with little to no maintenance - if you're really in the wild, on roads that are unmaintained and require 4WD at most times and 4Lo on a regular basis, congrats - you've found a special spot. Plan on travelling between 20-50 miles a day.

      Of course time of year, weather conditions, road conditions, stopping to enjoy the views, and many other factors can affect these estimates. No matter what, remember strategy #2 - be flexible. As evening is nearing, look for a spot wherever you currently are - it's much nicer to find, set up camp, and make dinner in daylight than drive into the night and miss the sights along the way.

      Saving your work
      Once you've added your routes, iterated on them and various points of interest, and thought about where you might camp... it's finally time to save your work. Actually, you should be saving as you go, since Google Earth has a tendency to crash (at least on my computer), but if you haven't saved to this point, make sure to do it now!

    29. Right click on the Death Valley folder you created, and choose Save Place As...
    30. Save the file as Death Valley.kmz to the location of your choosing.

    - - - - -​

    Whew, that was a lot to cover. Next time, we'll pick up with part 2 - how to move the route to a tablet and actually using it on your adventure! If you've got questions, feel free to add them below the post and I'll try to address them as quickly as possible.


    (shameless plug: I originally posted this at https://adventuretaco.com/how-to-planning-a-trip-route-with-google-earth-gpx-kml-and-more/)

    .
     
    Last edited: Mar 4, 2019
  2. Jun 12, 2018 at 1:53 PM
    #2
    turbodb

    turbodb [OP] AdventureTaco

    Joined:
    Feb 9, 2016
    Member:
    #177696
    Messages:
    7,787
    Gender:
    Male
    First Name:
    Dan
    PNW
    Vehicle:
    2000 Tacoma Xcab 4x4 SR5 V6 TRD
    AdventureTaco
    How-to: Planning a Trip/Route Part 2 (Taking the GPX on the Road)

    For part 1, see How-to: Planning a Trip/Route (with Google Earth, GPX, KML, and more)

    So, you've done your research and created a route that you're super-jazzed about. If you're anything like me, it's taken you days. Or weeks. Months of work (on-and-off), even. That's awesome - you're in a small class of folks who do detailed route planning. Now it's time to get out there! You know, like this...

    [​IMG]

    Seriously though - the hard part is done, now comes the fun part - seeing the beauty that nature has to offer. Here I'll cover how I take a route and use it to guide the adventure. As always, there are many ways to do this using all different sorts of technology. But this is what I do. We'll look at:
    • Setting up a tablet for navigation
    • Exporting a route to the tablet for in-vehicle use
    • Prepping the tablet for offline use when you're on the trail
    Equipment selection
    Before we get into setting up the tablet, let's talk about the hardware itself for a moment. I use an Android tablet - specfically a Samsung Galaxy Tab A 8.0, with 16GB of RAM and a 64GB or larger SD card. Here's why:
    1. As long as you get one with GPS capabilities, a tablet is much more functional than a standalone GPS unit, if you're willing to create your own maps (which is exactly what we're doing here).
    2. I choose Android over iOS because of cost - Android devices are a fraction of the cost.
    3. I choose an 8-inch screen because I like to keep the tablet mounted high on the dash. A larger screen would block either my AC vents or the windshield.
    4. I choose a tablet with 16GB of RAM (vs. 32GB or more) because I don't care how much storage is on the actual device - that's what the SD card is for. And again, that keeps cost down. A good SD Card is cheap (I recommend this 64GB, or this 128GB card).
    And, I should note - the Tab A 8.0 is a cheap tablet - if you spend more you can get a faster processor or better screen, but I don't feel like I've really needed those. The Samsung Galaxy Tab S2, and the Lenovo Tab 4 8" are two other tablets that I'd consider.

    Setting up the tablet for navigation
    Getting the tablet setup is relatively easy - there are really only a few steps.
    1. Make sure you have WiFi on and that you are connected to a network.
    2. Make sure you have location services turned on in your tablet Settings. Obviously, to use the GPS, any navigation app will need access to accurate location information.
    3. Download a navigation application. I'm a fan of Backcountry Navigator TOPO GPS (the paid version - $12 at the time of writing) onto your tablet because it's got a ton of features and is relatively straightforward to use (as straightforward as any of these type of apps).

      [​IMG]

    4. Insert your SD card if it isn't already.
    5. Configure Backcountry Navigator to save data to the SD card rather than built-in memory by:
      1. Tap on Menu > Settings > Storage Options > Storage Root(Advanced).
      2. Select the External Storage Card that is presented (if it is not already in the Current section).
      3. Click SAVE.

    Exporting a route to the tablet for in-vehicle use
    With the tablet setup, it's time to get the route we created exported so we can see it on the tablet as an overlay on a map. As you can imagine, this too is relatively easy to do.
    1. Connect the tablet to your computer using the USB cable and make sure you've enabled file transfers (vs. just charging). This is generally done by pulling down the notification menu and tapping USB connection > For file transfer.
    2. On your computer, find the KMZ or KML route file you created with Google Earth and copy it to the Download folder on your tablet (generally This PC > Galaxy Tab A > Tablet > Download).
    3. On the tablet, open Backcountry Navigator.
    4. Import the route file by tapping Trip Data > Import Tracks or Waypoints.
    5. The next screen should already show the Download folder, and you should see your route file listed. If it doesn't, navigate to your route file (likely KMZ or KML) and tap it to bring up the Import GPS Data screen.

      [​IMG]
    6. Generally on the Import GPS Data screen, you can simply tap Start Import (to the Existing Trip Database named default). However, take a quick look at the settings and make sure they are what you want before tapping Start Import.
    7. Backcountry Navigator will then import all of the tracks (routes) and waypoints (placemarks) from your file and display them on the map. If they aren't in view, pan and zoom the map to bring them into view.

      [​IMG]

      Nice. You now have maps on your tablet, and if you have internet connectivity (via WiFi or cellular), you can navigate a trip. Of course, on a great trip you won't have either, so let's deal with that situation...

    Prepping the tablet for offline use when you're on the trail
    When you go offline, the tablet will continue to show your tracks and waypoints - those are stored on the SD card if you followed the instructions above. However, unlike when you're sitting at home connected to WiFi, Backcountry Navigator won't be able to download maps, unless you've stored those on the SD card as well. Follow these steps to download the relevant maps for offline use.
    1. Open the Backcountry Navigator app while you are connected to your home WiFi. (Because you're about to download lots of data.)
    2. Tap on Map Layers at the top of the app, then More Map Sources and then select the map "type" you want to download. I find the following two maps to be the most useful
      1. Worldwide > Thunderforest: Outdoor (I primarily use this map)
      2. Worldwide > Virtual Earth Hybrid Satellite Imagery Maps (this is nice to see terrain/roads that may not be "official" roads).
    3. Tap Map Layers at the top of the app (again), then Select Areas For Download.

      [​IMG]
    4. The top toolbar will change to show SELECT | SCROLL | DOWNLOAD | DELETE; along the right side of the app, you'll see the zoom controls (+ | -) and the zoom level: 1-16+
    5. Make sure you are at zoom level 10, and then tap on SCROLL and use your finger to navigate to the area of the map you want to download.
    6. Tap on the SELECT button and use your finger to mark the area you want to download.

      Note: you probably won't be able to fit the entire area you want to download on the screen at one time. Alternate between the SCROLL and SELECT buttons to create rectangles that encompass the area you want to download. The edges will be "choppy" and that's OK. It's also OK for the rectangles to overlap; those areas will only be downloaded once.

      [​IMG]
    7. Once you have everything selected, tap the DOWNLOAD
      1. Set the Max Zoom to 16
      2. Set the Map Package to Cache to Main Tile Cache (Preview Cache)
      3. Tap Begin Download and follow the prompts as appropriate to download the maps.

      [​IMG]

      Note: You can repeat steps 3-6 to download different geographies for offline use; they will all just live in your map cache for offline use.

      Once the download of any/all the geographies you want offline complete, you can verify that they will work when you are offline by disabling WiFi and using the tablet to navigate the area you downloaded. Make sure to zoom in and out (between zoom level 8 and 16) to ensure you have all the map tiles.

      And that's it! You are now ready to head out on an adventure, with offline maps. #gooutside #beadventure :rofl:

    Bonus: Recording tracks and recording points of interest
    Besides just navigating with your offline maps, it's often useful to record where you actually go, and things you see along the way - since you often end up off-route, and you discover things along the way that you never found on the internet or didn't mark because they didn't seem interesting at the time. Camp sites are a great example of this.

    Recording tracks
    While you are adventuring, you can record a GPS route of where you've been. You do NOT have to have offline maps of the area to record the track - that is, even if Backcountry Navigator shows empty map tiles, it will still record a track correctly, and you can see it on the map later, when you have connectivity again.
    1. Open the Backcountry Navigator app
    2. Tap on Location, then on Record a Track
    3. Give the track a name and press Start Recording
    4. When you're done with the track (end of the day or end of the track), tap on Location, then on Stop Track Recording.
    Repeat steps 2-4 as appropriate to record as many tracks as you'd like.

    [​IMG]

    Noting Points of Interest
    In addition to recording tracks, you can also create waypoints at interesting places (this works whether you are recording a track or not, and like tracks, you do NOT need to have offline maps of the area to record a waypoint).
    1. While the Backcountry Navigator app is running, place the red + in the middle of the screen on the location you want to create a waypoint.

      Note: If the map is not centered on your current location, tap the center on current location icon ( [​IMG] ) to move your current location to the red + in the middle of the screen.
    2. Tap on the waypoint icon ( [​IMG] ) in the bottom right corner, then tap on the green text that pops up. This will either be Mark (if the map is not centered on your location) or Create GPS Waypoint if the map is centered on your location. They both bring up the same Waypoint dialog, and both create a waypoint where ever the + is currently shown on the map.
    3. Select the Waypoint name and enter the name of the waypoint you are creating.
    4. Tap Save in the top right of the application.

    [​IMG]

    So - with that you're ready to research and create your own routes, transfer those routes to an Android tablet running Backcountry Navigator, and use those routes offline while you adventure along them (noting anything interesting you come across). Hopefully this has been helpful, and as always feel free to ask questions or suggest improvements!


    EDIT: March 4, 2019
    There's now a Part 3 - which builds on part 1 and part 2. Skip the rest of the thread and read it here:
    Planning a Route the Easy Way (Google My Maps, GPSVisualizer, and Earth)
     
    Last edited: Mar 4, 2019
  3. Jun 12, 2018 at 1:53 PM
    #3
    turbodb

    turbodb [OP] AdventureTaco

    Joined:
    Feb 9, 2016
    Member:
    #177696
    Messages:
    7,787
    Gender:
    Male
    First Name:
    Dan
    PNW
    Vehicle:
    2000 Tacoma Xcab 4x4 SR5 V6 TRD
    AdventureTaco
    and one more
     
  4. Jun 12, 2018 at 2:22 PM
    #4
    Digiratus

    Digiratus Adventurer

    Joined:
    Mar 26, 2010
    Member:
    #34006
    Messages:
    23,037
    Gender:
    Male
    First Name:
    Mike
    Roaming the PNW
    Vehicle:
    The RedHead
    2002 XtraCab TRD 4x4 SCv6 AutoTrans With Lots of Mods ADS COs w/Compression Adjusters Camburg Uniball UCAs Whiteline Lower Control Arm Bushings Kartek 7" Limit Straps Plastics Guy Front Bumpstops Custom Alcan Springs +800 lbs +3" ADS 10" Stroke Triple Bypass w/Resi Rear Shocks Custom Rear Shock Relocate All-Pro U-bolt Flip w/Timbren Bumpstops 4.88 Nitro Gears ARB Front Locker ARB Twin Compressor Black 17x8 Konig Countersteer Type X 285/70r17 Falken A/T3w Gunmetal 16x8 SCS Ray10s 255/85r16 Maxxis Bighorns Limited Edition (Relentless) Elite Front Bumper Smittybilt X2O 10K Winch Diode Dynamics SS3 Sport Selective Yellow Fog Lights in the Bumper Diode Dynamics SS3 Pro 4,000 Kelvin SAE Driving Lights with Clear Lenses on the Bumper Morimoto D2S Projectors XB35 Ballasts + 4300K Bulbs Badland Sliders FrankenFab Tire Carrier Swingout bumper w/kitchen BudBuilt Front & Bellypan Skids BAMF Rear Diff Skid Dometic CFX 55im Fridge/Freezer Alpha II Hardshell RTT Badland Custom Bed Rack Denso 210-0461 105 amp alternator Dual Northstar 24F AGM batteries BlueSea 7622 ML-ACR Battery controller Peak DBI Dual Battery Voltage Monitor Magnuson MP62 Supercharger w/2.37" Pulley Haltech Elite 2000 Standalone ECU Denso 650cc Fuel Injectors Doug Thorley Headers Aeromotive Stealth 340 Fuel Pump TransGo A340F Reprogramming Shift Kit Magnaflow Hi-Flow CAT, Magnaflow 18" Muffler w/Vibrant Resonator 13WL Brake Calipers Braided Steel Brake Lines ScanGauge II OBDII Scanner Kenwood TM-71A Dual Band Ham Radio Larson 70CM/2M Antenna Uniden 520xl CB radio 3' Firestik Adjustable tip antenna Pioneer DEH-P9400BH HU Alpine Amps & Type R components (F) and coaxials (R) Wet Okole Seat Covers Weathertech Digital Liners Deck Plate Mod 1" Diff Drop Carrier Bearing Drop
    This can be a very time consuming process. One would have to almost be retired to have the necessary time to do it thoroughly...
     
  5. Jun 12, 2018 at 2:28 PM
    #5
    roguegs

    roguegs Well-Known Member

    Joined:
    Feb 23, 2018
    Member:
    #245423
    Messages:
    4,719
    Gender:
    Male
    First Name:
    Angelo
    Vehicle:
    V8 T4R
    Went from 3rd Gen Taco to 3GT4R to 2nd Gen Taco and finally a V8 4GT4R.
    I used this for one of my quick day trips up near Tahoe where majority of the trails are covered by treeline so Google Earth was only slightly helpful.

    I believe this tool is EXCELLENT on planning a route through wide open terrain but if someone is planning on doing something woodsy - it would be more difficult. Plus taking the extra step to see if the road is closed by Rangers is also time consuming. Another thing that some users need to get more experience in is planning a plan B and C route in case some shit hits the fan on the trail (again in wooded areas). Nothing worse than planning out the whole thing and getting to the trailhead to either find the route was closed, downed tree, overgrown brush on the trail, deep ruts, etc.

    All in all Google Earth is a great tool and I am just now scratching the surface of it's potential. I end up exporting it and using it on either AllTrails Pro or Gaia but I see your write up is going to include that in part 2!

    Nevertheless, solid work!
     
    turbodb[OP] likes this.
  6. Jun 12, 2018 at 2:49 PM
    #6
    Hobbs

    Hobbs Anti-Lander from way back…

    Joined:
    Mar 20, 2016
    Member:
    #181838
    Messages:
    22,346
    Yep…
    Vehicle:
    Rock Bangen', Desert Tamin', Gold Findin' Machine!
    Subbed two:D
     
    turbodb[OP] likes this.
  7. Jun 12, 2018 at 3:08 PM
    #7
    turbodb

    turbodb [OP] AdventureTaco

    Joined:
    Feb 9, 2016
    Member:
    #177696
    Messages:
    7,787
    Gender:
    Male
    First Name:
    Dan
    PNW
    Vehicle:
    2000 Tacoma Xcab 4x4 SR5 V6 TRD
    AdventureTaco
    Sure thing.

    :anonymous: :luvya:

    Thanks. Living in the PNW, I've planned quite a few trips through wooded areas and never had too much of a problem finding the trails. Satellite is high enough up there that what you're looking for is usually visible (at least as an outline).

    And for sure - checking road conditions is still something that you have to do and can be time consuming - it all can though, really!

    One of the most important things to remember is that a route will never be perfect. It's always important to be ready to adapt on the fly. As @m3bassman mentioned on this topic - everything will always work out. And, in my view - the whole point is adventuring, so be open to the unknown! In fact, I don't think I've ever run a route exactly the way I planned it; nor had I mapped out the re-routes we ended up taking!

    Part 2 will use Backcountry Navigator, but it's pretty similar to Gaia, I'd assume.
     
    roguegs[QUOTED] likes this.
  8. Jun 12, 2018 at 3:12 PM
    #8
    roguegs

    roguegs Well-Known Member

    Joined:
    Feb 23, 2018
    Member:
    #245423
    Messages:
    4,719
    Gender:
    Male
    First Name:
    Angelo
    Vehicle:
    V8 T4R
    Went from 3rd Gen Taco to 3GT4R to 2nd Gen Taco and finally a V8 4GT4R.
    Totally agree! I think using this tool as a general guideline but still being able to adapt on the fly is what makes it so much fun. I ended up scrapping some of my original waypoint because the descent was too steep on the original trail I wanted to take :(

    I do like the fact that you can search up POIs directly from Google Earth's platform instead of having to always plug in coordinates or go back and forth between multiple webpages
     
    turbodb[QUOTED][OP] likes this.
  9. Jun 13, 2018 at 2:26 PM
    #9
    jbrandt

    jbrandt Made you look

    Joined:
    Feb 12, 2011
    Member:
    #51038
    Messages:
    17,612
    Gender:
    Male
    First Name:
    Justin
    El Dorado, CA (NOT El Dorado Hills)
    Vehicle:
    '04 TRD Tacoma 4x4 DC
    Kings, J59's Total Chaos UCAs Custom skids Sticker mod
    I find Google Earth to be a good resource, but it's also pretty clunky at times, and often doesn't show you all the potential routes, closures, etc... Google simply isn't a platform designed for the backcountry. It's more for helping millennials use their Zipp car to find the nearest avocaddo. :devil:

    Even in not-especially remote areas like the El Dorado NF, GE doesn't show many designated routes, or they are simply inaccurate/wrong location. I end up switching back and forth between GE and an app like BC Nav, where I can create additional placemarks along the routes shown in MVUMs or other topo/forest service maps. Then I can import those BACK into GE. I definitely like how BCNav and Google Earth both use gpx and kml files. Makes file transfers super easy.

    Once I get a general route down, I then go over to my paper maps and trace the planned route there as well.

    While GE has the ability to calculate drive times, I wouldn't trust it for anything but major paved roads. Was doing a recent planning session for an area between Hwy 4 and 88 near Bear Valley - just a couple shorter, more technical trails. Trail book said this one route would take 1-2 hours, google said 15 minutes. lol
     
    Silver02Taco likes this.
  10. Jun 13, 2018 at 3:18 PM
    #10
    turbodb

    turbodb [OP] AdventureTaco

    Joined:
    Feb 9, 2016
    Member:
    #177696
    Messages:
    7,787
    Gender:
    Male
    First Name:
    Dan
    PNW
    Vehicle:
    2000 Tacoma Xcab 4x4 SR5 V6 TRD
    AdventureTaco
    Totally, but the reality is that there's no one-stop shop that's always right - that's why this all takes so much time and research. Iteration and learning where/how to look for fun stuff to do is the name of the game. And of course, adapting on the fly.

    Being satellite, I'd be surprised if GE wouldn't show a route - t hey are all there since you're looking at the actual surface of the earth. But it definitely doesn't "map" them all, so it can't auto-gen the points/track for you - that would be a manual process; but it would be with MVUMs, etc. as well.

    And BCN is great - it's the entire focus of Part 2 :) - but it doesn't make route planning any easier (at least as I've found). ...though route recording it excels at, of course.

    Yeah, I totally agree. I use it for distance, and then the general rule of thumb I posted above for how far I can get in a day. But again, important to adapt on the trail as well! :thumbsup:
     
  11. Jun 13, 2018 at 3:32 PM
    #11
    turbodb

    turbodb [OP] AdventureTaco

    Joined:
    Feb 9, 2016
    Member:
    #177696
    Messages:
    7,787
    Gender:
    Male
    First Name:
    Dan
    PNW
    Vehicle:
    2000 Tacoma Xcab 4x4 SR5 V6 TRD
    AdventureTaco
  12. Jun 13, 2018 at 3:37 PM
    #12
    jbrandt

    jbrandt Made you look

    Joined:
    Feb 12, 2011
    Member:
    #51038
    Messages:
    17,612
    Gender:
    Male
    First Name:
    Justin
    El Dorado, CA (NOT El Dorado Hills)
    Vehicle:
    '04 TRD Tacoma 4x4 DC
    Kings, J59's Total Chaos UCAs Custom skids Sticker mod
    Exactly. One of many tools that are kinda useful alone, but highly useful when paired with other techniques.

    The satellite imagery will only show the route if it's not obscured by the forest canopy, and being that I do a lot of NF driving, that happens a lot, lol.

    Google has vectorized many routes, but only the ones it knows about, or the ones it chooses to spend resources to vectorize.

    I've been playing around with several routes in the Nor Cal Backcountry Adventures book (link), and digitized a lot of routes from their published lat/lon data. I've already encountered several routes that just don't show up on GE, and because it's heavily forested, you can't always see the route in teh imagery, either.

    I have, actually...

    I'll sometimes import those GE waypoints (from the Backcountry book, or other) to either BCNav or Avenza, and the MVUMs or Forest Service topos show the correct routes/roads and are much easier to follow. I'll then plot several waypoints along the planned route, enough that I can see one point on the map from the current location, at least in areas with lots of turns, and crisscrossing trails... then export back to GE for further visualization, etc...

    I always over pack, too. A couple weekends ago, I planned to be on a 3 or 4 hour trail, brought 5 gallons of water, enough food for an entire day+, tools, emergency blankets, all that stuff. I was in a group with 3 other trucks so the chances of being stuck overnight was pretty slim, but all that stuff is in my kit, and I leave it there.

    Adapt and overcome, as they say...
     
  13. Jun 13, 2018 at 3:53 PM
    #13
    jbrandt

    jbrandt Made you look

    Joined:
    Feb 12, 2011
    Member:
    #51038
    Messages:
    17,612
    Gender:
    Male
    First Name:
    Justin
    El Dorado, CA (NOT El Dorado Hills)
    Vehicle:
    '04 TRD Tacoma 4x4 DC
    Kings, J59's Total Chaos UCAs Custom skids Sticker mod
    Really great posts by the way. Looks really familiar, lol

    One thing to keep in mind is that when you're marking your locations for downloading BCNav maps, make sure you take into consideration cell service, and when you might loose it, since that's when you'll loose the ability to navigate with google maps or most other street nav apps (unless you cache them - which, incidentally, I hate the interface for caching google maps).

    So, I will tend to extend the area I download for BCNav beyond just the trails, maybe download a smaller section of the nearby town(s) or roads to get to the trailheads. That way, I'll have a map (topos usually have pretty decent streets, but they aren't typically vectorized) and waypoints I can use to navigate after loosing cell service.
     
    Desert Drifter likes this.
  14. Jun 13, 2018 at 3:54 PM
    #14
    turbodb

    turbodb [OP] AdventureTaco

    Joined:
    Feb 9, 2016
    Member:
    #177696
    Messages:
    7,787
    Gender:
    Male
    First Name:
    Dan
    PNW
    Vehicle:
    2000 Tacoma Xcab 4x4 SR5 V6 TRD
    AdventureTaco
    100%
     
    Desert Drifter likes this.
  15. Jun 13, 2018 at 4:10 PM
    #15
    EatSleepTacos

    EatSleepTacos Well-Known Member

    Joined:
    Mar 24, 2015
    Member:
    #151688
    Messages:
    59,636
    Gender:
    Male
    First Name:
    Randy
    West Valley, AZ
    Vehicle:
    2017 4Runner
    Excellent work OP. I have never even considered what went into planning a route, but this was an excellent read. This really should be a sticky.
     
    ready6delta and turbodb[OP] like this.
  16. Jun 13, 2018 at 4:14 PM
    #16
    Drainbung

    Drainbung Somedays you are the show....

    Joined:
    Sep 2, 2010
    Member:
    #42629
    Messages:
    9,114
    Gender:
    Male
    First Name:
    Bob
    Fallabama, NV
    Vehicle:
    10 DCLB
    TRD Fleshlight
    Nice work, sub-a-dub-dubbed.
     
    turbodb[OP] likes this.
  17. Jun 13, 2018 at 6:06 PM
    #17
    themanbearpig012

    themanbearpig012 Well-Known Member

    Joined:
    Feb 4, 2017
    Member:
    #209621
    Messages:
    1,226
    Gender:
    Male
    First Name:
    Rudy
    Nipomo, Ca
    Vehicle:
    2015 DCSB TRD SPORT
    Fox 2.5 Factory Series Coil-Over Reservoir (Front) Fox 2.0 Performance Series IFP (Rear) Method "Mesh" 17x8.5|6x5.50|0/4.75" wheels
    sub'd. great write up!
     
    turbodb[OP] likes this.
  18. Jun 15, 2018 at 2:05 PM
    #18
    chyknees

    chyknees nomadic wanderer

    Joined:
    Dec 22, 2008
    Member:
    #11801
    Messages:
    386
    Gender:
    Male
    So Cal
    Vehicle:
    05 Tacoma TRD 4x4
    TRD, Total Chaos, Fox, Volk, BFHoodrich
    Great how to/tutorial!! thanks!
     
    turbodb[OP] likes this.
  19. Jul 13, 2018 at 1:46 PM
    #19
    SIZZLE

    SIZZLE Pro-party

    Joined:
    Oct 3, 2013
    Member:
    #113785
    Messages:
    642
    Novato, CA
    Vehicle:
    2014 DCSB TRD Off Road
    A little a this, a little a that...
    Thank you so much for doing this! Super helpful for a Luddite like me.
     
    turbodb[OP] likes this.
  20. Jul 25, 2018 at 6:15 PM
    #20
    Rosy Posy 88

    Rosy Posy 88 Member

    Joined:
    Jun 26, 2018
    Member:
    #257622
    Messages:
    22
    Gender:
    Male
    First Name:
    Mark
    Herriman, UTAH
    Vehicle:
    2008 Silver Tacoma TRD sport
    Trd cold air intake, TRD cat back exhaust, Icon add a leaf and coil overs, 17" alloy rims with 285/70r17
    sub'd
     
    turbodb[OP] likes this.

Products Discussed in

To Top