1. Welcome to Tacoma World!

    You are currently viewing as a guest! To get full-access, you need to register for a FREE account.

    As a registered member, you’ll be able to:
    • Participate in all Tacoma discussion topics
    • Communicate privately with other Tacoma owners from around the world
    • Post your own photos in our Members Gallery
    • Access all special features of the site

Norsmanvike's Budget Build Escape to Freedom With Azure...

Discussion in '3rd Gen. Builds (2016-2023)' started by Norsemanvike, May 17, 2018.

  1. Sep 22, 2018 at 12:26 PM
    #41
    Norsemanvike

    Norsemanvike [OP] Well-Known Member

    Joined:
    Feb 15, 2018
    Member:
    #244562
    Messages:
    5,210
    Gender:
    Male
    Escondido, CA
    Vehicle:
    '18 Sport 4x4, DblCb, ShBd, BBP
    First and only patch in my truck...

    1925363F-2F7D-4B24-A4E9-993E0D951014.jpg

    CoverKing velour dashmat. Yeah, I know it’s cheesy, but I like it and it’s my truck.

    47746DE6-5A18-40AE-B832-FBF72DC6D39F.jpg
     
    Steffychopstix likes this.
  2. Sep 28, 2018 at 6:18 PM
    #42
    Norsemanvike

    Norsemanvike [OP] Well-Known Member

    Joined:
    Feb 15, 2018
    Member:
    #244562
    Messages:
    5,210
    Gender:
    Male
    Escondido, CA
    Vehicle:
    '18 Sport 4x4, DblCb, ShBd, BBP
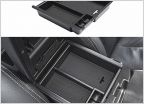
    I kept getting annoyed with my charging cables constantly getting pinched by the console lid, so I installed two small cable organizers on the inside/iioutside to hold them in place. They were clear, but I spray painted them flat black ( along with some screws). Just a few minor slips with the screw driver, but nothing noticeable unless your looking closely.

    1C5D2508-42E4-4AB1-AB12-A08C7F31AA74.jpg 2275A559-2EF3-4477-965F-662D903F2DD0.jpg
     
    Landpirate likes this.
  3. Oct 5, 2018 at 8:34 AM
    #43
    Norsemanvike

    Norsemanvike [OP] Well-Known Member

    Joined:
    Feb 15, 2018
    Member:
    #244562
    Messages:
    5,210
    Gender:
    Male
    Escondido, CA
    Vehicle:
    '18 Sport 4x4, DblCb, ShBd, BBP
    Well folks, looks like I’m all in.

    F6A8D4BD-B18E-421E-B8CB-7EE416F1A54D.jpg
     
    Steffychopstix likes this.
  4. Oct 11, 2018 at 12:50 PM
    #44
    OR4x4

    OR4x4 Well-Known Member

    Joined:
    Sep 17, 2018
    Member:
    #266625
    Messages:
    414
    Portland, OR
    Vehicle:
    2018 DCLB 4x4 TRD-OR Super White
    How do you like the center console armrest cover? Thinking about getting that to protect the longevity of the leather and add some cushion. Every leather center console I've owned before started to flake and peel.
     
  5. Oct 11, 2018 at 1:13 PM
    #45
    Norsemanvike

    Norsemanvike [OP] Well-Known Member

    Joined:
    Feb 15, 2018
    Member:
    #244562
    Messages:
    5,210
    Gender:
    Male
    Escondido, CA
    Vehicle:
    '18 Sport 4x4, DblCb, ShBd, BBP
    I was skeptical when I ordered it, but I love it. It doesn't add much cushion other than the thickness of the neoprene, but it feels much better than the factory cover and on hot days, I don't have to worry about my arms sticking to the console. It's well worth the investment imo.
     
    OR4x4[QUOTED] likes this.
  6. Oct 11, 2018 at 1:15 PM
    #46
    OR4x4

    OR4x4 Well-Known Member

    Joined:
    Sep 17, 2018
    Member:
    #266625
    Messages:
    414
    Portland, OR
    Vehicle:
    2018 DCLB 4x4 TRD-OR Super White
    How is the matte screen protector as well? I got the premium package, so I hope it fits. I just ordered both from Amazon.
     
  7. Oct 11, 2018 at 3:04 PM
    #47
    Norsemanvike

    Norsemanvike [OP] Well-Known Member

    Joined:
    Feb 15, 2018
    Member:
    #244562
    Messages:
    5,210
    Gender:
    Male
    Escondido, CA
    Vehicle:
    '18 Sport 4x4, DblCb, ShBd, BBP
    Works well with cutting down the glare. Just make sure that when you put on, the head unit's surface is really clean. I used my normal glass cleaner, dusted it, and then used their provided alcohol pad cleaner. Make sure it's completely dry. When I laid it down, I started on the top and worked out any bubbles that appeared as I slowly went down. I would suggest that before you put it on, that you have all of your doors and windows closed to reduce more dust from coming in, allow the dust to settle a for a minute or two, then start.
     
    OR4x4[QUOTED] likes this.
  8. Oct 14, 2018 at 12:23 AM
    #48
    Norsemanvike

    Norsemanvike [OP] Well-Known Member

    Joined:
    Feb 15, 2018
    Member:
    #244562
    Messages:
    5,210
    Gender:
    Male
    Escondido, CA
    Vehicle:
    '18 Sport 4x4, DblCb, ShBd, BBP
    13OCT2018 I finished the install of the Rexing V1LG Dual Channel Front/Rear Dash Cam. Here's the process that I went through...

    1) I did not want to install the rear camera taped/glued to the my rear window tint and being off-set. Since I wanted it centered, yeah I'm OCD like that, but not attached to the center rear sliding window, I pulled part of the rear headliner down so that I could see what was above the headliner to try and figure out how to attach some sort of bracket. After seeing what was there, I opted to go with a metal bracket that I would have to tape to inside of the roof and use the edge of the headliner to help keep it in place.

    2) I bought a roof flange from Home Depot since they were cheap, stiff ( but pliable ), and easy to cut with the tin snips I had. I figured out the basic size that I needed, rounded off the corners, and then started systematically bending the ad-hoc bracket into the shape I needed by constantly going back and forth checking fit and seeing if I was achieving enough "touch points" for the 3M 30lb. adhesive tape I planned on using.

    IMG_1099.jpg

    IMG_1103.jpg

    3) Once the basic shape of the bracket was done, I spray painted the exposed parts of the bracket that would be seen below the headliner and I even left a blank spot of exposed metal so that the rear dash cam would have something more solid to attach to.

    IMG_1118.jpg

    4) Once that was installed, I did a functionality test of the camera using the cigarette lighter for power to make sure everything worked. Then I attached the rear camera, using a bubble level dead center on the rear sliding window to ensure an even keeled install.

    5) I removed the factory installed GoPro mount and man almighty, Toyota really did not want that thing coming off. The middle part of it was actually rubber which explained why I couldn't get the dental floss to cut through it via heating up the area with a blow dryer like I did to remove the emblems. I did finally manage to get it off, but broke it in the process. The residue that was left behind was easily removed by using a razor blade flat against the window/vinyl and I was extremely careful not to cut into the vinyl.

    IMG_1117(1).jpg

    IMG_1116.jpg

    6) I attached the front Dash Cam where the GoPro mount had been. I then ran the cable that attached the rear cam to the front cam above the rear headliner, then ( all on the driver's side ) tucked it into the rear pillar at the top, down the rear door's weather strip, into the rear bottom door sill cover, under the bottom of the center pillar cover, then under the front door sill cover, up the front door weather stripping ( by the fuse box ), tucked into the top of the front A pillar, and then across to the Dash Cam tucked between the headliner and the windshield. Eventually, for the constant power tap, I followed the same path ( in reverse ) to the fuse box.

    IMG_1130.jpg

    IMG_1127.jpg

    7) To get the fuse cover off, used a flat head screwdriver to open the tab.

    8) I disconnected the read cable on the battery so that I didn't risk shorting something out.

    9) Using the fuse removal tool found in the fuse box under the hood, I took out the 20 amp Sunroof fuse since I don't have a sunroof.

    10) Since the metal screw holding the fuse box in place just above the fuse box was attached to the metal that lead to the truck's frame, I attached the grounding wire there.

    Photo 2018-10-13 11.04.55.821 PM.jpg

    11) I fired everything up and presto, it's working perfectly with everything centered as much as possible.

    IMG_1120.jpg
     

    Attached Files:

    Last edited: Oct 16, 2018
  9. Oct 14, 2018 at 12:48 AM
    #49
    Norsemanvike

    Norsemanvike [OP] Well-Known Member

    Joined:
    Feb 15, 2018
    Member:
    #244562
    Messages:
    5,210
    Gender:
    Male
    Escondido, CA
    Vehicle:
    '18 Sport 4x4, DblCb, ShBd, BBP
    Photos of my carry case for my hand held ham radios... My mom got that case for me years ago and now I finally have a permanent use for it.

    IMG_1045.jpg

    IMG_1047.jpg
     
    sdsurfer likes this.
  10. Oct 15, 2018 at 12:04 PM
    #50
    Ruminator

    Ruminator Chairman of the Bored

    Joined:
    Feb 13, 2018
    Member:
    #244300
    Messages:
    2,117
    Gender:
    Male
    First Name:
    Mark
    Northern Illinois, USA
    Vehicle:
    2017 Red TRD-Sport, ACLB, MT!!!
    Alright doll-face, c'mon and bore me!
    Thanks for the detailed photos showing your cable routing. I've got a BlackVue 2-channel system I need to install sometime soon and this should help.

    Just a mention if you should need to make an oddly-shaped sheet metal piece in the future...

    I haven't actually tried this, but I have a roll of aluminum flashing material from the hardware store, around 5 or 6" wide, that's thin and extremely soft, but stiff enough to hold a shape. I'm going to try getting the general shape by pressing a strip of this material into place, then transferring that shape to a stiffer material. I'm sure some fine tuning of the final piece will be required.

    As you may have guessed, I have the same medical condition (OCD), but I'm getting better.
     
  11. Oct 15, 2018 at 12:08 PM
    #51
    Norsemanvike

    Norsemanvike [OP] Well-Known Member

    Joined:
    Feb 15, 2018
    Member:
    #244562
    Messages:
    5,210
    Gender:
    Male
    Escondido, CA
    Vehicle:
    '18 Sport 4x4, DblCb, ShBd, BBP
    Good to hear. OCD is very similar to CDO, which is the same thing as OCD, but CDO has the letters in correct order. :p
     
    Ruminator[QUOTED] likes this.
  12. Oct 15, 2018 at 10:05 PM
    #52
    OR4x4

    OR4x4 Well-Known Member

    Joined:
    Sep 17, 2018
    Member:
    #266625
    Messages:
    414
    Portland, OR
    Vehicle:
    2018 DCLB 4x4 TRD-OR Super White
    Very detailed and amazing write up. Why not use the go pro mount and get an adapter for your dash cam?
     
  13. Oct 16, 2018 at 5:38 AM
    #53
    Norsemanvike

    Norsemanvike [OP] Well-Known Member

    Joined:
    Feb 15, 2018
    Member:
    #244562
    Messages:
    5,210
    Gender:
    Male
    Escondido, CA
    Vehicle:
    '18 Sport 4x4, DblCb, ShBd, BBP
    Thanks for the compliment. Since the shapeways adapter didn't fit my version of the Rexing dash cam and trying to use it would have relied on a small area to attach the dash cam to the adapter, it likely would have eventually came off due to a lack or adhesion strength. I did explore several ideas including trying to use two low profile GoPro adapters, but reversing them so the teeth would have been the connector ( idea found on Youtube ). However, that would have put the dash cam 4 inches off the windshield which would have made it too obvious that it was installed it also would have been a distraction inside the cab. By mounting the Rexing V1LG the way it was designed, virtually flat against the windshield, it blends in with the rear view mirror and doesn't become a driving distraction.
     
  14. Oct 16, 2018 at 8:42 AM
    #54
    quadcrazy

    quadcrazy Well-Known Member

    Joined:
    Feb 6, 2013
    Member:
    #96943
    Messages:
    114
    Gender:
    Male
    Awesome write up! I'm not very savvy when it comes to this stuff, but am wanting to install the Rexing V1 dash cam asap. Would you be able to tell me what my options might be for powering the camera if I do have a sunroof? Also, to power the rear dash cam, it just plugs into the front cam, correct? Thanks!
     
  15. Oct 16, 2018 at 8:50 AM
    #55
    Norsemanvike

    Norsemanvike [OP] Well-Known Member

    Joined:
    Feb 15, 2018
    Member:
    #244562
    Messages:
    5,210
    Gender:
    Male
    Escondido, CA
    Vehicle:
    '18 Sport 4x4, DblCb, ShBd, BBP
    Correct, the rear cam is powered via mini USB cable to the front camera ( which is also the data cable ). If you didn’t want to tap into the fuse box, you could just use the 12v cigarette lighter adapter that they provide and it’s long enough to reach the center console. If you did go with tapping the fuse box, use one of the 20s that you use the least, just remember that the cameras will always be on and a manual shutdown might be needed for longer parked scenarios to avoid draining the battery. If you really do have just the V1 version, the Shapeways adapter is supposed to work. Feel free to let me know if you have any more questions.
     
    quadcrazy[QUOTED] likes this.
  16. Oct 16, 2018 at 3:30 PM
    #56
    quadcrazy

    quadcrazy Well-Known Member

    Joined:
    Feb 6, 2013
    Member:
    #96943
    Messages:
    114
    Gender:
    Male
    Thanks for the response! Just a couple more questions:
    So you're saying that tapping the camera into the sunroof port on the fuse box still gives power to the camera when the truck is turned off? Also, why do you suggest tapping into one of the 20s that I use the least? Is it because you lose the original functionality of that port? Or is it because you're more likely to blow the fuse? Thanks again!
     
  17. Oct 16, 2018 at 3:45 PM
    #57
    Norsemanvike

    Norsemanvike [OP] Well-Known Member

    Joined:
    Feb 15, 2018
    Member:
    #244562
    Messages:
    5,210
    Gender:
    Male
    Escondido, CA
    Vehicle:
    '18 Sport 4x4, DblCb, ShBd, BBP
    No problem. Yes, constant power from any of the fuses, even when the truck ignition is off.

    It's to reduce the risk of blowing a fuse. There's no guarantee of avoiding it, but it at least reduces the risk. The install video that I found on YouTube recommended using the 30 amp wiper motor, but that's a safety issue for me if the fuse blows while you're driving in inclement weather. Even if you do have a sunroof, most folks either don't use their sunroof or just slide the headliner cover back and leave the glass closed in order to let some sunlight in ( without dealing with the swirling winds ). In that scenario, blowing the fuse is okay since the sunroof is actually closed, but if you do use your sunroof, just keep the tapped fuse in the back of your mind in the event something weird happens.
     
    quadcrazy[QUOTED] likes this.
  18. Oct 16, 2018 at 3:51 PM
    #58
    desertjunkie760

    desertjunkie760 @DesertJunkie760 (IG)

    Joined:
    Apr 11, 2016
    Member:
    #183963
    Messages:
    8,967
    Gender:
    Male
    First Name:
    Shane
    Vehicle:
    2011 MGM DCSB TRD Sport 4x4
    Check My Sig.
  19. Oct 27, 2018 at 9:57 AM
    #59
    Norsemanvike

    Norsemanvike [OP] Well-Known Member

    Joined:
    Feb 15, 2018
    Member:
    #244562
    Messages:
    5,210
    Gender:
    Male
    Escondido, CA
    Vehicle:
    '18 Sport 4x4, DblCb, ShBd, BBP
    Added Startup and Display Off images to EnTune head unit today. The startup image is the Cubs 2016 WS Championship. That will probably stay until they win it again or the Vikings win the Super Bowl.

    StartupImageImages.jpg

    DisOffImage.jpg
     
  20. Nov 10, 2018 at 3:31 PM
    #60
    Norsemanvike

    Norsemanvike [OP] Well-Known Member

    Joined:
    Feb 15, 2018
    Member:
    #244562
    Messages:
    5,210
    Gender:
    Male
    Escondido, CA
    Vehicle:
    '18 Sport 4x4, DblCb, ShBd, BBP
    Had a busy day. After finally washing most of the dirt off from the previous trail run on Red Canyon, I installed the 3D glovebox letters ( much better than the vinyl ones ) and my 4” legal sun visor strip across the windshield. Also, here’s a pic of the D-ring shackle and hitch pin.

    A9DACE18-18A2-4BFB-A9D5-114E9A9482CA.jpg 6ED5EA37-5557-481A-B39D-48133986EFB0.jpg 8BFCC182-8386-4CA7-BE2A-EE68C01F3BE8.jpg 35A86617-67B2-40A4-AA80-509ACADC6F8F.jpg E430233D-01BC-4DAB-B99A-84CF783FD02E.jpg 0F1AB3B3-542C-4EB4-9CD9-9EA4819AB11D.jpg
     
    My Name is Rahl and Tombiology70 like this.

Products Discussed in

To Top