

-
Welcome to Tacoma World!
You are currently viewing as a guest! To get full-access, you need to register for a FREE account.
As a registered member, you’ll be able to:- Participate in all Tacoma discussion topics
- Communicate privately with other Tacoma owners from around the world
- Post your own photos in our Members Gallery
- Access all special features of the site
Quick Links: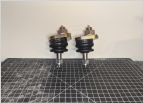 SOLD - BNIB Tacoma SPC UBJs #25001 - $100 - VA - SOLD
 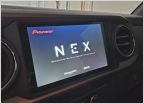 *SOLD* Pioneer DMH-WT3800NEX with all necessary harnesses
 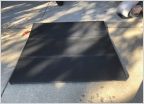 Rugged cover tonneau cover 250 obo
 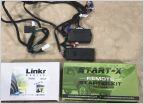 Start-X Remote Start Kit with Linkr Mobile
  We have GoPro Mount, but too cheap for a GoPro - Action Cameras SOLD: SpiderTrax spacers set of 4
MESO Total Tail Light Kit
Discussion in '3rd Gen Tacoma Parts Marketplace (2016-2023)' started by MESO, Feb 20, 2019.
Page 139 of 294
Page 139 of 294


