1. Welcome to Tacoma World!

    You are currently viewing as a guest! To get full-access, you need to register for a FREE account.

    As a registered member, you’ll be able to:
    • Participate in all Tacoma discussion topics
    • Communicate privately with other Tacoma owners from around the world
    • Post your own photos in our Members Gallery
    • Access all special features of the site

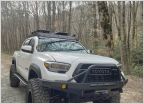
Pilot_MM's Dadwagen

Discussion in '3rd Gen. Builds (2016-2023)' started by PilotMM, Feb 9, 2020.

  1. Feb 9, 2020 at 3:39 PM
    #1
    PilotMM

    PilotMM [OP] Well-Known Member

    Joined:
    Jan 14, 2020
    Member:
    #316078
    Messages:
    185
    Gender:
    Male
    Las Vegas
    Vehicle:
    '17 TRDOR DCSB
    RLD Canopy, Icon Stage 4 plus RXT leaf
    Hello TW!
    I figure it time to kick off my build thread. I will include build notes and travel reports all in this thread.

    I actually have been a TW lurker for a while; previously I had a '05 Reg Cab 4x4 with the inline 4. That was going to be my builders truck and then life happened. I got married, knocked up my wife, moved across the country and then had another kid. This meant in '15 I had to sell my Taco. It was a sad day in the MM household, even my oldest kid cried (he was 2 lol). Since then I had vowed to buy a DC and build my dream rig.

    Fast forward 5 years and in January I purchased a '17 DCSBOR. It only had 4700 miles on it so it was pretty much new. :eek::D

    My plan with this truck; named Gunner by the kids because he is "gun metal gray", was to build a family adventure vehicle. We drive across the country to visit my wife's family every summer and stop and camp along the way. After doing this for the last 4 years I have realized what I want and need to make the trip more enjoyable.

    So for my build I wanted:
    Truck cap
    Rack on top of cap
    Electric Cooler/Fridge
    OBA
    Bed Storage
    Lighting
    Meatier tires
    Front Bumper
    Dual battery system


    Thanks to this site I have come to the realization that I will also have to do something to to my suspension, so that's on the list now.

    Here is a photo of how it looked when I picked it up. It came equipped with the Tech Package and an OEM toneau cover.

    IMG_1715.jpg
     
    StayinStock likes this.
  2. Feb 9, 2020 at 4:04 PM
    #2
    PilotMM

    PilotMM [OP] Well-Known Member

    Joined:
    Jan 14, 2020
    Member:
    #316078
    Messages:
    185
    Gender:
    Male
    Las Vegas
    Vehicle:
    '17 TRDOR DCSB
    RLD Canopy, Icon Stage 4 plus RXT leaf
    That first weekend I took the family out to the Desert Wildlife National Refuge. This place is great because its just outside of Vegas and the road is rough enough to keep the sedans at home. You don't need 4wd at all but high clearance is a help. There is a very short canyon you drive through called Peekaboo Canyon. After that I knew I needed to get a camper shell on my truck, my poor dogs felt left out!

    I made a choice right off the bat that I didn't want fiberglass. I won't be doing any hardcore off roading but I want options, options to load it up, drill holes in it, or insulate it. This meant I was looking at aluminum or some other alternate. After going to the local dealer I was disappointed to see that aluminum contractor caps really are not that much better and IMO over priced. I started searching for a used aluminum cap or as a last resort FG. All I could find where contractor kits with No windows. This also wasn't and option for me.

    Patience really paid off because @Tacosoul decided he wanted to sell his Tacoma and get a full sized truck. I purchased his RLD cap and couldn't be happier! I also picked up his Front Runner Rack because this checked some boxes for me. After throwing on my Yakima Rocketbox this is how the truck now sits! I took it for a quick shakedown ride with the whole family right outside my neighborhood. 15 miles or so of double track, wash, and desert. Let me tell you, I LOVE THIS THING!

    So here is the real start of the Dadwagen, the Broverlander. Trips planned so far are DVNP at the end of the month for an overnight, ND&SD in June and then across the country to NC. The wife has decided that she is game for my crazy adventures and we have the Arctic Circle penciled in for the summer of '23. More details on that to come as I start to plan out a trip. I hope the build will be finished by then and tested.

    Thanks for stopping by
    -M

    IMG_3809.jpg IMG_2198.jpg
     
    StayinStock and Tremors834 like this.
  3. Feb 11, 2020 at 6:34 PM
    #3
    brandon78lusch

    brandon78lusch Well-Known Member

    Joined:
    Oct 22, 2019
    Member:
    #308678
    Messages:
    4,029
    Gender:
    Male
    First Name:
    Brandon
    East Carolina University
    Vehicle:
    2019 TRD Sport DCSB, 1978 Pontiac Firebird Trans Am
    Nice, I like it, good luck on the build!
     
    PilotMM[OP] likes this.
  4. Feb 20, 2020 at 9:32 PM
    #4
    PilotMM

    PilotMM [OP] Well-Known Member

    Joined:
    Jan 14, 2020
    Member:
    #316078
    Messages:
    185
    Gender:
    Male
    Las Vegas
    Vehicle:
    '17 TRDOR DCSB
    RLD Canopy, Icon Stage 4 plus RXT leaf
    Quick update! When I purchased the RLD cap the previous owner recommended that I put some bed stiffeners in, well I picked up some Total Chaos stiffeners and put them in yesterday. They were super easy to install and they don't interfere with my bed mat. I liked that they went farther up than most and that they don't stick out too much from the bed.

    Next up is a fridge and bed storage. That will be started and purchased next month, hopefully, lol. I want an Engel fridge/freezer and they are expensive.

    Cheers!
    -M

    IMG_6936.jpg
     
  5. Feb 22, 2020 at 7:40 PM
    #5
    PilotMM

    PilotMM [OP] Well-Known Member

    Joined:
    Jan 14, 2020
    Member:
    #316078
    Messages:
    185
    Gender:
    Male
    Las Vegas
    Vehicle:
    '17 TRDOR DCSB
    RLD Canopy, Icon Stage 4 plus RXT leaf
    Took the kids on a little drive today. The sky was amazing after some rain. We made it up to little Red Rock and looked at some petroglyphs. If you want to see those photos check out my instagram at mohauptphoto

    -M

    IMG_4035.jpg
     
  6. Feb 25, 2020 at 9:05 PM
    #6
    TwinTaco31719

    TwinTaco31719 Well-Known Member

    Joined:
    Nov 16, 2019
    Member:
    #310895
    Messages:
    7,842
    Gender:
    Male
    First Name:
    Eric
    Glenbrook, NV
    Vehicle:
    2023 Lunar Rock LB Sport
    RLD looks sweet! Nice truck, good luck with the build!
     
    PilotMM[OP] likes this.
  7. Feb 26, 2020 at 9:33 AM
    #7
    PilotMM

    PilotMM [OP] Well-Known Member

    Joined:
    Jan 14, 2020
    Member:
    #316078
    Messages:
    185
    Gender:
    Male
    Las Vegas
    Vehicle:
    '17 TRDOR DCSB
    RLD Canopy, Icon Stage 4 plus RXT leaf
    Thanks Twin!
    -M
     
  8. Mar 2, 2020 at 8:45 PM
    #8
    PilotMM

    PilotMM [OP] Well-Known Member

    Joined:
    Jan 14, 2020
    Member:
    #316078
    Messages:
    185
    Gender:
    Male
    Las Vegas
    Vehicle:
    '17 TRDOR DCSB
    RLD Canopy, Icon Stage 4 plus RXT leaf
    Quick trip report!

    I wanted to take my family on an overnight camping trip to Death Valley this past weekend. Because of the changing weather forecast we turned it into a day trip. Initially my plan was to take my family from Vegas to Rhyolite, down Titus Canyon, up to Ubehehe Crater, and then to Lost Burro Gap to camp and see the mining site. I know you can't camp at the mining site but you can at the gap. The next morning we were going to run down to The Playa and see the Grandstand. Well a moist air mass coming from the coast and a cold front meant the possibility for rain and even snow. But Saturday was going to be a high of 80! Mother Nature shows no remorse in the spring and I wasn't about to take my family on some crazy drive on the wet DV roads.

    Instead we hit Rhyolite, Titus Canyon and Furnace Creek before heading back home. All told it was a 295 mile jaunt.

    We woke up early and packed up the truck and went to our favorite breakfast spot for a hearty meal. I knew it was going to be a while before we had lunch and didn't want the kids to fuss. After about 1000 we started north on the 95 only stoping at Armagosa for a nature break before making it to Rhyolite just before noon. If you haven't been to Rhyolite its a cool ghost town outside of Beatty that has turned into an open air museum. There is quite a bit to see actually, the old train depot, the school, Tom Kelly's Bottle house (cool story), and then a bunch of neat sculptures.

    After spending quite a while there we headed down to Titus Canyon Road. Because I am running the stock tires I decided to air down to about 25psi right at the start. The road to Red Pass is a little washboarded and I wanted to maximize comfort for my family. As I was letting air out two other Tacomas stopped by to see what was going on. Cheers guys, who ever you were. We chatted for a second about meeting at the ghost town and then they were off. The initial climb to Red Pass is... Meh.. but once you hit the false summit it really gets good! Before we hit the false summit we happened to see those same guys following my lead and airing down, the road really is bumpy.

    The false summit is pretty incredible in its own right with a valley opening up before you but Red Pass is something else. It is exposed on one side and, like the name implies, RED! The drop off the side is substantial but the road is so wide at no time did I feel uncomfortable. I will mention that I road this same road on my mountain bike a few years before so I knew what to expect.

    The drop off Red Pass takes you down, down, down until you hit Leadfield. It was an old mining town that lived 6 months before going bust. There is quite a few places to explore and I highly recommend staying for a while. This was our lunch spot. After hiking about with my family I noticed a Dodge late model minivan coming down the road, tourists. It was a friendly Asian couple, they asked me about the fastest way out of the canyon, I informed them it was one way, and with concern in their eyes they pressed on. LOL The signs say 4x4 road...

    After tacos were finished we got to experience the best part of the drive, through the narrows. This road is amazing! Whats more amazing is that Red Pass is about 5200' MSL and the terminus of Titus Canyon is below sea level. How cool. Once we made it out the temperature had climbed so much, and the tires warmed so much, my TPMS was reading 30PSI! I decided to take it easy all the way to Furnace Creek to get air, my 12V Harbor Freight compressor takes too long fill even 5PSI I figured it would be ok. We stopped at the general store for ice cream and then started the drive back to Vegas. I live on the north side of town so we ended up making a lollipop through Pahrump and back to the 95 at Armagosa before heading south. It was a great trip and I highly recommend it to anyone. I will be back with the family to see Ubehehe and Lost Burro and The Playa but another time.

    Enjoy the photos.

    -M

    IMG_3080.jpg
    IMG_4108.jpg
    IMG_4113.jpg
    IMG_4140.jpg
     
    Tremors834 likes this.
  9. Mar 11, 2020 at 8:27 PM
    #9
    PilotMM

    PilotMM [OP] Well-Known Member

    Joined:
    Jan 14, 2020
    Member:
    #316078
    Messages:
    185
    Gender:
    Male
    Las Vegas
    Vehicle:
    '17 TRDOR DCSB
    RLD Canopy, Icon Stage 4 plus RXT leaf
    Kind of a big update today. After spending entirely too much time on TW I found that I HAD to put together some sort of Aux power system for the accessories that I plan on adding eventually. I read the forums and talked to my friend who builds out #vanlife builds.

    This is really a worthwhile upgrade BEFORE you start adding any accessories and luckily I don't have a ton of money to drop right away on a Fridge, a light bar, and an air compressor so this was a relatively cheap add-on. I saw some pre-made brackets, and some DIY boxes and decided I liked the bracket idea the best. I wasn't keen on dropping nearly $100 with shipping on something that probably cost less than $10 in materials. Luckily I have the privilege of having a machinist in the family. I called him up and told him what I wanted. He said to make a 1:1 template out of cardboard and he would bend the aluminum for me.

    My initial photos and mock ups went through 2 or 3 revisions before I sent it to him. After a few days I had it in my hot little hands. I had purchased a 100A circuit breaker and a Blue Sea 6 place Fuse Block ahead of time. I also had to pick up a hydraulic crimper from Harbor Freight. I planned on using 4AWG from the battery to the CB and then to the Fuse Block. Unfortunately Lowes didn't have enough 4AWG end rings for me so from my Fuse Block to my Ground I used 6AWG wire. The entire circuit is only 24 inches long so I think 4AWG was overkill, I think I could have gone with 8AWG, so I am not worried about the 6AWG ground.

    Anyways, I learned I should have made some further modifications. I had him made vertical slots for the bolts that affix to the side of the engine bay and I should have had horizontal slots. Also I added some angled supports for the lower mounting point and in retrospect they were not needed and interfered with the closing of the OEM relay box. I had to shave the attachment point to make it fit right but it works. I am happy with it, plus my uncle put a cool finish on the top. It's gotta look cool.

    Here are the attached photos.
    Pic1: Finished product
    Pic2: My template
    Pic3: Finished bracket
    Pic4: Harbor Freight special! LOL Gotta be the most expensive HF tool that wasn't on sale *eyeroll*

    -M

    IMG_1142.jpg
    IMG_6329.jpg
    IMG_4672.jpg
    IMG_6371.jpg
     
  10. Apr 25, 2020 at 4:56 PM
    #10
    PilotMM

    PilotMM [OP] Well-Known Member

    Joined:
    Jan 14, 2020
    Member:
    #316078
    Messages:
    185
    Gender:
    Male
    Las Vegas
    Vehicle:
    '17 TRDOR DCSB
    RLD Canopy, Icon Stage 4 plus RXT leaf
    Ok Time for a lot of updates. I have been busy doing work on the truck and traveling. So initially my build plan was to get the back all kitted out and then buy the suspension I want in the winter. After 4 trips with all of my gear and family I realized that was the wrong approach. But lets not get ahead of myself. First up is my solar shower build.

    After some discussion with my wife we decided that if we are going to do some extended trips with the kids we need a way to wash them. Kids are dirty if you didn't know.... ;) I looked around at some pre-made options and stumbled on this thread from REI. REI DIY Shower I made some modifications for my application and what parts I could find but came up with this. It holds about 5 gallons and pressurized to about 35PSI it runs and runs. I found the best performance is to leave just a little air gap in the main tube. If you fill it all the way up to the filler cap it pressurizes quick and runs out quick. Thinking back to HS Physics this makes sense. More volume for air means it will run longer.

    It cost about $100 but I ended up with enough ABS to make two. It is absolutely one of my favorite camp features. Being able to wash your hands before a meal, clean dishes, and clean yourself after a long day is amazing. We even used it to wash clothes.

    I recommend getting the right bib that has a nut on the back. I didn't and have a little leak issue when I am trying to put the hose on. If I give it a 1/4 turn tight it stops leaking but isn't in the 12 o'clock position. :annoyed: I can deal with it. I mounted it using some 5/8ths bolts and 1" spacers I found. Did I mention I love my Front Runner Rack?

    -M

    IMG_7823 2.jpg
     
    jwctaco likes this.
  11. Apr 25, 2020 at 5:18 PM
    #11
    PilotMM

    PilotMM [OP] Well-Known Member

    Joined:
    Jan 14, 2020
    Member:
    #316078
    Messages:
    185
    Gender:
    Male
    Las Vegas
    Vehicle:
    '17 TRDOR DCSB
    RLD Canopy, Icon Stage 4 plus RXT leaf
    Now for the post I have been waiting for! After a lot of trips I realized I needed to upgrade the suspension. I feel like the stock OR suspension was optimized for small bumps at about 20-25mph. Washboard roads suck if you go any faster and any slower it feels like your crawling around. As soon as the bumps get bigger than washboards you bottom out the rear loaded down. I began my quest for what suspension I should have. It took me down many avenues and what I found is that most shops want to sell you something. The problem is you need to find out what you need!

    My first call was to my local shop asking about the OME BP-51's. After some good discussion they suggested an Icon set up, it made sense, the shocks are rebuildable, you can upgrade components as you go along and it looked awesome. Unfortunately they turned me off to it because they suggested a stage 9 right out of the gate. And then they told me the cost, I was disheartened. I ended up reaching out to a few more people and finally was suggested what I felt I needed.

    I was back and forth over Fox, King and Icon. Finally it was suggested I get an Icon stage 4 but upgrade the AAL to the RXT leaf pack. This made sense to me, plus I would be buying all the real expensive parts first (UCA's and the front coilovers). If I wanted to upgrade to the RXT 2.5 shocks down the road I could but with the driving I do I probably wouldn't need it. This is the DadWagen after all, my kids are with my 90% of the time.

    I shopped the heck out of this looking for the best deal. Here is where I want to give a big shoutout to @HeadStrong Off-Road and Marie for helping explain everything to me and giving me what I thought was the best deal. The best part?? I paid for it on a Tuesday and had all of my parts with the exception on the RXT leafs by Thursday.... Yeah... I love not living in CA but close enough I can get parts in 1 day :rofl::spending:

    After getting my schedule and my friends schedule to line up we installed the front today. The whole thing took 3.5 hours but that also included changing the oil and lubricating the prop shaft. Oh, and a test ride! My first measurements were as follows: LH 20 1/4 inches RH 20 1/2 inches

    After my test ride I am showing LH 21 3/4 and RH 22 1/2

    I have to get my hands on the Icon spanner wrench so I can fix the taco lean. I can't see it though looking at it. I am amazed at how different the ride is. I went wheeling on Wednesday and drove down a long wash. The family was with me and I couldn't drive over 10mph because I thought my teeth were going to rattle out. Today with two other adults I was cruising at about 25mph and it was buttery smooth down the same wash! I also had 15 more PSI today in the tires :eek: I think I could have driven it harder but since the rear is still stock I didn't want to push my luck, plus the DadWagen is my baby.

    Here are two quick snaps but I won't do a before and after until I get the rear installed. My street is on a little incline too, I parked with the nose on the low side. After I finish the back I will snap a photo at my work where I know the ground is level.

    -M

    IMG_1433.jpg
    IMG_6954.jpg
     
    Last edited: Apr 25, 2020
  12. Apr 25, 2020 at 5:29 PM
    #12
    PilotMM

    PilotMM [OP] Well-Known Member

    Joined:
    Jan 14, 2020
    Member:
    #316078
    Messages:
    185
    Gender:
    Male
    Las Vegas
    Vehicle:
    '17 TRDOR DCSB
    RLD Canopy, Icon Stage 4 plus RXT leaf
    Final update for the day. Yesterday I was able to insulate the RLD cap. I used Lizard Skin and wow it also is night and day. After the truck sat in the Vegas sun all day the cabin was unbearably hot. I climbed into the bed and it was NOTICEABLE cooler. This is a worthwhile upgrade for ANYONE that has a camper shell.

    I imagine it would be more effective on metal shell than fiberglass but would help nevertheless. It doesn't look pretty, kind of like rhino-liner, but it works. Here is the snap of the back. Just as an FYI when the cup gets low it really starts to sputter. Hence the big spatter on the roof. It doesn't bother me so long as it works :)

    -M

    IMG_4586.jpg
     
  13. Apr 25, 2020 at 5:59 PM
    #13
    GladiatorNOT

    GladiatorNOT Well-Known Member

    Joined:
    Mar 19, 2019
    Member:
    #287171
    Messages:
    632
    Gender:
    Male
    Vehicle:
    2017 TRD OR
    Old Man BP51 coilovers Dakar HD leaf springs Icon Delta control arms TRD Pro rims with Kenda Klever RT 33x10.5 tires Exhaust mod TRD front skid, RCI tranny and transfer case skids Southern Style Slimline front bumper Baja Designs S8 bumper light Warn Zeon Platinum 10s winch 4.88 Nitro gears ARB front locking differential ARB twin air compressor X2 Power 27 battery RCI rear bumper with Rigid SRQ lights RCI rock sliders RLD canopy Dometic CFX3 55 refrigerator TRD Pro grill Front & Rear anytime camera Seat Jackers Diode Dynamics Pro fogs
    Thanks for the tip! I have an RLD cap that’s suppose to be here in a couple weeks (been waiting since early January) and now plan on doing the same with mine. We do a lot of summer camping so hopefully this will help keep the temp down inside.
     
    PilotMM[QUOTED][OP] likes this.
  14. Jan 4, 2021 at 10:19 AM
    #14
    PilotMM

    PilotMM [OP] Well-Known Member

    Joined:
    Jan 14, 2020
    Member:
    #316078
    Messages:
    185
    Gender:
    Male
    Las Vegas
    Vehicle:
    '17 TRDOR DCSB
    RLD Canopy, Icon Stage 4 plus RXT leaf
    Happy New Year! I realized I had neglected my build thread. I never updated when I finished the rear. The rear was finished about a week after the front. I remember it taking me about 3+ hours because the leaf springs were heavy. I needed help putting those in. Here are a few before and after shots at my work. Other than a few minor upgrades; constant power to the inverter and some Diode Dynamics SS2 fogs and new tires, not much has changed. The CEO of the MM household put the axe on additional spending in the year 2020. Well here are are in '21 and I have stuff on order. :)

    This year we will see armor and finally that Fridge that I have wanted for a year. As a family we put 21000 miles on the truck. We drove all over the Desert SW and even across the country to see the Atlantic ocean. There probably won't be much completed in the next couple of months— lead times are killing me, but there are some surprises to come.

    Here are the Before and After when I did the suspension upgrade as well as a photo of how he sits now.


    Thanks for stopping in!
    -M

    IMG_4570.jpg
    IMG_4605.jpg
    0BD1C597-99ED-46FE-9E71-DCF1FAB00815.jpg
     
    Peace1 and bigonenine like this.
  15. May 6, 2021 at 3:26 PM
    #15
    PilotMM

    PilotMM [OP] Well-Known Member

    Joined:
    Jan 14, 2020
    Member:
    #316078
    Messages:
    185
    Gender:
    Male
    Las Vegas
    Vehicle:
    '17 TRDOR DCSB
    RLD Canopy, Icon Stage 4 plus RXT leaf
    Wow I am terrible at this game! There has been a ton of changes to the Dadwagen since January. I will start with the biggest upgrade I did, my front bumper. I went with the Victory Strike with Tubework. I went back and forth with whether or not I should get steel or aluminum and in the end the weight savings won out. I don't intend to bash it on the rocks but wanted the peace of mind of a little extra protection. After I decided that I ordered on 1/4 and had it shipped to my uncles house down in Arizona. It meant that we would get some time together and I could use his lift. His shop is a builders paradise. After 32 days I got a shipping notification that it was on its way to his house! I couldn't believe it! The bumper showed up raw and well packaged.
    e18a1aa3-10eb-440e-9e58-269566e64cbf-jpe_e5e42a7656f9bc9deebb8eec72760f67037753e5.jpg

    e15ad8b2-27f4-4a61-821d-19443605168f-jpe_f2d7e212d752966e7154b45400be71cf91d1ec5c.jpg

    11da4d8a-4b61-4a65-afff-55aa59e60516-jpe_5e6a7e8585029ff78a833e5d847d6498931d0d2d.jpg

    c53e838c-b110-4faa-a1fa-2ce59e145154-jpe_491e1efd99ede2bbfae57ca5f067db041e45bb42.jpg

    Included was a box of assorted goodies.
    aad58eec-635f-4796-9c1d-425d2274a230-jpe_ecd78f97fc8fcd8ae2765982698e1dd353ce7b4d.jpg

    I want to say thanks to @monkeyevil for offering TW members a small discount, you have to find it in his posts but every penny counts.


    We spent more time than I care to admit leveling the truck but when you are cutting this is the most important step. I measured level on the rear bed sides, the front door jams and across the hood support in the front. Once we felt comfortable we got to cutting.

    aefda696-7fcd-4bcd-8747-afe8fe69a95f-jpe_b02c15c44f7975b6ff9e041d73ef9138683577f3.jpg
    80147986-b70d-46a1-93a5-1e75c6b24a2e-jpe_f176c86d4b612509068c2504f052536b52eb859d.jpg
    0e590250-7876-4183-a786-86905a480a63-jpe_18fd4ac42c0a5a48e752f93ee3d0f1621499d119.jpg
    6ecab520-a606-4260-9dc0-4d72eba67645-jpe_d157d8ba4c7ee04af167d6c28b07a63195bb5fa8.jpg
    We pretty much followed the directions on Victory's website and uses a 4" cutoff wheel. From there it was time to install the bumper. The only complaint I have/had was the supplied washer for the frame reinforcement was small. There should be a panel washer in there. I used stacked the supplied washer over a larger fender washer and called it good.
    f272c7d9-2c8c-4a0c-a664-b7f2c251d4aa-jpe_397f97c37805bf13a57f64ca1051166e5cb0c165.jpg

    Because money doesn't grow on trees I didn't get a winch installed when I installed the bumper. That actually happened just a few weeks ago. I went with a Warn EVO 10S. Pulling the bumper off the truck was no problem without a lift since I had done it before.
    [​IMG]

    Getting the control pack off meant finding a home for it. There is a crossmember behind the grill that with a piece of flat steel I was able to make a little bracket. Its held on with 4 nuts and bolts and some red lock tight. Don't do like I did and get excited at this point only to forget to connect the ground.... That is a PAIN IN THE ASS to install after everything is put back together
    [​IMG]
    [​IMG]

    The wires were secured and covered with some wire loom. (There hot isn't just laying down like that in the photo. Again, don't get excited when putting your winch on, you forget things.)

    I want to give a big shout out to @memario1214 for taking care of me with all of my accessories. His shop has come up big with things like lights and the winch. I will be purchasing my gears from him later this year, again just waiting on the that money tree to start producing.

    So that's it for todays update. I will try and include more info later this week. I have also added an RTT as well as a fridge to the back. The fridge meant that I had to run DC power to the bed. My extruded aluminum should be here today so I can start working on bed storage next. There is a lot going on with this build and its hard to remember to keep updating my build thread. :taco::taco::cheers:

    Thanks for tuning in! Be sure to check back for more updates real soon.

    -M
     
    monkeyevil and memario1214 like this.
  16. May 12, 2021 at 9:22 AM
    #16
    monkeyevil

    monkeyevil Victory 4x4

    Joined:
    Sep 12, 2016
    Member:
    #197124
    Messages:
    953
    Gender:
    Male
    First Name:
    Daryl
    Kalamazoo, MI
    Looks awesome!
     
    PilotMM[OP] likes this.
  17. May 16, 2021 at 9:36 AM
    #17
    PilotMM

    PilotMM [OP] Well-Known Member

    Joined:
    Jan 14, 2020
    Member:
    #316078
    Messages:
    185
    Gender:
    Male
    Las Vegas
    Vehicle:
    '17 TRDOR DCSB
    RLD Canopy, Icon Stage 4 plus RXT leaf
    I built some boxes!
    A cautionary tail.

    I had know I wanted to build bed storage since I purchased my truck about a year and half ago. It was one of those things that was really high on the priority list but once I looked into it took a back seat. I wanted the Decked storage thing but when I saw the price tag and saw what you were really getting I was a little less excited about it. I found a guy out of Cali that did custom woodworking and built storage for vehicles and I thought to myself "I can do that." Let me go ahead and tell you I SUCK at woodworking.

    I then saw the https://pullkitchen.com and my draw dropped! That was something I wanted, then I saw the price tag. In retrospect I get it now; the aluminum isn't that expensive, it's all the damn connectors. I had to come up with something else.

    Enter @mpatrick with his build. After asking nicely he shared how he built his system. I was hooked! I ordered up some aluminum and got to building. FYI the aluminum part is the easiest part. From there it was a matter of picking out some drawer slides and building boxes to go inside my aluminum. I had a few people ask me about them so I thought I would just share some of the pitfalls I ran into and offer up some tips. Without further adieu:

    1.) Finding 80/20 or t-slot aluminum or aluminum extrusions is not hard. You just have to know what to ask for. Locally (Las Vegas) the only place I could find it was Grainger and they were not cheap. The only good thing about Grainger was if you ordered they usually had it next day for free shipping. I shopped around and my first caution would be with Amazon. I found quite a bit of extrusions there but most of it was 20mm. This is an important note! Not all extrusions are the same size and I am not sure that a 20mm connector will fit in 1 inch (25mm) extrusions.

    2.) Purchase lengths 8 foot or less. This will save you on freight shipping. I ordered from https://www.orangealuminum.com because with their free shipping and 10% off coupon for new members it came out the cheapest. This was strictly for the extrusions. The other nice part is they are out of LA so I had my aluminum in a day or so. I recommend buying at least one extra piece...

    3.) Connectors are going to eat you up and you will not have enough. There are a number of ways to make a 3-way connector, you can use the flat plates, you can use a bunch of little "L" brackets or you can buy the nice 3-way connectors. I had to look around for the 3-way connectors because they ranged in price from $9/piece to $20/piece! I ended up ordering them from https://www.tnutz.com and went with Zinc connectors because they were around $4/piece. I ended up getting all of my connectors from them. I think I spent 50% of the cost of aluminum on connectors.

    4.) What ever you use to cut the aluminum make sure it comes out strait. I recommend a chop saw/miter saw. Make a fence of some sort so you can get all of the piece exactly the same size. Again all this stuff with aluminum is the easy part but if you have a piece that is even 1/8th inch off you will know because it won't fit right.

    5.) Locktight is your friend. I think I went through a bottle.

    6.) Buy more 1/4-20 hardware than you need. Source this from where ever you can find it. Don't try to "make due" with what you find in your hardware bin because you will just end up taking stuff apart to do it right. I used mostly flat head screws and pan head screws. If you are lucky you can buy them out from Lowes/Home Depot. If you are not lucky check out your local Ace Hardware.

    7.) The most important building tip I can give you is this on build order:
    Build the aluminum platforms first. Test fit them in the truck or where ever you plan on installing them THEN take them back out. Install your slide rails next. Build your boxes and test fit them WITHOUT installing them to the rails. Then put the aluminum platforms with the slide rails in the truck and bolt them down at this point. Then install your drawers/boxes to the rails. Lastly build the top cover. I didn't do it this way and ended up pulling stuff out 100000 times and frustrating myself.

    For the woodworking part you are on your own LOL! I recommend making a fence for your circular saw so you can get strait cuts. A table saw would be helpful too. I enlisted the help of my neighbor to help me because my woodworking skills are lacking.

    Anyways here are some photos!

    IMG-6783_cc2fdebd208076372e170ca12e994e9f9cefb876.jpg
    First Box built

    [​IMG]
    Test fit in the bed of the truck

    IMG-6795_a1e1577e38ac92011f1aaf75f3bdc40846f923a7.jpg
    I split a piece of plywood to fit on top here. I added a few piano hinges near the bed-side pockets so I could still easily access them

    IMG-6806_522205963da68460b0dbb00a596bde4ac2e0eefb.jpg
    Rails are your choice. I went with Amazon chinese made ones for about $80 less than the domestic ones. They were still $165/pair

    IMG-6810_6686d0067310df41f48652020dc86257055e0277.jpg
    Rail installed

    IMG-6812_0058fd6c72bb8e6e54e3c7486161764cf9bb49ca.jpg
    Drawers installed and closed. Fridge in its location.

    IMG-6813_aac0d59b4a8502cbdd37437dbaa0a986f055fcf4.jpg
    Wide drawer open. It locks open at the half way point and fully open. It also locks closed.

    IMG-6814_ffb42f6369f55abd755b340317dd4e5be8005a6b.jpg
    Narrower drawer open. I plan on making a little platform for my stove on this one, that's why its narrower than the other.

    This was a fun build and I HIGHLY recommend that you do it. Budget between $700-$900 for your build, wood prices make this cost so variable. I was really surprised how much volume the drawers have even thought they are only 7" tall.

    Thanks for looking!
    -M
     
    Last edited: May 16, 2021
  18. May 16, 2021 at 1:49 PM
    #18
    mpatrick

    mpatrick Well-Known Member

    Joined:
    Aug 21, 2012
    Member:
    #85259
    Messages:
    1,990
    Gender:
    Male
    First Name:
    Mason
    Rancho Cucamongbruh
    Vehicle:
    2019 TRD Offroad 4x4
    Bro Dozer II
    Great build! Glad I was able to help. Drawers turned out awesome!
     
  19. Dec 25, 2021 at 9:52 PM
    #19
    LongDistanceTaco

    LongDistanceTaco Well-Known Member

    Joined:
    Mar 12, 2019
    Member:
    #286425
    Messages:
    300
    First Name:
    Geoff
    California
    Any issues with odor? For whatever reason I'm pretty sensitive to chemical smells. I just picked up a RLD cap and plan to sleep in the rear on occasion and having some insulation would be nice.

    Also sweet boxes! I'm also planning on doing something similar out of tslot extrusions. How do you feel about the chinese slides? I'm skeptical of their longevity and would rather pony up the money for the domestic made ones versus chancing it with the imported ones.
     
  20. Dec 26, 2021 at 8:46 AM
    #20
    PilotMM

    PilotMM [OP] Well-Known Member

    Joined:
    Jan 14, 2020
    Member:
    #316078
    Messages:
    185
    Gender:
    Male
    Las Vegas
    Vehicle:
    '17 TRDOR DCSB
    RLD Canopy, Icon Stage 4 plus RXT leaf
    @LongDistanceTaco I really can’t smell anything. I did leave the back open for a few days to air everything out but now it just smells like dogs back there :rofl:

    As for the the Chinese slides they have actually held up really really well. They have been used on a number for trips from a cross country road trip do 4-5 off road trips. The only word of caution I would give you is to make sure you use lock tight with all of the hardware for mounting. My larger drawer has shifted ever so slightly and now won’t lock open. It’s not a deal breaker because it locks closed and at the 50% mark still.

    When you get everything lined up you have to instal the drawer box inside the slides. They are not removable. This is a blessing and a cures. It means everything is guaranteed to line up with regard the slides but takes a lot of fiddling to get them installed plus you have limited space to work.


    This though, is mine and my wife’s most favorite mod. If we could do it again we would. I don’t know that the American made slides are any better than the Chinese ones. I wonder if China has been cloning them so long they are hard to mess up?

    Hope this helps. Feel free to shoot me any questions.

    As for updates to the DadWagen I have a few in store for 2022. My roof rack showed up just before Christmas. Not sure when my gears will be here for a regear though. Plus I have all the stuff to put my secondary electrical system in the back.

    -M
     

Products Discussed in

To Top