

-
Welcome to Tacoma World!
You are currently viewing as a guest! To get full-access, you need to register for a FREE account.
As a registered member, you’ll be able to:- Participate in all Tacoma discussion topics
- Communicate privately with other Tacoma owners from around the world
- Post your own photos in our Members Gallery
- Access all special features of the site
 Black money pit build
 WrxRome's Picture Thread
 XPOTRPR build & BS
 ScottClarkinCO's 2014 TRD Off Road Soilwork Edition Build
 Lars' Mobile Antenna Farm Build
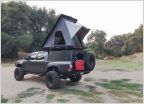 MTNROMR Build
Wackyhacky's 2013 TaCOmarado Build
Discussion in '2nd Gen. Builds (2005-2015)' started by Wackyhacky, Aug 26, 2019.
Page 2 of 9
Page 2 of 9
Products Discussed in


