1. Welcome to Tacoma World!

    You are currently viewing as a guest! To get full-access, you need to register for a FREE account.

    As a registered member, you’ll be able to:
    • Participate in all Tacoma discussion topics
    • Communicate privately with other Tacoma owners from around the world
    • Post your own photos in our Members Gallery
    • Access all special features of the site

DIY touchup paint advice

Discussion in '3rd Gen. Tacomas (2016-2023)' started by Zachdrescher, Dec 26, 2020.

  1. Dec 26, 2020 at 2:34 PM
    #1
    Zachdrescher

    Zachdrescher [OP] Member

    Joined:
    Oct 8, 2020
    Member:
    #343177
    Messages:
    19
    Gender:
    Male
    First Name:
    Zach
    Vehicle:
    2020 Black Tacoma
    Hello all,
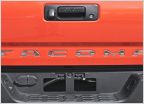
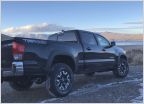
    I would assume this has been covered in other threads, but I wanted to put my specific vehicle paint and info up here to get some advice. Attached are two photos. Just minor scratches on my 2020 Tacoma.
    This is my 4th Tacoma, a 2020, v6 4x4 with the XP Predator package. Paint job is Midnight Black Metallic (With a hint of blue specs if you look closely). Anyway, I have a small patch of scratches on the driver side back quarter panel, right at the bevel line above the wheel well (See attached). I assume this is from falling leaves/branches. I live on an island in South Carolina where there are literally a million trees. The second scratch is on the tail gate, right below the handle.
    I am looking for DIY touchup advice for this particular paint color. These are very minor scratches. In the past, I got some turtle wax buffing stuff for another Black Tacoma that I had. The scratches on that were way more substantial, so it didn't work very well. I also didn't continue to try and re-apply and buff because I didn't want to damage the rest of the paint.

    Advice would be much appreciated. Thanks.

     
  2. Dec 26, 2020 at 3:20 PM
    #2
    Trousers

    Trousers Well-Known Member

    Joined:
    Dec 19, 2020
    Member:
    #350087
    Messages:
    48
    Gender:
    Male
    NW FL
    Vehicle:
    2021 Limited 4x4 Wind Chill Pearl pavement princess
  3. Dec 26, 2020 at 3:25 PM
    #3
    medic2230

    medic2230 @Koditten Pirate Radio member #002

    Joined:
    Oct 13, 2008
    Member:
    #9942
    Messages:
    63,971
    Gender:
    Male
    First Name:
    Murph
    Bama! Roll Tide
    Vehicle:
    2011 Taco 4x4 DCLB 2019 TRD PRO 4runner 2018 RAM 2500 mega cab
    20% Tint, OME 3"complete lift with Dakar's, Light Racing UCA's, 285/75/16 Nitto Terra Grapplers, 10 HP TW sticker, Ultraguage, B.A.M.F. Rock Sliders, MedicFab Bed Rack, Relentless front bumper, Air Flow Snorkel, Ham comms, Tech Deck
    On the second pic some rubbing compound then polishing compound should get that right out with a buffer.

    Too one looks like it may be deeper. Hard to tell in a pic. If it’s not through the clear coat then use the same as above.
     
  4. Dec 26, 2020 at 5:07 PM
    #4
    Halena Molokai

    Halena Molokai Well-Known Member

    Joined:
    Oct 14, 2015
    Member:
    #166698
    Messages:
    749
    Gender:
    Male
    Vehicle:
    Black 2016 TRD DCSB OR 4x4 MT6
    BFG KO2 265/70/17 Moto Metal 17x 9 -12mm ToyTec Boss 2.0 lift Kit Wet Okole, Ceramic tint 35% Bakflip F1 Flowmaster Exhaust Single in /Dual out with 3"stainless tips DashMat Covercraft Custom windshield shade Tilt Alarm Weatherbeater Mats Diode Dynamic LED upgrade to interior OEM Bed Mat OEM 5" Chrome Side Steps
    As a Painter I would say that you have to be as aggressive as it needs to be to correct the scratch or gouge so take it from mild to coarse. If the clear is scratched then a compound buffing should do but if the scratch is deeper to the base coat or primer then correcting the the base is required.$.02
     
  5. Dec 26, 2020 at 5:26 PM
    #5
    rsimi72

    rsimi72 Well-Known Member

    Joined:
    Mar 31, 2017
    Member:
    #214965
    Messages:
    590
    Gender:
    Male
    PNW
    Vehicle:
    2020 Tacoma SR5 Access Cab
    Not sure your experience or comfort level with paint correction. Here are a couple of expensive lessons I’ve learned as an amateur. 1) Start with the least abrasive/aggressive option. It might be enough and will keep as much paint on there as possible. A fine polish or even the Sratch-X listed in the above post. 2) If you decide to use sandpaper, however fine, be prepared for things to get expensive. It’s easy to blow through the clear coat.
    Personally, I’d use a fine compound and/or polish. I like Griot’s products. If you need touch up paint, I like Dr. Colorchip. But matching metallic paint with touch up is really difficult. Good luck!
     
  6. Dec 26, 2020 at 5:51 PM
    #6
    Tacomike18

    Tacomike18 Well-Known Member

    Joined:
    Oct 28, 2018
    Member:
    #270886
    Messages:
    2,022
    First Name:
    J
    Vehicle:
    2018
    A lot of tw members live with the battle scars along with myself. Just wait until someone sideswipes you then paint everything.
     
  7. Dec 26, 2020 at 5:53 PM
    #7
    Relyk711

    Relyk711 Well-Known Member

    Joined:
    Apr 11, 2019
    Member:
    #289848
    Messages:
    257
    Gender:
    Male
    First Name:
    Kyler
    Santa Cruz
    Vehicle:
    2018 TRD Pro Black - 1999 Pre-Runner Black
    Alucab Canopy Camper BAMF HC Dual Swingout Rear bumper BAMF Sliders Westcott 1.5" TRD pro lift Icon RXT option3 leaf pack Rago HD Shackles & Hangars BFG KO2 285/75/16 CBI T3 Aluminum front bumper Warn EVO 10S Total Chaos Bed stiffeners Home built Aluminum HDPE bed platform.
    I just "repaired" some rock chips in mine and a good gouge I did with my bike once and my bed cap more recently. Got some Attitude black/black midnight metallic which I had a hard time believing were the same.

    Only advice is clean it really well first, I was surprised how much better it looked after that alone. Tried applying with some microbrushes and some toothpicks. At first it looked better with the toothpicks because it filled nice and didn't have the brush stroke look. What I found after my first go around was that the drops off the toothpick collapse when it dries but the brush strokes look better after drying. Anyway after some trial and error I'm okay with the results. It's much better than the white marks jumping off the black truck. I got some paint cleaner stuff too which helped remove it from the paint that was find around the areas. I think it's just one of those things, it will look 90% alright with 50% effort but to get the last 10% or (perfect) it's going to take considerably more time effort or expertise.

    After it dries for a couple days give it a wash and wax and it looks a million times better.
     

Products Discussed in

To Top