1. Welcome to Tacoma World!

    You are currently viewing as a guest! To get full-access, you need to register for a FREE account.

    As a registered member, you’ll be able to:
    • Participate in all Tacoma discussion topics
    • Communicate privately with other Tacoma owners from around the world
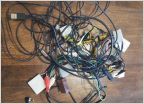
    • Post your own photos in our Members Gallery
    • Access all special features of the site

Cali-Raised Light Bar wiring question.

Discussion in '2nd Gen. Tacomas (2005-2015)' started by Sydney472, Dec 27, 2020.

  1. Dec 27, 2020 at 11:03 AM
    #1
    Sydney472

    Sydney472 [OP] Member

    Joined:
    Jan 29, 2014
    Member:
    #121779
    Messages:
    5
    Gender:
    Male
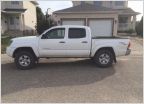
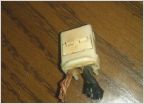
    Any help is much appreciated. Just put this light bar up on this 2015 Tacoma. The video clip *(YouTube) just says run it down the molding (weather stripping and it easily hides) Before I start tearing up molding etc. it looks like this plug is 3/4 down and will need to be hidden as well. How and where do I do exactly tuck all this in ? and where do I put it and how do I seal it back? I'm new at this and any help is much appreciated. There is a local place that said they would do this for $500 but I passed on that. I've done wiring etc. before so I can probably do this, it will just take much much longer for me. Any help before I destroy the molding, weather stripping will be much appreciated.

    Thanks a ton for any help!!
     
  2. Dec 27, 2020 at 11:04 AM
    #2
    Sydney472

    Sydney472 [OP] Member

    Joined:
    Jan 29, 2014
    Member:
    #121779
    Messages:
    5
    Gender:
    Male
    Forget to attach photo of where I'm at now. IMG_1622.jpg
     
  3. Dec 27, 2020 at 1:55 PM
    #3
    TnShooter

    TnShooter The TacomaWorld Stray

    Joined:
    Sep 2, 2010
    Member:
    #42625
    Messages:
    21,320
    Gender:
    Male
    First Name:
    Deogee
    Vehicle:
    07' TRD Off-Road, Auto
    STOCK
    If you’re trying to go down the puller and through the hood, then you’ll likely need to extend that harness. Cut/ splice/ solder / Heat Shrink

    You could probably get away with butt connections. But you might need to stager the splices.
    Make sure you use heat shrink. Probably wouldn’t hurt to apply some dielectric grease to the connector ends for a little extra protection.
    (This would be my second option. And it’s not ideal)

    Or........Drill a hole in the cap roof channel. ( Not for me)

    Here are a few examples that others have used.
    https://www.tacomaworld.com/threads/how-to-run-wires-for-lightbar-thats-roof-mounted.356843/
     
  4. Dec 27, 2020 at 1:57 PM
    #4
    Sydney472

    Sydney472 [OP] Member

    Joined:
    Jan 29, 2014
    Member:
    #121779
    Messages:
    5
    Gender:
    Male
    Thanks for your response. I'm looking into this and will definitely have to splice this.
     
    TnShooter likes this.
  5. Dec 27, 2020 at 1:59 PM
    #5
    BalutTaco

    BalutTaco Moja_Przygoda

    Joined:
    Apr 2, 2019
    Member:
    #288885
    Messages:
    3,324
    Gender:
    Male
    Vehicle:
    2019 Cement Limo Trail Edition -> 2022 Magnetic Grey OR
    Bird nest engine bay.
    Jesus thats one big ass cable....
     
  6. Dec 27, 2020 at 2:01 PM
    #6
    Sydney472

    Sydney472 [OP] Member

    Joined:
    Jan 29, 2014
    Member:
    #121779
    Messages:
    5
    Gender:
    Male
    Surely, no one is having to do this with Cali-Raised light bars and Prinsu racks. The older posts have some rather crude ways of doing this as they date back to 2014. How simple Cali-Raised makes this looks and doesn't show anything on their tutorial sites their customer service emailed me and only verbally said just easily "tuck" these wires away down the A Pillar. Well it would be nice to know how in the world do you accomplish this and not make it look so janky-rigged ??? Surely someone has done this with the new updated equipment for these Toyotas. thanks for any help out there.
     
    Alexely999 likes this.
  7. Dec 27, 2020 at 2:05 PM
    #7
    Alexely999

    Alexely999 Well-Known Member

    Joined:
    Jan 17, 2016
    Member:
    #175203
    Messages:
    2,157
    Gender:
    Male
    First Name:
    Alex
    Bay Area, CA
    Vehicle:
    2015 DCSB 4X4
    Sucks that’s where the connector is.

    I have a light bar up top, Amazon brand. I ran it just like you are trying to.

    I tucked it in the corner, put dabs of silicone, and blue taped into place while the silicone hardened.

    it looks great, can’t see any silicone, and is removable if I want to get rid of it.
     
  8. Dec 27, 2020 at 5:52 PM
    #8
    Sydney472

    Sydney472 [OP] Member

    Joined:
    Jan 29, 2014
    Member:
    #121779
    Messages:
    5
    Gender:
    Male
    Thanks that's a start, I think that's what I'm going to have to do with this along with splicing the wire. Thanks for the response.
     
  9. Dec 28, 2020 at 7:05 AM
    #9
    buzhazzard

    buzhazzard Dad

    Joined:
    Aug 7, 2009
    Member:
    #20793
    Messages:
    77
    Gender:
    Male
    First Name:
    Chris
    Houston
    Vehicle:
    2009 Magnetic Grey DC 4X4
    Wet Okole seat covers, Weathertech floor mats, blacked out tail lights, leer cap, OME 885s in front and leaf pack in rear with AAL, bhlm, all pro sliders, Pioneer head unit, rear plate bumper, US Off Road hidden winch mount, 10k lb winch, On-board water
    I partially installed mine yesterday and thought the same thing. I grabbed the main harness that I ordered and it is a much smaller diameter. It appears to be long enough to run up the A pillar from and connect at the light bar itself. From there, just bundle up the portion of the wire in your picture and zip tie it behind the wind deflector. I can't wait for the rest of my Cali Raised order to come in so I can get everything put back together.
     

Products Discussed in

To Top