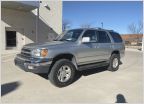
Enigma8246's 2007 4Runner Limited Build Thread (Pic Heavy)

Discussion in '4Runner Builds' started by Enigma8246, Nov 9, 2020.

  1. Nov 9, 2020 at 8:36 AM
    #1
    Enigma8246

    Enigma8246 [OP] Well-Known Member

    Joined:
    Mar 25, 2014
    Member:
    #126209
    Messages:
    1,144
    Gender:
    Male
    First Name:
    Lee
    Central Arkansas
    Vehicle:
    2007 4Runner Limited 4WD V8
    FAIR WARNING: Short term this will be baby hauler and will not be modified too much so this will probably be a very boring build thread for the next few years.


    I love my 2001 Tacoma but with a baby on the way I needed more space. I wanted a 4Runner and since we'll hopefully have a tractor to tow in the next 3-4 years I wanted the V8 for a little extra towing capacity. I also hadn't had a V8 since high school and really missed that exhaust note. I looked all over the country for a couple of months and had a lot of difficulty finding one with a decent frame and low-ish miles. I had pictures sent to me of very poorly painted frames and even one guy who couldn't be bothered to move the spray paint can out of frame before taking the picture.

    I finally found a 2007 Limited in Houston with a decent frame and ~126k miles. It was listed a little over Blue Book but already had a roof rack and a nice touch-screen head unit.


    As purchased:

    [​IMG]


    As it sits now:

    [​IMG]


    GENERAL INFO:

    EXTERIOR:

    LFD Rugged Roof Rails (stainless steel)
    Weather-Tech Front Window Visors

    ENGINE & DRIVETRAIN:
    4.7L V8
    Stock Gearing
    Flowmaster 18" Muffler
    Hewitt Technology SAIS Bypass (Post #5)
    aFe Magnum Force Stage-2 Intake with Pro Dry-S Filter and Magnum Shield Pre-Filter (Post #11)
    PLANNED: FJ Cruiser Axle w/ diff locker (preferably 2010-2014) or Eaton E-locker

    SUSPENSION:
    All OEM, will upgrade with when needed. Looking at Ironman 4x4 Foam Cell Pro Stage 3 3/2" Performance Load.

    WHEELS & TIRES:
    Toyota OEM Wheels from wife's 5th Gen 4Runner Trail
    Bridgestone Dueler H/T (P265/70R17) (factory pull-offs)

    ARMOR:
    Slee SliderSteps with lights
    PLANNED: Low Pro Winch Bumper
    PLANNED: Full Skids

    LIGHTING:
    DDM Interior LED Lighting Package
    Diode Dynamics SS3 Sport Fog Lights
    BX Built Retrofit Headlights
    PLANNED: Rigid Midnight Series in Lo Pro Bumper

    COMMS:
    PLANNED: GMRS

    INTERIOR:
    Weather-Tech Floor Mats (F, R, & Cargo)

    RECOVERY:
    Warn Recovery Kit
    Hi-Lift Xtreme 48" jack with 'Wabbit's Foot' and slider adapter
    MAXSA traction mats
    PLANNED: Warn Zeon 10-S in lo pro bumper

    MISC:
    ScanGauge II (Post #20)
    USB Power in Center Console (Post #20)
    RedArc Tow Pro Elite Trailer Brake Controller
     
    Last edited: Feb 26, 2024
    BassAckwards likes this.
  2. Nov 9, 2020 at 8:36 AM
    #2
    Enigma8246

    Enigma8246 [OP] Well-Known Member

    Joined:
    Mar 25, 2014
    Member:
    #126209
    Messages:
    1,144
    Gender:
    Male
    First Name:
    Lee
    Central Arkansas
    Vehicle:
    2007 4Runner Limited 4WD V8
    MAINTENANCE AND MODS:
    2020.09.26

    125,863 mi
    Purchased
    Transmission Fluid, Engine Oil, Engine Oil Filter Changed by Selling Dealership

    2020.09.30
    126,358 mi
    Toyota OEM 5th Gen Trail Wheels
    Bridgestone Dueler H/T P265/70R17

    2020.10.08
    126,478 mi
    Front & Rear Diff Fluid Changed

    2020.10.15
    126,740 mi
    Transfer Case Fluid Changed & Driveshafts Greased

    2020.10.27
    126,956 mi
    Magnaflow 18" Muffler, Front Tint & Eyebrow

    2020.10.30 (Post #4)
    127,016 mi
    OEM Water Pump & Gasket
    OEM Timing Belt Hydraulic Tensioner
    OEM Timing Belt Tensioner Pulley Assembly
    OEM Timing Belt Idler Pulley
    OEM Timing Belt
    AISIN/OEM Fan Pulley Bracket Assembly
    Duralast Drive Belt Tensioner Pulley Assembly
    Gates Drive Belt Idler Pulley
    OEM Drive Belt
    OEM Thermostat & Gasket
    Duralast Radiator
    Dayco Upper & Lower Radiator Hoses
    ~2 Gal OEM Coolant
    Duralast PCV Valve
    NGK Laser Iridium Spark Plugs

    2021.01.09 (Post #5)
    128,608 mi
    Hewitt Technology SAIS Bypass

    2021.01.16
    128,757 mi
    OEM Coolant Temperature Sensor

    2021.03.06
    130,116 mi
    STP Extended Life Engine Oil Filter
    6.5 qt Castrol Syntech Full Synthetic Oil
    STP Engine Air Filter
    STP Cabin Air Filter
    Tires Rotated

    2021.04.05
    131,111 mi
    Grille replaced with OEM pre-painted grille
    Left and right CV axles replaced with CVJ remanufactured axles with high angle inner boots.

    2021.08.04 (Post #11)
    132,870 mi
    aFe Magnum Force Stage-2 Intake with Pro Dry-S Filter and Magnum Shield Pre-Filter

    2021.10.16 (Post #12)
    133,454 mi
    BX Built Retrofit Headlights
    Diode Dynamics SS3 Sport Fog Lights

    2021.11.11 (Post #20)
    133,662 mi
    ScanGauge II

    2022.03.21 (Posts #23 & #24)
    134,584 mi
    Slee Slider Steps with lights

    2022.05.06
    134,921 mi
    STP Extended Life Engine Oil Filter
    6.5 qt Castrol Syntech Full Synthetic Oil
    Tires Rotated

    2022.06.24
    135,833 mi
    Propeller Shafts Greased

    2022.07.15
    136,149 mi
    Continental Blower Motor

    2023.02.09
    138,895 mi
    Transmission rebuilt and torque converter replaced

    2023.06.14
    139,873 mi
    STP Extended Life Engine Oil Filter
    6.5 qt Castrol Syntech Full Synthetic Oil
    Tires Rotated

    2023.07.30
    140,742 mi
    Denso driver's side upstream O2 sensor

    2023.09.02
    RedArc Tow Pro Elite Trailer Brake Controller

    2023.10.19
    141,211 mi
    Duralast Platinum 24F AGM Battery


    NEED TO INSTALL:
    Apex Recovery Points

    PLANNED FOR FUTURE:
    Lift (likely Ironman 4x4 Foam Cell Pro Stage 3 3/2" Performance Load)
    Lo Pro Winch Bumper
    Rigid Midnight Light Bar
    Full Skids
    Trail Swing Tire Carrier?
     
    Last edited: Dec 14, 2023
  3. Nov 9, 2020 at 8:36 AM
    #3
    Enigma8246

    Enigma8246 [OP] Well-Known Member

    Joined:
    Mar 25, 2014
    Member:
    #126209
    Messages:
    1,144
    Gender:
    Male
    First Name:
    Lee
    Central Arkansas
    Vehicle:
    2007 4Runner Limited 4WD V8
    TRIPS:
    Probably will not be anything here for a while.
     
    Last edited: Nov 9, 2020
  4. Nov 9, 2020 at 9:41 AM
    #4
    Enigma8246

    Enigma8246 [OP] Well-Known Member

    Joined:
    Mar 25, 2014
    Member:
    #126209
    Messages:
    1,144
    Gender:
    Male
    First Name:
    Lee
    Central Arkansas
    Vehicle:
    2007 4Runner Limited 4WD V8
    This vehicle looks like it has been very well taken care of. However it had 127k by the time I got it home from Houston and I couldn't find any indication that the timing belt had been changed. Even without hauling the baby, I didn't want to risk it just based on the fact that everything else was well taken care of. So I purchased just over $1k in parts and coolant and $300 in factory service manuals and got started on the first big work I'd done on this vehicle.

    Most of the parts for this were from a kit that I purchased from Royal South Toyota on ebay. This is the third kit that I've ordered from them and I cannot say enough about their kits, pricing (compared to my local dealer), and customer service.


    [​IMG]


    My dad and I have done multiple Toyota timing belts together between our various vehicles. However, this was the first one with VVT-i so there were a few extra steps that turned out to not be a big deal and everything went fairly smooth. Those extra steps did take longer than we expected though and it took us 12.5 hours not counting the lunch break.


    [​IMG]


    We got everything torn down, buttoned back up, and started the vehicle. It sounded beautiful. The next morning I drove it to the carwash to get all of the coolant off of the frame and underside of the engine and almost as soon as I pulled into the driveway I got a call from my dad:
    "Hey, do you remember when I torqued those timing belt tensioner bolts down but then had to back them off?"
    "Yeah."
    "Well, this is just me getting to be an old man but do you remember either of us retorquing them?"
    "Very funny."
    "I'm serious."
    "No. I was working on the plugs while you were doing that."
    "Well I'm about 90% sure I retorqued them"
    "I don't want to grenade an engine in my new-to-me 4Runner."
    "*sigh* Yeah, you're right. I'll be over tomorrow."

    After watching a few YouTube videos to see how far down we'd have to take it to get to those bolts I was very relieved. I went outside and put it up on ramps (front bash plate still off for carwash) and guess what was staring me in the face after pushing aside some transmission lines to the radiator:


    [​IMG]


    Thankfully they were easily accessible without removing anything else. They were also already properly torqued.
     
    Last edited: Oct 8, 2021
    This site contains affiliate links for which the site may be compensated.
    #4
    xtremewlr and Roody like this.
  5. Jan 10, 2021 at 12:55 PM
    #5
    Enigma8246

    Enigma8246 [OP] Well-Known Member

    Joined:
    Mar 25, 2014
    Member:
    #126209
    Messages:
    1,144
    Gender:
    Male
    First Name:
    Lee
    Central Arkansas
    Vehicle:
    2007 4Runner Limited 4WD V8
    I knew when I bought this vehicle that one of the weak points with the 4.7l V8 is the SAIS. I also knew there were kits out there to bypass it so I decided to wait for it to go out, then bypass it when the time came. What I didn't know was that when it goes out the vehicle goes into limp mode. On the last Wed of 2020 I got in the 4Runner when leaving work and it was in limp mode. Thankfully my commute isn't very long or hilly. I have no idea what I would have done if I had been far from home or in the woods. I drove straight to Auto Zone and it was throwing 3 codes, all for the SAIS. After some research I ordered the bypass kit from Hewitt Technology.

    This install took me about 3.5 hours but I definitely made it harder than it had to be. I wanted a factory looking install and didn't want to run a 3/8" wire loom for just one wire for the jumper to the starter relay. I put two layers of heat-shrink over the jumper wire and painted purple bands about every 8 inches so I would know what it is in the future.


    [​IMG]


    I also followed the factory wire loom path from the right side of the engine bay to the fuse box. This required removing and reinstalling a few things for easier access to the factory wire loom that otherwise wouldn't have had to be messed with. I also realized that following this path put me about 24 inches short of where I needed to be in the fuse box. Fortunately I had some 18 AWG wire laying around and it solders easily, even when it's 36 degrees outside. All said and done I think 2.5 hours of my install time was spent making and routing this wire but it was worth it to me for the factory look. Because I had to solder additional wire on anyway I left myself an almost comically long service loop in the fuse box.


    [​IMG]


    I was pleasantly surprised at how easy it was to install the block-off plates and the module. I installed the module on the resonance chamber of the intake so it's tucked away and I won't have to mess with it when I pull the air box in the future.


    [​IMG]


    Cleared codes, started it up, and all good so far. I'm happy with it. If I was just trying to slap this in to get it running right it probably could have been done in an hour but to me it was worth the extra effort for my installation to look as close to factory as possible.
     
    Last edited: Jan 11, 2021
    xtremewlr likes this.
  6. Feb 17, 2021 at 8:52 AM
    #6
    Enigma8246

    Enigma8246 [OP] Well-Known Member

    Joined:
    Mar 25, 2014
    Member:
    #126209
    Messages:
    1,144
    Gender:
    Male
    First Name:
    Lee
    Central Arkansas
    Vehicle:
    2007 4Runner Limited 4WD V8
    Very thankful for an AWD on snow days. Especially thankful for an AWD V8 when I have to push snow with my front bumper to get into my office parking lot.

    [​IMG]
     
    BassAckwards and Roody like this.
  7. May 7, 2021 at 9:28 AM
    #7
    MatthewMay1

    MatthewMay1 I'm an amateur professional.

    Joined:
    Nov 21, 2011
    Member:
    #67486
    Messages:
    11,091
    Gender:
    Male
    First Name:
    Matthew
    Lone Star Republic
    Vehicle:
    Supercharged '01 TRD
    Sub for the new rig! I love my 4th Gen Runner
     
  8. May 7, 2021 at 9:40 AM
    #8
    Enigma8246

    Enigma8246 [OP] Well-Known Member

    Joined:
    Mar 25, 2014
    Member:
    #126209
    Messages:
    1,144
    Gender:
    Male
    First Name:
    Lee
    Central Arkansas
    Vehicle:
    2007 4Runner Limited 4WD V8
    Is there a model of Toyota truck/SUV you don't own?
     
    CRASHMAN50 likes this.
  9. May 7, 2021 at 12:44 PM
    #9
    TerraNerva

    TerraNerva Well-Known Member

    Joined:
    Nov 13, 2017
    Member:
    #235889
    Messages:
    1,076
    Gender:
    Male
    First Name:
    Chip
    Central Arkansas
    Vehicle:
    Ummm....Tundra
    He doesn't have an 80 Series Land Cruiser, but I might know a guy...
     
  10. May 8, 2021 at 3:15 AM
    #10
    MatthewMay1

    MatthewMay1 I'm an amateur professional.

    Joined:
    Nov 21, 2011
    Member:
    #67486
    Messages:
    11,091
    Gender:
    Male
    First Name:
    Matthew
    Lone Star Republic
    Vehicle:
    Supercharged '01 TRD
    Lol. Yeah, I don’t have a Cruiser so there’s one!
     
  11. Oct 12, 2021 at 6:47 AM
    #11
    Enigma8246

    Enigma8246 [OP] Well-Known Member

    Joined:
    Mar 25, 2014
    Member:
    #126209
    Messages:
    1,144
    Gender:
    Male
    First Name:
    Lee
    Central Arkansas
    Vehicle:
    2007 4Runner Limited 4WD V8
    Did some minor stuff this weekend. I installed an aFe intake on the 4Runner a couple of months ago but switched out the cheap clamps for higher grade t-bolt clamps yesterday. These are supposed to form a more even seal all the way around the connection.

    [​IMG]


    [​IMG]


    [​IMG]

    The one I ordered for the actual filter to the housing inside the air box wasn't quite big enough so I have the correct size on the way. If anyone needs a pair of t-bolt clamps for 5.3"-5.6" they're yours for shipping.


    I also debadged it. The factory badges were pitted and looking rough, plus it looks cleaner without them so they had to go. Badged:

    [​IMG]

    'Sawed' off badges with fishing line:

    [​IMG]

    Tape removed (looked worse in person):

    [​IMG]

    Clay bar:

    [​IMG]

    Hand polish:

    [​IMG]

    There's still a little bit visible if you're looking for it but I plan to have the vehicle buffed and ceramic coated soon. I'm sure the buffer will make short work of what is left.
     
  12. Oct 18, 2021 at 8:14 AM
    #12
    Enigma8246

    Enigma8246 [OP] Well-Known Member

    Joined:
    Mar 25, 2014
    Member:
    #126209
    Messages:
    1,144
    Gender:
    Male
    First Name:
    Lee
    Central Arkansas
    Vehicle:
    2007 4Runner Limited 4WD V8
    I finally carved out some time to install my BX Built LED headlights and my Diode Dynamics SS3 Sport fog lights. The headlights on this thing were severely oxidized and I know polishing, etc. is only a temporary solution so I decided to put new headlights in and put clear vinyl on (I know, still temporary). Here's how it looked at the start:

    [​IMG]

    Fog light burned out as well. One old and one new headlight:

    [​IMG]

    The new headlights make a huge difference in appearance and output. I'd also like to note that it did not take me this long to get the bumper off, old headlight out, and new headlight in. I was interrupted by tornado sirens, picking the kid up from daycare, and dinner with some friends. New headlights and fogs in:

    [​IMG]

    Really love the fogs. The passenger side headlight has an issue with crazing on the inside of the lens and also not being able to adjust it far enough up to meet the other beam, even with the other beam at it's lowest setting. I've emailed BX Built and hopefully they're going to make things right (EDIT: They've told me they're going to cover the passenger side light under warranty but I still have to pay for shipping. Wound up being $140. Ug). I didn't put the vinyl on because I'm sure I'll wind up having to send them back to BX Built but I did put everything back together because it's scheduled for a ceramic coating tomorrow and Wednesday. Everyone gripes about having to remove the bumper to access bolts for the headlights but it really did not take long to get the bumper off and on. The big time consumer on this project was my apprehension of drilling into the bumper for the fog lights. Check and recheck 40 times.


    I also put the correct size t-bolt clamp on the air filter but didn't get a picture of that. It's boring anyway.
     
    Last edited: Nov 16, 2021
  13. Oct 31, 2021 at 2:56 PM
    #13
    MohoMan

    MohoMan TTC #0165

    Joined:
    May 11, 2018
    Member:
    #253216
    Messages:
    466
    Gender:
    Male
    First Name:
    Sean
    Austin
    Vehicle:
    99 Limited
    TTC badging
    Enjoying this! Just bought an 08 few months back. Had an 06 about a year ago I did the hewitt tech SAIS bypass. Took me not long but such a crude and ugly job. I'll most liekly be doing this as well although, watching videos of the replacement really isnt that bad. I have to replace my right VC gasket and that's about 50% of the work. Most likely will go with HT bypass again but.... Cheers, look forward to more!
     
  14. Oct 31, 2021 at 5:04 PM
    #14
    Enigma8246

    Enigma8246 [OP] Well-Known Member

    Joined:
    Mar 25, 2014
    Member:
    #126209
    Messages:
    1,144
    Gender:
    Male
    First Name:
    Lee
    Central Arkansas
    Vehicle:
    2007 4Runner Limited 4WD V8
    Thanks! I didn't want to put money into the SAIS when I don't think it's that great of a design anyway. On my wife's 5th gen I plan to replace the SAIS filter every 75k miles and hopefully we won't have issues out of it.
     
  15. Nov 1, 2021 at 6:16 AM
    #15
    Enigma8246

    Enigma8246 [OP] Well-Known Member

    Joined:
    Mar 25, 2014
    Member:
    #126209
    Messages:
    1,144
    Gender:
    Male
    First Name:
    Lee
    Central Arkansas
    Vehicle:
    2007 4Runner Limited 4WD V8
    BX Built headlights and DD SS3 Sport fogs in and all cleaned up for Halloween.

    [​IMG]
     
    Last edited: Mar 7, 2023
    BassAckwards and MohoMan like this.
  16. Nov 1, 2021 at 7:17 AM
    #16
    MohoMan

    MohoMan TTC #0165

    Joined:
    May 11, 2018
    Member:
    #253216
    Messages:
    466
    Gender:
    Male
    First Name:
    Sean
    Austin
    Vehicle:
    99 Limited
    TTC badging
    Which SS3 did you end up going with? Crazy the lack of support for 4th gen 4Runners in this area... They offer Toyota Matrix fog lights but not 4th gen runners lol. I've done some research on TW and t4r and came to these https://www.diodedynamics.com/stage-series-3-sae-dot-yellow-sport-round-led-pod-pair.html. Are these what you used (going off your build thread this seems to be the closest match)? Cheers!!
     
  17. Nov 1, 2021 at 7:27 AM
    #17
    Enigma8246

    Enigma8246 [OP] Well-Known Member

    Joined:
    Mar 25, 2014
    Member:
    #126209
    Messages:
    1,144
    Gender:
    Male
    First Name:
    Lee
    Central Arkansas
    Vehicle:
    2007 4Runner Limited 4WD V8
    I used the 5th gen yellow sports (SKU: DD6161P) with the appropriate plug-n-play harness (SKU: DD4077). I figured if I couldn't get them to look right in my 4Runner I could always put them in my wife's 5th gen. I had to drill for the bracket bolt and do a little extra flat black paint behind the fog light bezel but I'm pretty happy with the way they turned out.
     
  18. Nov 1, 2021 at 7:35 AM
    #18
    MohoMan

    MohoMan TTC #0165

    Joined:
    May 11, 2018
    Member:
    #253216
    Messages:
    466
    Gender:
    Male
    First Name:
    Sean
    Austin
    Vehicle:
    99 Limited
    TTC badging
    That seems to be the work most people have to do. I opted for the Lamin-X covers for now but will eventually go with the SS3 Cheers
     
  19. Nov 1, 2021 at 7:44 AM
    #19
    BassAckwards

    BassAckwards Well-Known Member

    Joined:
    May 3, 2016
    Member:
    #186002
    Messages:
    27,640
    Vehicle:
    AWD Turbo 2TR-FE
    Lookin good :thumbsup:
     
    Enigma8246[OP] likes this.
  20. Nov 16, 2021 at 6:07 AM
    #20
    Enigma8246

    Enigma8246 [OP] Well-Known Member

    Joined:
    Mar 25, 2014
    Member:
    #126209
    Messages:
    1,144
    Gender:
    Male
    First Name:
    Lee
    Central Arkansas
    Vehicle:
    2007 4Runner Limited 4WD V8
    On Veteran's Day I was off work while the wife was working and the boy was at daycare. The front end of the 4Runner is taken apart right now with headlights back at BX Built for corrections so I decided to do some miscellaneous things on the interior. I am not currently doing much towing and I do not have a winch yet but once I do start towing a tractor and doing some winching I want to be able to monitor transmission temp and voltage. I have always thought Toyota skimps on the gauges and while I agree I probably don't need to see these all of the time, there are times when they're very important. So I picked up a ScanGauge II from Auto Zone (I was very surprised that they had one in stock). Since I don't need to see it all of the time I installed in it the worthless little cubby at the bottom of the center stack:

    [​IMG]

    I did have to slightly modify the cubby door to gain some clearance for the actual ScanGauge and for the cable so the door can be closed.

    [​IMG]

    For cable routing I used a Dremel with a mini router bit to make a hole in the top of the cubby which was a little nerve-racking since it was right next to a large wiring harness. If I decide to move or ditch the ScanGauge I can replace the door and the hole I drilled won't be visible unless someone decides to rest their head in the cup holders.

    I am liking the ScanGauge so far and with the customizable backlight color I was able to get it pretty close to the factory instrument color. I used the X-Gauge feature to program in the transmission fluid temperature which was easier than I thought it was going to be. In the top picture it's displaying coolant temp, transmission fluid temp, throttle percent open, and voltage. I'd rather have oil pressure than throttle percent open but that doesn't seem to be an option for my vehicle for some reason.


    One thing that has always baffled me is why cars don't come with flashlights inside the center console. They give you a spare tire and jack but if you need to use them on the side of the road in the middle of the night you're supposed to use NVGs? So I've gotten in the habit of putting a flashlight in the center console as soon as we buy a vehicle. On our last two vehicles this has been a Streamlight 88054 ProTac HL which has a USB-rechargeable battery.

    [​IMG]

    While I had the center console torn apart for the ScanGauge install I also tapped the power for the 12V outlet which is on when the key is on and replaced the AUX port in the center console with a dual-USB charging port to keep the flashlight battery topped off. I tried to get a picture but due to the location I wasn't really able to.

    FYI for anyone else who wants to do this, the size of the opening is 1.3" X 0.9". I was unable to find this information anywhere online and ordered the wrong size the first time. Here's what I wound up using:

    https://www.amazon.com/Cllena-Charge-Charger-Socket-Toyota/dp/B08MVTDZ5Z/
     
    Last edited: Nov 16, 2021

Products Discussed in

To Top