1. Welcome to Tacoma World!

    You are currently viewing as a guest! To get full-access, you need to register for a FREE account.

    As a registered member, you’ll be able to:
    • Participate in all Tacoma discussion topics
    • Communicate privately with other Tacoma owners from around the world
    • Post your own photos in our Members Gallery
    • Access all special features of the site
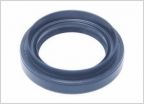
Bed cover hinges melting?

Discussion in '3rd Gen. Tacomas (2016-2023)' started by axisofoil, Dec 20, 2019.

  1. Nov 13, 2020 at 2:05 PM
    #21
    trac

    trac Well-Known Member

    Joined:
    Nov 9, 2020
    Member:
    #346308
    Messages:
    59
    Gender:
    Female
    That is nuts! Note to future self, if ever moving to AZ, get a garage
     
  2. Nov 15, 2020 at 12:08 AM
    #22
    chavez11sr

    chavez11sr Member

    Joined:
    Jan 13, 2017
    Member:
    #207478
    Messages:
    15
    First Name:
    Scott
    Vehicle:
    2017 TRD Sport DCSB 4x4
    Mine too... 4 years in AZ. I was looking for a 3M high performance tape to cover these and fix the waterproofing issue. Haven’t found the right product yet.
     
  3. Nov 15, 2020 at 11:07 AM
    #23
    SWOR17

    SWOR17 Well-Known Member

    Joined:
    Jan 16, 2018
    Member:
    #241418
    Messages:
    76
    Gender:
    Male
    WA
    Dang. Mine is starting to peel up but nothing like the melting. Looks like something was spilled on them and let sit. Like others have said it could be the climate of where you live.
     
  4. Nov 15, 2020 at 11:14 AM
    #24
    davidstacoma

    davidstacoma Friendly Curmudgeon

    Joined:
    Nov 2, 2019
    Member:
    #309695
    Messages:
    4,635
    Gender:
    Male
    First Name:
    David
    NC
    Vehicle:
    2019 Tacoma SR Access cab - Utility
    *OEM Mods: Intermittent wipers, Fogs, Keyless Entry, Lomax
    Just took note that 303 apparently doesn’t work lol
    Have some on the shelf o_O
     
  5. Mar 23, 2021 at 11:39 AM
    #25
    axisofoil

    axisofoil [OP] Rocket Surgeon

    Joined:
    Mar 25, 2016
    Member:
    #182306
    Messages:
    653
    Gender:
    Male
    Gilbert, AZ
    Vehicle:
    2016 TRD OR Dcsb 4x2
    Finally getting around to working on this.

    The front two hinge covers are part number 6497104011, and the rear single hinge cover is 6497204011.

    Not sure what the difference is, but the front ones look to be $15 a pop, while the rear one is $50.
     
  6. Mar 23, 2021 at 11:51 AM
    #26
    DES2009

    DES2009 Minister of Truth

    Joined:
    Jul 22, 2014
    Member:
    #134426
    Messages:
    1,000,540
    Gender:
    Male
    Southeast Louisiana
    Vehicle:
    2017 MGM Limited
    I'm a Millionaire! One Million Posts!!
    When you receive the parts can you post a picture?
    I'm curious mostly about the 64972-04011 part, as to why it costs so much more and why it is only quantity 1.
     
  7. Mar 28, 2021 at 8:49 PM
    #27
    axisofoil

    axisofoil [OP] Rocket Surgeon

    Joined:
    Mar 25, 2016
    Member:
    #182306
    Messages:
    653
    Gender:
    Male
    Gilbert, AZ
    Vehicle:
    2016 TRD OR Dcsb 4x2
    It's slightly wider. No idea why it costs so much more. Only 1 because it's the rear hinge. Need 2 of the other for the front two hinges.

    Didn't get a picture with all the strips together.
     
    DES2009[QUOTED] likes this.
  8. Mar 29, 2021 at 7:46 PM
    #28
    2021SR5V64WD

    2021SR5V64WD Well-Known Member

    Joined:
    Mar 29, 2021
    Member:
    #360995
    Messages:
    3,473
    Gender:
    Male
    Vehicle:
    2021 SR5 V6 4WD ACCESS CAB
    $1700 to fix ???... I just got the Bakflip MX4 installed for $1100 over at Truck Access Plus off of McDowell.. good folks over there I live in AZ as well
    and the Bakflip MX4 claims to be Arizona-Hot-Tough, just registered my purchase for 5-year-warranty.
     
  9. Mar 29, 2021 at 10:44 PM
    #29
    chavez11sr

    chavez11sr Member

    Joined:
    Jan 13, 2017
    Member:
    #207478
    Messages:
    15
    First Name:
    Scott
    Vehicle:
    2017 TRD Sport DCSB 4x4
    Hey Guys I finally installed the replacement strips and took some good photos. The back strip is slightly wider so you do need it.

    5F573F00-1132-49E7-B329-B71874214D6C.jpg
    3AD68D5D-8427-4B87-BBB4-82D0AF2F3BDF.jpg
    B7E28E71-7E84-4964-B7FE-F1E1BC5184C9.jpg
    EC29685B-5CBC-43E4-ADB4-1648DA2F254F.jpg
     
    Bleep100, axisofoil[OP] and DES2009 like this.
  10. Mar 31, 2021 at 11:28 AM
    #30
    axisofoil

    axisofoil [OP] Rocket Surgeon

    Joined:
    Mar 25, 2016
    Member:
    #182306
    Messages:
    653
    Gender:
    Male
    Gilbert, AZ
    Vehicle:
    2016 TRD OR Dcsb 4x2
    Some photos from me,too.

    Make sure to line the notches in the seal up with the pins in the channels. The front seals are not symmetric front-to-back. :)


    PXL_20210327_220922893.jpg PXL_20210327_220311681.jpg PXL_20210327_220922893.jpg PXL_20210327_220311681.jpg PXL_20210327_192101877.jpg PXL_20210327_220549591.jpg PXL_20210327_185749241.jpg
     
  11. Mar 31, 2021 at 11:39 AM
    #31
    chavez11sr

    chavez11sr Member

    Joined:
    Jan 13, 2017
    Member:
    #207478
    Messages:
    15
    First Name:
    Scott
    Vehicle:
    2017 TRD Sport DCSB 4x4
    Ya to @axisofoil ‘s point, take your time line everything up cause once it goes in it’s not coming back out without destroying it. I had a little trouble with one section pushing out long on one end, maybe cause it was hot but I had to trim off a little of the push in rubber to get it to lie flush. Also removal of the old stuff is a bit of a messy pain, after tearing out the strips, the V groove was stuck in the bottom so I took a razor to cut it up in order to remove the rubber left in the grooves w a mini needle nose plier. Cleaned up the tar w WD-40 and made sure it was clear before install.
     
    DES2009 likes this.
  12. Mar 31, 2021 at 1:50 PM
    #32
    chavez11sr

    chavez11sr Member

    Joined:
    Jan 13, 2017
    Member:
    #207478
    Messages:
    15
    First Name:
    Scott
    Vehicle:
    2017 TRD Sport DCSB 4x4
    As far as repairing sun damage on the actual tonneau cover - do you guys have a product that works well? I’ve used McGuires plastic restorer a couple of times, obviously not nearly enough.
     
  13. Mar 31, 2021 at 1:58 PM
    #33
    DES2009

    DES2009 Minister of Truth

    Joined:
    Jul 22, 2014
    Member:
    #134426
    Messages:
    1,000,540
    Gender:
    Male
    Southeast Louisiana
    Vehicle:
    2017 MGM Limited
    I'm a Millionaire! One Million Posts!!
    I used the CeraKote wipes on mine... it took 7 from the pack of 10. Is it perfect? No. But it is much much better.
    Mine used to look about like the pics in @axisofoil post above. It's raining right now AND I have a busted knee, so I can't go out and take any pictures of it today.
    But I did mine about this time last year and the water still beads up like new, and it looks pretty decent.
     
    chavez11sr[QUOTED] likes this.
  14. Apr 2, 2021 at 1:51 PM
    #34
    axisofoil

    axisofoil [OP] Rocket Surgeon

    Joined:
    Mar 25, 2016
    Member:
    #182306
    Messages:
    653
    Gender:
    Male
    Gilbert, AZ
    Vehicle:
    2016 TRD OR Dcsb 4x2
    For that part (they were about an inch long - 95 and sunny in AZ), I installed both ends, and smoothed it down into the middle. No trim required, ended up fitting just fine. :)
     
  15. Apr 2, 2021 at 1:52 PM
    #35
    axisofoil

    axisofoil [OP] Rocket Surgeon

    Joined:
    Mar 25, 2016
    Member:
    #182306
    Messages:
    653
    Gender:
    Male
    Gilbert, AZ
    Vehicle:
    2016 TRD OR Dcsb 4x2
    That's mine AFTER the meguiar's equivalent of cerakote. ;)

    I'll be going over it with a bunch of coats of "back to black" or similar.
     
  16. Apr 5, 2021 at 6:52 AM
    #36
    Tmaloy

    Tmaloy Well-Known Member

    Joined:
    Oct 3, 2019
    Member:
    #306953
    Messages:
    344
    Gender:
    Male
    First Name:
    Troy
    Vehicle:
    2019 SR DC LB
    I actually just did mine yesterday with Cerakote, and just like yours, it took 7 wipes to do it. I pressure washed it and alot of the oxidation came off. Used the compressor and blow gun to get it all dried out and sat in the sun for an hour, moved it to the garage to cool down. Applied the Cerakote and let it sit overnight to cure.

    I'm going to use the last 3 for the trim at the bottom of the windshield and my bumper step trim and maybe the mudflaps, but I'll get another kit for it.

    Back to OP, I have thought about the same issue of when it comes time to replace the seals. I was thinking of using the tailgate gap fillers like this:
    https://www.amazon.com/BLOCK-Tailga...17630179&sprefix=truck+bed+gap,aps,346&sr=8-2

    They even come in a 7" width, maybe it could be used to cover over the OEM ones for added protection.

    IMG-20210404-WA0025.jpg
     
    DES2009[QUOTED] likes this.
  17. Apr 5, 2021 at 7:24 AM
    #37
    DES2009

    DES2009 Minister of Truth

    Joined:
    Jul 22, 2014
    Member:
    #134426
    Messages:
    1,000,540
    Gender:
    Male
    Southeast Louisiana
    Vehicle:
    2017 MGM Limited
    I'm a Millionaire! One Million Posts!!
    That's almost the exact procedure I used... pressure wash, scrub, and let it dry really good. It's interesting that you used 7 wipes also. I found that although the wipes tended to leave behind "fuzz" during the application, the fuzz could be easily removed after the product cured. Mine was applied a year ago, and it still looks pretty decent.
     
    Tmaloy[QUOTED] likes this.
  18. Jun 8, 2021 at 9:05 PM
    #38
    Gdreeves

    Gdreeves New Member

    Joined:
    Apr 6, 2013
    Member:
    #101478
    Messages:
    4
    Gender:
    Male
    Arizona
    Vehicle:
    2024 Limited
    Thanks, OP, for the part numbers. I have the new seals on order. I have already removed the old seals since they were such a sticky mess. As a side note, I was at the dealership today and there was a 2017 on their lot with seals that were totally rotted out.
     
  19. Sep 21, 2021 at 3:21 PM
    #39
    DES2009

    DES2009 Minister of Truth

    Joined:
    Jul 22, 2014
    Member:
    #134426
    Messages:
    1,000,540
    Gender:
    Male
    Southeast Louisiana
    Vehicle:
    2017 MGM Limited
    I'm a Millionaire! One Million Posts!!
    I installed my new seals today. I received them in May, and I decided it was time to finally get it done. A couple of interesting things to note... There is a YouTube video linked in another thread that shows someone with a 2016 removing and installing new seals on his truck. He mentions that his tonneau has tabs near the ends of the seals and also farther towards the center that must align with cuts in the new seals. My new seals had all the cuts as mentioned, but the tonneau on my early 2017 only had the tabs at the ends... not towards the center. This did not affect the installation at all. The other thing is that between the two seals nearest the cab there had been a bit of blistering on the surface of what I had thought was a plastic piece of the tonneau. After removing the old seals and wiping the area clean with a wet (water) rag, the blistering part exposed what is apparently aluminum. I will have to try to repaint that section of the cover at some future time.

    20210921_153859.jpg

    20210921_153913.jpg
     
    Last edited: Sep 21, 2021
  20. Sep 21, 2021 at 5:37 PM
    #40
    zoo truck

    zoo truck Well-Known Member

    Joined:
    Apr 21, 2020
    Member:
    #325379
    Messages:
    8,950
    Gender:
    Male
    Vehicle:
    2020 quicksand sr5 tacoma
    None
    I worried about that this summer when it was 100 degrees out days. My truck sits outside 24/4 with that tonneau cover getting hot enough to cook a meal on. Dealer gave me wolfstein's tonneau cover protectant to apply on the cover periodically....supposedly it aids against the suns ultra violet rays. So far so good. Right now need another bottle.
     
    Patch Barracks likes this.

Products Discussed in

To Top