1. Welcome to Tacoma World!

    You are currently viewing as a guest! To get full-access, you need to register for a FREE account.

    As a registered member, you’ll be able to:
    • Participate in all Tacoma discussion topics
    • Communicate privately with other Tacoma owners from around the world
    • Post your own photos in our Members Gallery
    • Access all special features of the site

2012 TRD OR "Smokey" Build Thread

Discussion in '2nd Gen. Tacomas (2005-2015)' started by Ben95, Apr 23, 2021.

  1. Apr 23, 2021 at 9:04 PM
    #1
    Ben95

    Ben95 [OP] Well-Known Member

    Joined:
    Nov 7, 2016
    Member:
    #201845
    Messages:
    97
    Gender:
    Male
    First Name:
    Ben
    North GA
    Vehicle:
    2012 TRD OR Grey
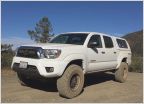
    Smokey is my 2012 TRD off-road. Been on quite a few trips and adventures over the time I've had it. But haven't done much for mods until recently.

    IMG_9935.HEIC.jpg

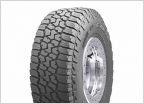
    I've made a roof rack, put in a duel battery system, android head unit, ham radio, and a bunch of other accessories inside. Upgraded to 33's at the last tire change. Still no lift on it. But hardly any rubbing. Here's what I have planned:

    - Aux fuse and relay panel (Current project)
    - Modified ripcord style camper
    - Onboard air and water
    - Front winch bumper
    - Rear bumper with swing out tire carrier
    - 2ish inch lift

    Here's some pics of it so far.

    Head unit and powered tablet mount
    IMG_9842 3.HEIC.jpg

    First aid kit. Used a travel toiletry bag because the ones labeled first aid kit bags cost like $100.
    IMG_9924.HEIC.jpg IMG_9923.HEIC.jpg

    AA/AAA charger
    IMG_9729.HEIC.jpg

    Duel batter system
    IMG_9985.HEIC.jpg

    The fuse/relay panel so far
    IMG_0042.HEIC.jpg

    I'll be starting a thread for the camper build soon. I'll make sure to link that here. I'll be using aluminum instead of steel to cut down on the weight. And as of April 2021, the material cost was almost the same.

    Put my roof rack to the test hauling 4 24' sticks of 1.5 inch square tubing back to the shop.
    IMG_0016.HEIC.jpg
     
    Last edited: Apr 23, 2021
  2. Apr 24, 2021 at 1:10 PM
    #2
    jimbeam999

    jimbeam999 Active Member

    Joined:
    Apr 19, 2021
    Member:
    #363186
    Messages:
    27
    Gender:
    Male
    First Name:
    Jim
    Vehicle:
    2009 Tacoma PreRunner
    Very cool!! How many miles?
     
  3. Apr 24, 2021 at 1:25 PM
    #3
    jburner

    jburner Well-Known Member

    Joined:
    Feb 9, 2019
    Member:
    #282426
    Messages:
    186
    Gender:
    Male
    Vehicle:
    2013 Tacoma TRD DCSB Black
    Android head unit model? Install challenges? Where did you get it? Like the mods so far!
     
    Ben95[OP] likes this.
  4. Apr 24, 2021 at 3:01 PM
    #4
    Ben95

    Ben95 [OP] Well-Known Member

    Joined:
    Nov 7, 2016
    Member:
    #201845
    Messages:
    97
    Gender:
    Male
    First Name:
    Ben
    North GA
    Vehicle:
    2012 TRD OR Grey
    I started a thread on it. It’s linked in that first paragraph.
     
    jburner[QUOTED] and Steves104x4 like this.
  5. Apr 24, 2021 at 3:03 PM
    #5
    Steves104x4

    Steves104x4 Well-Known Member

    Joined:
    Apr 17, 2010
    Member:
    #35468
    Messages:
    17,263
    Gender:
    Male
    First Name:
    Steve
    Buffalo NY
    Vehicle:
    2010 RC 2.7 4x4
    BUCKLE UP! It makes it harder for Aliens to pull you out of your Truck.
    Nice. Are you putting the original bed to the curb?
     
  6. May 13, 2021 at 9:38 PM
    #6
    Ben95

    Ben95 [OP] Well-Known Member

    Joined:
    Nov 7, 2016
    Member:
    #201845
    Messages:
    97
    Gender:
    Male
    First Name:
    Ben
    North GA
    Vehicle:
    2012 TRD OR Grey
    Nope, the camper will sit on top of the bed. I want to be able to take it off when I need to use the bed.
     
    Steves104x4[QUOTED] likes this.
  7. May 13, 2021 at 9:54 PM
    #7
    Ben95

    Ben95 [OP] Well-Known Member

    Joined:
    Nov 7, 2016
    Member:
    #201845
    Messages:
    97
    Gender:
    Male
    First Name:
    Ben
    North GA
    Vehicle:
    2012 TRD OR Grey
    A few quick updates:

    Running a few things through the aux fuse panel now. I accidentally wired the relays to be normally closed so I have to go back and fix that. But not the end of the world for now. Added a timed relay so my battery charger keeps running off the house battery for an hour after the truck shuts off. I promise it's not a bomb.
    IMG_0084.HEIC.jpg

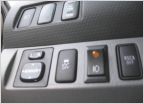
    Added these double switches and moved my USB ports to the center console.
    IMG_0067.HEIC.jpg

    Slim 42 inch light bar
    042F9494-61B3-460D-BA15-A9CB1B703FC6.jpg

    Adding switches above the mirror with a custom housing cause I use both of my sunglass holders.
    IMG_0069.HEIC.jpg
    IMG_0071.HEIC.jpg
    IMG_0112.HEIC.jpg

    Camper project is officially started
    IMG_0065.HEIC.jpg IMG_0106.HEIC.jpg

    IMG_0060.HEIC.jpg
    IMG_0065.HEIC.jpg
     
    Last edited: May 13, 2021
    Mike714 and Steves104x4 like this.
  8. May 13, 2021 at 9:59 PM
    #8
    Ben95

    Ben95 [OP] Well-Known Member

    Joined:
    Nov 7, 2016
    Member:
    #201845
    Messages:
    97
    Gender:
    Male
    First Name:
    Ben
    North GA
    Vehicle:
    2012 TRD OR Grey
    Thanks! About 157k currently
     
  9. May 14, 2021 at 12:25 PM
    #9
    Mike714

    Mike714 Well-Known Member

    Joined:
    May 8, 2018
    Member:
    #252886
    Messages:
    382
    Gender:
    Male
    First Name:
    Mike
    Cypress, CA
    Vehicle:
    2013 DCSB Prerunner Super White
    Great craftmanship with your wiring. Looks fantastic. And the overhead panel looks great as well. Can't wait to see what it looks like all mounted up.
     
    Ben95[OP] likes this.
  10. May 15, 2021 at 10:29 PM
    #10
    Ben95

    Ben95 [OP] Well-Known Member

    Joined:
    Nov 7, 2016
    Member:
    #201845
    Messages:
    97
    Gender:
    Male
    First Name:
    Ben
    North GA
    Vehicle:
    2012 TRD OR Grey
    Switch panel is done! I gotta say, I'm rather proud of how this turned out. Gives me the warm fuzzies.

    IMG_0128.HEIC.jpg

    IMG_0129.HEIC.jpg

    Got the trigger wires run for the Ham Radio and Battery isolator. Still have to run the rest

    This is how the wires are run behind the panel. Red and black both go together and are grounded, Yellow or blue is the backlight for when the headlights are on, I can go into more detail if someone wants to do something similar. Green is the trigger.

    IMG_0127.HEIC.jpg

    Before paint

    IMG_0122.HEIC.jpg
     
    Hawapino and Mike714 like this.

Products Discussed in

To Top