

-
Welcome to Tacoma World!
You are currently viewing as a guest! To get full-access, you need to register for a FREE account.
As a registered member, you’ll be able to:- Participate in all Tacoma discussion topics
- Communicate privately with other Tacoma owners from around the world
- Post your own photos in our Members Gallery
- Access all special features of the site
 Shiny stuff in oil
 Electrical Issue Today - Voltage on Ground Bar?
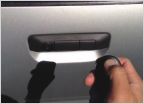 NEW YEAR, NEW MOD. REMOTE TAILGATE RELEASE FROM KEY FOB.
 Moog aftermarket LCA's
 Zip tie mod fail... Steering shaft knocking worse
 K&N Intake problem
How-To: Lower dash console dual USB (Dual data)
Discussion in '2nd Gen. Tacomas (2005-2015)' started by deanosaurus, May 11, 2021.


