

-
Welcome to Tacoma World!
You are currently viewing as a guest! To get full-access, you need to register for a FREE account.
As a registered member, you’ll be able to:- Participate in all Tacoma discussion topics
- Communicate privately with other Tacoma owners from around the world
- Post your own photos in our Members Gallery
- Access all special features of the site
 Best/ most popular
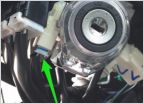 Enable remote door lock while truck is running
 Fluid Film
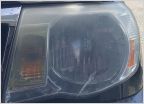 Yellow headlight
 Low budget 2nd Gen Lockable Bed pocket cover
Expedition Essentials 2TPAM fitment questions
Discussion in '2nd Gen. Tacomas (2005-2015)' started by Gr8rSherman8r, Oct 10, 2021.


