1. Welcome to Tacoma World!

    You are currently viewing as a guest! To get full-access, you need to register for a FREE account.

    As a registered member, you’ll be able to:
    • Participate in all Tacoma discussion topics
    • Communicate privately with other Tacoma owners from around the world
    • Post your own photos in our Members Gallery
    • Access all special features of the site

Show off your aux fuse panels.

Discussion in 'Lighting' started by Newlife, Dec 29, 2013.

  1. Feb 14, 2022 at 11:25 PM
    #1581
    Key-Rei

    Key-Rei Well-Known Member

    Joined:
    Jun 20, 2017
    Member:
    #221942
    Messages:
    7,863
    First Name:
    Key
    Florida
    Vehicle:
    2010 TRD Off-Road 6Spd 4x4 209BSM
    Locker anytime Fog Lights anytime Full LED light conversion TRD cat back Rear cat delete Exaust Y reroute away from actuator Alloy Clutch master 2000 4Runner "Dog Leg" shift leaver Marlin shift seats and bushing Rear seat delete Rear diff breather extension Chrome grille swap Debadge Rear seat delete Honda blower motor beefy plug and wire mod Anytime 12v and USB with volt gauge in bed Blue Sea fuse box Hella AND 70's Caddy horns Low profile recessed hex drain plug swaps Alluminum battery strap 7pin relocated Backup cam on anytime Various other creature comfort and personal taste mods.
    I think it's the dual battery isolator.
     
  2. Feb 17, 2022 at 7:18 PM
    #1582
    kwalton

    kwalton Well-Known Member

    Joined:
    Jan 13, 2008
    Member:
    #4222
    Messages:
    277
    Gender:
    Male
    Baltimore, Md
    Vehicle:
    2017 MGM DCSB Sport 4x4
     
  3. Apr 22, 2022 at 12:52 PM
    #1583
    LeeTN

    LeeTN New Member

    Joined:
    Mar 19, 2022
    Member:
    #392944
    Messages:
    3
    Gender:
    Male
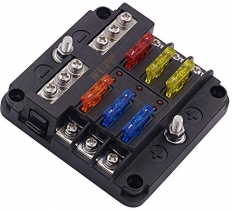
    I'd like to add a 6-circuit Blue Seas fuse box to hard-wire a few low-amperage accessories (in a 5G 4Runner): USB and 12-volt ports, GMRS radio, fridge. I'm thinking to locate it inside the cab somewhere under the dash, with a 4 AWG cable to the battery (and a breaker under the hood). This shortens the downstream wiring, compared to pulling a bunch of smaller gauge wire through the firewall. Is there some reason that's a bad idea?

    ETA
    I'd also include a Blue Seas 7615 low-voltage/timed disconnect under the hood, since I've still only got one battery.
     
  4. Apr 22, 2022 at 7:36 PM
    #1584
    bagleboy

    bagleboy Well-Known Member

    Joined:
    Aug 5, 2017
    Member:
    #226018
    Messages:
    6,854
    Gender:
    Male
    First Name:
    Scott
    Norcal, Santa Rosa
    Vehicle:
    2014 5-lug AC 2.7L VVTI
    Snug top Rebel, Thule tracks, ditch tracks, Bagged rear suspension, F/R anytime camera, intermittent wiper switch...
    I did pretty much what you described. An 8-circuit fuse panel under the center console. Mines a 5-speed manual and has the 3-way cup holder which is removable so I located it under that and removed the yellow clips to make it easier to pop out. I used #10 with a 40A fuse instead because I know it won’t have a huge current draw. Everything on at once won’t top 25A so a heavy, expensive, cumbersome #4 cable like the ones serving the Bussman in the engine bay isn’t called for. I ran another #10 wire with it to a ground buss so any in-cab ground wires go to that rather than multiple long runs back to the engine bay. Same for the bed, power/ground to a distribution center convenient to a switch panel and branch my bed circuits from there. Size the panel to your projected needs plus some extra slots then size your supply wires to match. Really high drain accessories often require dedicated supply anyway since most panels are limited to ~30A per circuit even if the max for the panel is 80-100A or more.
     
  5. Apr 23, 2022 at 3:19 AM
    #1585
    LeeTN

    LeeTN New Member

    Joined:
    Mar 19, 2022
    Member:
    #392944
    Messages:
    3
    Gender:
    Male
    Thanks for the confirmation--and additional input. I did forget to mention that I plan to run a parallel ground back to the battery's negative terminal, in order to minimize noise on the radio. I'll take a closer look at the various components' loads. BTW, I thought of putting it in the console, too, but there did not seem to be much room. (It's a 2022 TRD ORP automatic with the transfer case lever.) I also considered screwing it to the underside of the glovebox but am concerned about interfering with the passenger's knee airbag.

    Edit: there did not seem to be much room
     
    Last edited: Apr 24, 2022
  6. Apr 23, 2022 at 1:01 PM
    #1586
    stealthmode

    stealthmode Well-Known Member

    Joined:
    Dec 7, 2014
    Member:
    #143869
    Messages:
    2,407
    Gender:
    Male
    Alberta
    Vehicle:
    2016 Short N Stubby Bed- MGM
    Front and Rear lifts Tires ECGS bushing Lots of other crap +HP sticker
    Never heard of this parallel ground before ? I'd be interested to hear about it.
    I'm getting serious noise from my set up now. I have a blue sea panel and amp with Lc6 line out put converter and amplifier and noticeable white noise sound
     
  7. Apr 23, 2022 at 1:22 PM
    #1587
    LeeTN

    LeeTN New Member

    Joined:
    Mar 19, 2022
    Member:
    #392944
    Messages:
    3
    Gender:
    Male
    Maybe worded sloppily. All I meant was running positive and negative wires together: battery <> breaker <> LVD <> fuse box <> etc. I would definitely take the radio's ground back to the battery (through the fuse box) rather than to the chassis or whatever. Having the fuse box in the cab with relatively short accessory wires facilitates this. Just a guess: your amplifier is probably the source of the noise.
     
  8. Apr 23, 2022 at 6:45 PM
    #1588
    bagleboy

    bagleboy Well-Known Member

    Joined:
    Aug 5, 2017
    Member:
    #226018
    Messages:
    6,854
    Gender:
    Male
    First Name:
    Scott
    Norcal, Santa Rosa
    Vehicle:
    2014 5-lug AC 2.7L VVTI
    Snug top Rebel, Thule tracks, ditch tracks, Bagged rear suspension, F/R anytime camera, intermittent wiper switch...
    Yeah, autos are different and I also don’t have the inverter or anything else under the console other than the e-brake cables so I tucked my air distribution stuff in there too since I use solenoid air valves and the switches are in the center cubby. Anyplace you can access a panel that won’t get buried when you’re packed will do. I just prefer a comfortable position when working on it so anyplace under the dash or under a seat was less attractive.
     
  9. Apr 24, 2022 at 4:39 PM
    #1589
    CAG Gonzo

    CAG Gonzo Ascendant Spaghetti

    Joined:
    Oct 25, 2018
    Member:
    #270558
    Messages:
    1,683
    Gender:
    Male
    Vehicle:
    2018 OR DCLB BarRed
    20220424_173157.jpg 20220424_173224.jpg

    Installed a RTMR in the bed. It's mounted to an ABS sheet from Amazon cut to size to mount as a panel side on an aluminum extrusion drawer I built a few months ago. The fit is great.

    I'm waiting on some appropriately thick grommets which I'll slip into some drilled holes in the bed to route the wiring in. I'm using 4awg from the battery and will be grounding to an existing factory ground in the drive side rear wheel well.

    This project was, and continues to be, much more enjoyable than the RFRM project I wrapped up last month. The next step besides power and ground is making a switch box. Planning to get an ABS project box and cut it up to fit whatever switches I want and mount it to the molle panels I have on the bed sides. Very much looking forward to this part.

    Speaking of, I setup my ditch lights with the RFRM to be left/right and backlit/on independently controlled with a double small Toyota switch from CH4x4 and a DPDT slider switch from Digi-key. And as the lights are low current (0.7A each) I didn't have to use a relay position.
     
    Aws123 and TheTacomaInn like this.
  10. Apr 25, 2022 at 8:38 AM
    #1590
    atpage

    atpage Well-Known Member

    Joined:
    Feb 27, 2019
    Member:
    #284742
    Messages:
    177
    Western NY
    I put mine inside the center console (in the main box, where the USB ports are). In hindsight, I would rather have it somewhere more accessible, because it's a bit of a pain when I have to to run new wires to it. Maybe up under the steering wheel / knee panel somewhere? I definitely prefer having it in the interior, though, rather than the engine bay.
     
  11. Apr 26, 2022 at 7:03 AM
    #1591
    JDPNW

    JDPNW Well-Known Member

    Joined:
    Jan 13, 2021
    Member:
    #352655
    Messages:
    206
    Gender:
    Male
    S. Oregon
    Vehicle:
    2021 DCSB TRD OR Cement KDMax-Pro
    Eibach 2.0,SPC UCA,ECGS,ATS 4/1 rear leaf,5.29
    I just got done mounting my auxbeam AR-800 using a homemade mount. I have all wires ran and now to figure out where to mount the switch panel. I like the 3d printed parts on Etsy to mount it in the switch area to the left of the steering column yet I have a 3d printer and can't bring myself to buy a piece I can make. We'll see....

     
    Paddy77, SigBoy, dpele and 1 other person like this.
  12. Apr 26, 2022 at 3:51 PM
    #1592
    CAG Gonzo

    CAG Gonzo Ascendant Spaghetti

    Joined:
    Oct 25, 2018
    Member:
    #270558
    Messages:
    1,683
    Gender:
    Male
    Vehicle:
    2018 OR DCLB BarRed
    3d printing your own is much more fun and rewarding. When your printer works, that is. Mine likes to clog itself and I haven't attempted to diagnose it yet.
     
    rob1208 and JDPNW[QUOTED] like this.
  13. Apr 26, 2022 at 3:57 PM
    #1593
    JDPNW

    JDPNW Well-Known Member

    Joined:
    Jan 13, 2021
    Member:
    #352655
    Messages:
    206
    Gender:
    Male
    S. Oregon
    Vehicle:
    2021 DCSB TRD OR Cement KDMax-Pro
    Eibach 2.0,SPC UCA,ECGS,ATS 4/1 rear leaf,5.29
    LOL aint that the truth. Only used mine a couple times in the past year and luckily no bad juju. Just printed an extended fuse panel cover.

     
    dpele and CAG Gonzo[QUOTED] like this.
  14. Apr 26, 2022 at 6:18 PM
    #1594
    CAG Gonzo

    CAG Gonzo Ascendant Spaghetti

    Joined:
    Oct 25, 2018
    Member:
    #270558
    Messages:
    1,683
    Gender:
    Male
    Vehicle:
    2018 OR DCLB BarRed
    You oughta post that in the 3d printed parts thread!
     
  15. Apr 26, 2022 at 9:15 PM
    #1595
    srspicer

    srspicer Paint it black

    Joined:
    Jul 29, 2017
    Member:
    #225326
    Messages:
    1,570
    Gender:
    Male
    Lower Bucks PA.
    Vehicle:
    05' Black DBLC short bed
    Painting things black
    Can you send me a link to that thread pls? Been looking for it. TY!
     
  16. Apr 26, 2022 at 10:14 PM
    #1596
    CAG Gonzo

    CAG Gonzo Ascendant Spaghetti

    Joined:
    Oct 25, 2018
    Member:
    #270558
    Messages:
    1,683
    Gender:
    Male
    Vehicle:
    2018 OR DCLB BarRed
    srspicer[QUOTED] and dpele like this.
  17. Jun 16, 2022 at 7:28 PM
    #1597
    switch

    switch Well-Known Member

    Joined:
    Oct 12, 2009
    Member:
    #24216
    Messages:
    410
    Gender:
    Male
    Norther California
    Vehicle:
    2022 Tacoma Access Cab
    That was basically a BlueSea fuse block in a project box mounted on the aux battery.

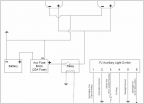
    Below is my aux fuse/relay for my 2022 Tacoma:

    My design criteria:

    Use a MOSFIT low voltage cut off device to prevent draining the main battery (which I already replaced with a deep cycle Odyssey Battery PC1700)
    Waterproof fuse/relay block
    Use a separate fuse block in the cab and in the bed (so I only need to run one wire to those locations)
    Fuse/relays for up to 6 accessories
    Don't obstruct access to factory parts
    Don't power stuff directly through switches (that is what relays are for)
    No metal edges on fuse block mounts to cause shorts in wires
    No negative terminals on the fuse block; there are factory ground points all over the truck
    No dual battery (no room, so use a lithium ion jump starter battery instead).

    Here's the (almost) finished project:
    IMG_2224_ac913c27164fe4fd16fbac608acff6edcf14266a.jpg

    To make room for the fuse/relay box, I had to relocate the factory Relay Block #2. On my 2006 Tacoma I just zip tied it to the side of the the engine bay using those extra bolt holes.
    Taco_Dual_Battery_Figure_1a-1_b35c8f85a9ef2618c0ad6c8adcfc16ac927b1139.jpg

    But on the 2022 the cable is much thicker and I didn't like stress in that position. So I made a mount to hold it in an accessible location:
    IMG_2219_6e27944db8f26e6c4a8909fbbfbab96d20484a5e.jpg
    The mount is secured with a bolt using the existing hole though the wheel well (obstructed in the above photo)

    All of the parts were made using FreeCAD software and 3D printed with a Prusa MK3S printer in PETG plastic.
    Relay_block_2_mount_96d103671cf222e981fe45da3a6398e6bb5a5c2e.jpg

    I used this for the fuse/relay box:


    [​IMG]

    I needed a way to mount the fuse/relay box so I designed a mount which could also be used to hold the low voltage cut off switch.


    [​IMG]

    (edited)_IMG_2216_8c7c53cf25c6e12d05bf277c6670db73f77aa498.jpg

    If you look carefully, you will see a hole on the left side for the main power from the battery. The long screw post on the low voltage cutoff eliminates the need for a bus to run power to the individual fuses.

    The mount has two holes for bolts though the wheel well and tabs that use the factory fuse/relay box mount:
    IMG_2212_fc0e702e4cfc2b21a5426013672f1159e9c3d829.jpg

    There is also a spacer to provide extra room for wires under the fuse/relay box:
    Relay_block_2_mount_spacer_c6cb0797e5a5d78d009385486e8417f8976f77dc.jpg

    Here's the base installed before adding the fuse/relay box:
    IMG_2222_051da7d2cc3fdd3fb23a7cecf068172829c54906.jpg
    I needed to drill a hole to secure the mount on the upper left in the photo above. The other bolt uses the existing factory hole in the wheel well.

    You will notice a fuse/breaker on the left in the photo above.
    I designed a mount for the fuse/breaker that slides into the Factory fuse/relay box
    IMG_2217_6e190a70c46bb3a7c1cf5cdf89de122e1c9dd4ad.jpg IMG_2218_ab5e6449a22f6c88612e901ff1aaceb2c965378d.jpg

    Here's the cable to the battery and Victron Energy Smart Battery Protect
    [​IMG]


    [​IMG]
    Before:
    IMG_2220_9ce0faf0a5db7682feae2035884101e1079ba0f5.jpg

    After:
    IMG_2221_a45bf842af4e03a248989e65b122cd0a5888d7a6.jpg

    Wires to the fuses in the fuse block are done like this.
    [​IMG]

    Here is how all of the parts fit together:
    upload_2022-11-4_20-46-42.jpg

    and with the spacer for the fuse/relay block
    upload_2022-11-4_20-50-18.jpg

    Here's the finished project:
    IMG_2225_82aa1dd3ded5eedffa60d4e2ae088e89fc66a50b.jpg


    CA4WDC #11593
    My projects on Etsy
    YouTube
    *****Don't believe everything you think*****
     
    Last edited: Nov 4, 2022
  18. Jun 19, 2022 at 9:37 PM
    #1598
    srspicer

    srspicer Paint it black

    Joined:
    Jul 29, 2017
    Member:
    #225326
    Messages:
    1,570
    Gender:
    Male
    Lower Bucks PA.
    Vehicle:
    05' Black DBLC short bed
    Painting things black
    Awesome design and fab work.:thumbsup:
     
  19. Sep 1, 2022 at 3:36 PM
    #1599
    Mudman

    Mudman Well-Known Member

    Joined:
    Dec 5, 2010
    Member:
    #47201
    Messages:
    620
    Gender:
    Male
    Cerritos
    Vehicle:
    08 4X4 TRD Sport
    Thoughts? I don't have all the parts yet, but drew up a template based off Blue Sea provided dimensions.

    This is without the bending and mount tabs yet.

    20220901_013253.jpg
     
  20. Sep 1, 2022 at 5:09 PM
    #1600
    switch

    switch Well-Known Member

    Joined:
    Oct 12, 2009
    Member:
    #24216
    Messages:
    410
    Gender:
    Male
    Norther California
    Vehicle:
    2022 Tacoma Access Cab
    Most of the Blue Sea fuse blocks I see installed have a negative bus for ground wires. But there really isn't much point to running ground wires back to the engine bay because there are factory ground points located throughout the truck. Also, if you use relays, you can run lower gauge wire from your switches because they only need to carry a very small amount of current.

    Power should go from the battery, to a fuse in your fuse block, to a relay, to the accessory, to a factory ground point.

    In some cases you may decide to power something directly through a switch, but then you need to make sure the switch can handle the current. I did this for the compressor in my on board air setup, and burned out several switches even though they were supposedly 30A.
     
    Mudman[QUOTED] likes this.

Products Discussed in

To Top