

-
Welcome to Tacoma World!
You are currently viewing as a guest! To get full-access, you need to register for a FREE account.
As a registered member, you’ll be able to:- Participate in all Tacoma discussion topics
- Communicate privately with other Tacoma owners from around the world
- Post your own photos in our Members Gallery
- Access all special features of the site
 Advice because I won't use my truck for 10 months
 Where can I find these clips or DIY clips
 Questions from Wdunnlee (Newest: 7/16/25)
 CB Antenna in Factory Antenna Location
 (2005-15) Tacoma experts help identify this part
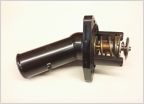 Anyone know thermostat part number?
Cleaning up relays under hood is causing a mental malfunction
Discussion in '2nd Gen. Tacomas (2005-2015)' started by w33kender, May 2, 2023.


