1. Welcome to Tacoma World!

    You are currently viewing as a guest! To get full-access, you need to register for a FREE account.

    As a registered member, you’ll be able to:
    • Participate in all Tacoma discussion topics
    • Communicate privately with other Tacoma owners from around the world
    • Post your own photos in our Members Gallery
    • Access all special features of the site

SR5 camper truck build thread

Discussion in '3rd Gen. Builds (2016-2023)' started by BarkingGarlic, Nov 11, 2023.

  1. Nov 11, 2023 at 3:30 PM
    #1
    BarkingGarlic

    BarkingGarlic [OP] New Member

    Joined:
    Oct 23, 2023
    Member:
    #436029
    Messages:
    2
    California
    Vehicle:
    2022 Black SR5
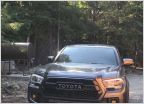
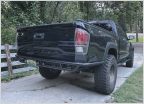
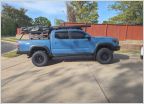
    Hi everybody! Long time lurker, first time poster. I recently purchased my 2022 SR5 Access Cab and thanks to everyone here, my bank account balance continues to decline . I have much planned for my build and will be focused mostly on getting me to campsites in remote places. I'm coming from a small camper van with very low clearance, so I'm looking forward to continuing down all of those roads I had to turn back on.

    [​IMG]

    I chose the access cab because I wanted a long bed, but a short truck. I live in an apartment building and our parking structure is very tight to maneuver within. Black wasn't my first choice mostly because I expect some pinstriping and scratches, but it was slim pickings out there for the AC's. I bought it certified used from a dealer about a four-hour drive away and did most of the deal over email and FaceTime. I'll never buy another vehicle another way. It's a one-owner with only 6k on the clock.

    I installed a bunch of small interior accessories today—large cup holders, console storage organizers, etc. I also put a knockoff TRD grill on it because I didn't love the chrome trim, and liked the look better. I don't have too much farkle in the plan, and this was a splurge. A few other things on the way:
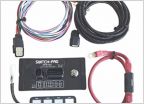
    • Remote lock tailgate (need to install once BedRug arrives)
    • BedRug
    • SmartCap (received but need to install)
    • RCI aluminum skids (not crawling, just peace of mind)
    • Bed stiffeners
    • DIY drawer build
    • Sealing the bed from water and dust
    • Probably some airbags once all the weight is added

    I've learned a lot from y'all and look forward to hopefully paying it forward.
     
    Ngneer and Road_Warrior like this.
  2. Nov 11, 2023 at 3:53 PM
    #2
    Road_Warrior

    Road_Warrior There is nothing on my horizon except everything

    Joined:
    Aug 22, 2021
    Member:
    #374919
    Messages:
    7,259
    Gender:
    Male
    East Coast
    Vehicle:
    2021 Black SR5 4x4
    Oh I am so in for this build.

    Sounds like you have some great plans! It’s always nice to see another SR5, and a black one at that!
     
    Ngneer and BarkingGarlic[OP] like this.
  3. Nov 11, 2023 at 4:05 PM
    #3
    BarkingGarlic

    BarkingGarlic [OP] New Member

    Joined:
    Oct 23, 2023
    Member:
    #436029
    Messages:
    2
    California
    Vehicle:
    2022 Black SR5
    There's so much conflicting information on forums, Reddit, and YouTube so thought I'd outline how I installed the "raptor" lights.

    I wired mine to my headlight fuse because I a. don't trust cheap lights anywhere near my ignition fuse, and b. I didn't want them running at all times when the truck was on. I just want them on with the DRL's and/or headlights. Once I narrowed down the fuse, I used the included Add a fuse tail.

    I'm including some photos because it was hard for me to see how folks got their wire into the fuse box. There are so many videos on YouTube where they're simply throwing it over the side of the box and shoving the cover down on top of it. Many people with sliced wires I'm assuming. I saw several actually cut reliefs into the box itself, just asking for water to get in there . I read mentions of feeding the wire through the harness, but couldn't find any photos or video, so hope this might help someone else.

    [​IMG]
    I unfortunately didn't take photos with the tape removed and before I threaded the wire through the surround, but there's electrical tape wrapped around the wires and surround that clips into the fuse box. I removed the tape to make it easier to pull the surround out of the box (also not shown :/). Then it was simply running the power wire in with the rest of the bundle and re-taping (I used self-fusing tape). Make sure the tape wraps around both the wire bundle and the bottom of the surround that clips into the box to make it water-tight.

    [​IMG]
    Pulling the four harnesses out made it much easier to work in there. You can see the red power wire threaded in with the rest of the bundle.

    [​IMG]
    I then routed the wire through some gaps between the fuses and popped the add-a-fuse to the headlight fuse. You'll see that my wire is a little tight at the top in this photo, but I gave it a little more slack before closing everything up.

    This is much easier than it sounds and way better than cutting a hole in your fuse box or crimping wires along the edge.

    Edit: forgot the after photo

    [​IMG]
    I know everyone has an opinion on these lights, but my personal preference at the moment is that I dig them, and I dig four of them.
     
    Last edited: Nov 11, 2023
    Coopsdaddy likes this.

Products Discussed in

To Top