1. Welcome to Tacoma World!

    You are currently viewing as a guest! To get full-access, you need to register for a FREE account.

    As a registered member, you’ll be able to:
    • Participate in all Tacoma discussion topics
    • Communicate privately with other Tacoma owners from around the world
    • Post your own photos in our Members Gallery
    • Access all special features of the site

Installation Instructions & Review: Ironman 4x4 Medium Load Leaf Spring Kit for 2005+ Tacoma

Discussion in 'Suspension' started by Tenmile Tacoma, Jan 21, 2024.

  1. Jan 21, 2024 at 12:07 PM
    #1
    Tenmile Tacoma

    Tenmile Tacoma [OP] IG: tenmile_tacoma

    Joined:
    Mar 19, 2012
    Member:
    #75182
    Messages:
    508
    Gender:
    Male
    First Name:
    Nate
    Colorado
    Vehicle:
    2016 DCLB TRD Sport 4x4
    F&R locked on 33s
    Installation of Ironman 4x4 Medium Load (0-440lbs Additional Payload) Rear Leaf Spring Kit for 2005+ Toyota Tacoma

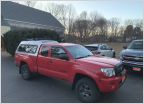
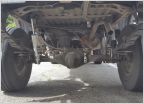
    I have been on the hunt for some heavier duty leaf springs to upgrade my current OEM & Icon Progressive AAL setup. Since installing the 1.5" Icon Progressive AAL, I had added a topper, steel rear bumper, full size (33") spare, and my @BamBeds sleeping platform, which combined, weigh in at ~400-500lb & were giving me a small squat in the rear. To compensate for this extra weight & regain the lift & rake I was hoping for, I landed on the Ironman 4x4 Medium Load (0-440lbs additional payload) rear leaf spring kit for the 2005+ Toyota Tacoma. I was excited to pull the trigger on these leaves because of the positive reviews, their weight capacity (they also sell at 440lb constant load leaf spring, but from my research, that pack was too much for my setup), the fact that they came with new poly bushings & u bolts, & the 25% off sale that Ironman 4x4 was running. This post is to serve as a summary of my install process & give folks some insight into what a DCLB looks like before & after an install of these less popular leaf springs. Also, quick classic disclaimer - I am not a professional, so I'm not responsible for your install or anything that would occur during or after it :)

    Truck Ride Height Before Install (note: 33" BFG KO2, OEM Leaves + 1.5" Icon Progressive AAL):

    Driver Side Height: 36.75"
    Passenger Side Height: 37.25"


    Overview:
    • Rear leaf spring kit for 2005+ Toyota Tacoma with additional accessories needed for install including u-bolt kit and bushing kit.
    • Ironman 4x4 Leaf springs are produced from high quality steel that meets Australian standard AS1447. Shot-peened and load tested to ensure maximum longevity.
    • Available for different load varieties (Medium Duty (0-440lb constant load); Heavy Duty (440lb+ constant load), to ensure the ride is perfectly matched to your requirements by being both strong and flexible.


    Find it Online:
    Tools & Materials Needed:
    • Jack
    • Jack stands (x4)
    • Wrenches / Sockets: 14, 17, 19 mm (and a 22mm if you have aftermarket u-bolts that use larger nuts)
    • Impact (I'd recommend a 1/2 impact if you have it. The leaf spring bolts & torqued down pretty solid)
    • Torque Wrench
    • Screw Driver
    • Small Pry Bar
    • Rubber Mallet
    • 2 medium to large c-clamps (may or may not be necessary, see note on step 16 for why these may be required)
    • Gloves
    • Vice Grips
    • Bushing Kit (supplied by Ironman)
    • U Bolts (supplied by Ironman)
    • Multi-Purpose Synthetic Great with PTFE
    • Bags & sharpie to organize your bolts & nuts
    • Blue loctite (used when re-installing all bolts & nuts)
    Installation Instructions

    Thank you to @LunarTaco13 for the help w/ writing these detailed instructions! These instructions can be used for any leaf spring installation - we installed some Old Man Emu Heavy Duties on his rig yesterday as well.

    Important note for entire installation: be sure to remember the orientation of all bolts (especially the upper rear leaf spring bolt). Installing in certain directions may cause interference w/ other components of the truck, like the frame.

    1. Jack up truck, one side at a time, placing 2 jack stands under each side of the truck's frame
    2. Bring jack around to the rear axle & orient it on the side you are starting on. I recommend angling it away for the side you're working on to give you room to work
    3. Remove wheel using impact
    4. Use 17mm wrench and socket to remove the lower shock mount nut and washer
    5. Use 19mm (or 22 mm in my case) socket to remove u-bolt nuts; pull u-bolts, bump stop, & u-bolt plate out & set aside
    6. Use 12mm socket to remove the brake cable bracket
    7. Lower the axle a bit using the jack
    8. Use a 19mm wrench and socket to disconnect the front leaf spring
    9. Use a 19mm wrench & socket to remove both upper & lower leaf spring
      • Note: you may need to lower spare tire to fully remove the lower rear leaf spring bolt
    10. Remove leaf spring
    11. Grease new bushings & sleeves, install into the new leaf either by hand or w/ a mallet
    12. The leaf springs are marked w/ "D/S" and "N/S" on top of them. "D/S" stands for "Driver Side" and "N/S" stands for "Near Side" or in our case, passenger side. The wrapped part of the spring is the front, the end is diamond cut so that there is clearance for the shackle
    13. Install shackle in the rear of leaf spring & install the shackle mount bolt & nut hand tight
    14. Lower the axle, then, position the leaf spring over the axle & align it to the mounting points on the frame. Use the jack to raise or lower the axle to align it close the mounting points.
    15. Install bolt & nut, hand tight, in the front spring. Use a mallet & small pry bar to align the leaf spring in the mounting location.
    16. Ensure the pin in the bottom of the leaf spring is set in the hole on the axle
      • Note: If you are struggling to align this, remove the top nut from the leaf spring and use a mallet to align the pin in the hole. Then, use large c-clamps to compress spring back together, tighten the nut on top of the leaf spring, and once tighten, remove c-clamps.
    17. Position bottom of the shackle in rear mount using the jack & install bolt & nut hand tight
    18. Place bump stop on top of leaf spring, slide over u-bolts, & orient rear mounting plate under rear axle. Evenly tighten nuts for each u-bolt, using a star / crossing pattern like you would for a wheel. Use torque wrench to torque u-bolts to 75 ft-lbs.
    19. Tighten front spring mount bolt w/ 19mm torque wrench to 89 ft-lbs
    20. Tighten rear upper shackle bolt to 89 ft-lbs as well
    21. Install rear shock w/ bolt and nut using 17mm. Torque to 43 ft-lbs.
    22. Reinstall brake line bracket
    23. Install wheel, torque lug nuts to 83 ft-lbs
    24. Repeat entire process on other side
    25. Remove jack stands, jump on tailgate / in truck bed a bit to "settle" the springs, then torque the rear lower shackle bolts to 89 ft-lbs.
    26. Grab a beer & admire how sick your truck looks
    27. Check all torques after 100-200 miles driving
    28. Go wheel it
    After Installation:
    Driver Side Height: 38.5"
    Passenger Side Height: 39"
    If you're keeping track of pre-install height, that is a 1.75" lift on both driver & passenger side


    I took it on a quick drive following the install and the ride quality seems to be nearly identical to my previous setup. Very comfortable. As of now, I'd definitely recommend these springs. I'll post a longer term review later when I've got some miles on them.

    Please let me know if you have questions about the process or the leaf springs!
     
    metalgraytaco and TVH475 like this.
  2. Feb 1, 2024 at 4:47 AM
    #2
    metalgraytaco

    metalgraytaco New Member

    Joined:
    Apr 12, 2021
    Member:
    #362484
    Messages:
    1
    Gender:
    Male
    First Name:
    Joel
    Vehicle:
    2021 trd off road 4x4
    Stock
    Does it squeak like other leaf packs?
     
  3. Feb 1, 2024 at 5:03 AM
    #3
    Tenmile Tacoma

    Tenmile Tacoma [OP] IG: tenmile_tacoma

    Joined:
    Mar 19, 2012
    Member:
    #75182
    Messages:
    508
    Gender:
    Male
    First Name:
    Nate
    Colorado
    Vehicle:
    2016 DCLB TRD Sport 4x4
    F&R locked on 33s
    Nope! No squeaking whatsoever. One of the big reasons I pulled the trigger on them was thanks to the positive reviews regarding no squeaking.
     
    Last edited: Feb 1, 2024
  4. Feb 1, 2024 at 6:17 AM
    #4
    545

    545 Well-Known Member

    Joined:
    Mar 21, 2019
    Member:
    #287482
    Messages:
    1,162
    Gender:
    Male
    First Name:
    Matt
    Vehicle:
    2015 Access Cab
    I have a very similar pack on a 2nd gen Xterra for ~2 years, no squeaking
     
    Tenmile Tacoma[OP] likes this.
  5. Feb 27, 2024 at 6:19 PM
    #5
    eminence978

    eminence978 Well-Known Member

    Joined:
    Apr 8, 2020
    Member:
    #324175
    Messages:
    123
    I have the same ironman leaf pack medium load going on 1 1/2yr . Haven’t seen any sagging .


    IMG_4106.jpg
     
  6. Feb 28, 2024 at 8:55 AM
    #6
    Tenmile Tacoma

    Tenmile Tacoma [OP] IG: tenmile_tacoma

    Joined:
    Mar 19, 2012
    Member:
    #75182
    Messages:
    508
    Gender:
    Male
    First Name:
    Nate
    Colorado
    Vehicle:
    2016 DCLB TRD Sport 4x4
    F&R locked on 33s
    Nice truck man, love the setup! These Ironman packs are really great products. Surprised more folks don't run them on here.
     
  7. Mar 25, 2025 at 10:26 PM
    #7
    GawainXR

    GawainXR Well-Known Member

    Joined:
    Jun 3, 2023
    Member:
    #425972
    Messages:
    496
    Gender:
    Male
    First Name:
    William
    Vehicle:
    2020 TRD Off-Road
    DashCam
    Are you still running this setup, if so what's the distance from the center of your wheel hub to the fender?
     
  8. Mar 25, 2025 at 10:35 PM
    #8
    GawainXR

    GawainXR Well-Known Member

    Joined:
    Jun 3, 2023
    Member:
    #425972
    Messages:
    496
    Gender:
    Male
    First Name:
    William
    Vehicle:
    2020 TRD Off-Road
    DashCam
    Additionally I don't see carrier bearing drop mentioned, did you do that previously or forgo it altogether?
     
  9. Mar 26, 2025 at 6:57 AM
    #9
    Tenmile Tacoma

    Tenmile Tacoma [OP] IG: tenmile_tacoma

    Joined:
    Mar 19, 2012
    Member:
    #75182
    Messages:
    508
    Gender:
    Male
    First Name:
    Nate
    Colorado
    Vehicle:
    2016 DCLB TRD Sport 4x4
    F&R locked on 33s
    Yep still running it! I can pull the measurements for you and post here when I’ve got em.
     
  10. Mar 26, 2025 at 6:58 AM
    #10
    Tenmile Tacoma

    Tenmile Tacoma [OP] IG: tenmile_tacoma

    Joined:
    Mar 19, 2012
    Member:
    #75182
    Messages:
    508
    Gender:
    Male
    First Name:
    Nate
    Colorado
    Vehicle:
    2016 DCLB TRD Sport 4x4
    F&R locked on 33s
    Did not do carrier bearing drop. I don’t think it’s necessary. No vibrations or anything with the additional lift.
     
  11. Mar 26, 2025 at 1:02 PM
    #11
    GawainXR

    GawainXR Well-Known Member

    Joined:
    Jun 3, 2023
    Member:
    #425972
    Messages:
    496
    Gender:
    Male
    First Name:
    William
    Vehicle:
    2020 TRD Off-Road
    DashCam
    Thanks, I'm currently sitting at 23" rear, 22.25 front (Measured from center of hub so tire size isn't a factor)
    I'm trying to get an idea of how much my rake would changet after adding the rear leafs and whether I can do it before I plan to next disassemble the front struts to install heavier springs along with a bumper+winch.
    My uneducated guess based on your weight is you're probably around 23.5-23.75 but wanted to confirm as I have a set of these I'm picking up this weekend.
     
  12. Apr 4, 2025 at 2:33 PM
    #12
    TacoNachoBurrito

    TacoNachoBurrito New Member

    Joined:
    Jan 5, 2024
    Member:
    #440992
    Messages:
    3
    Gender:
    Male
    Vehicle:
    2012 TRD Sport 6 Ft. Bed
    2" lift 32"KO2
    Anyone else's squeak? Been dealing with it for a couple weeks now. Wondering if there's a quick fix before I go greasing between each leaf.
     
  13. Apr 5, 2025 at 5:11 PM
    #13
    burdmarc

    burdmarc Active Member

    Joined:
    Feb 13, 2024
    Member:
    #443804
    Messages:
    30
    Gender:
    Male
    Vehicle:
    2008 Black Tacoma TRD Sport 4x4 4.0L
    mine squeak like a mothertrucker…. On the highway I can’t hear them. But driving around the town or backing into my driveway… I just hear non stop creaking. I sprayed white lithium grease on them and the shackles… didn’t help at all
     
  14. Apr 5, 2025 at 6:39 PM
    #14
    GawainXR

    GawainXR Well-Known Member

    Joined:
    Jun 3, 2023
    Member:
    #425972
    Messages:
    496
    Gender:
    Male
    First Name:
    William
    Vehicle:
    2020 TRD Off-Road
    DashCam
    Don't use lithium grease on leaves, use dry lube as lithium grease will attract dirt and make things worse after a short while
     
  15. Apr 5, 2025 at 6:42 PM
    #15
    GawainXR

    GawainXR Well-Known Member

    Joined:
    Jun 3, 2023
    Member:
    #425972
    Messages:
    496
    Gender:
    Male
    First Name:
    William
    Vehicle:
    2020 TRD Off-Road
    DashCam
    I’d open the leaf pack slightly by raising the vehicle, then pressure wash out any grease or gunk that’s built up between the leaves. After that, dry it out with a leaf blower or compressed air, and then apply a PTFE dry lube. That way you're starting clean and avoiding the dirt-attracting mess that grease causes.
     
  16. Apr 5, 2025 at 6:49 PM
    #16
    TacoNachoBurrito

    TacoNachoBurrito New Member

    Joined:
    Jan 5, 2024
    Member:
    #440992
    Messages:
    3
    Gender:
    Male
    Vehicle:
    2012 TRD Sport 6 Ft. Bed
    2" lift 32"KO2
  17. Apr 5, 2025 at 6:56 PM
    #17
    GawainXR

    GawainXR Well-Known Member

    Joined:
    Jun 3, 2023
    Member:
    #425972
    Messages:
    496
    Gender:
    Male
    First Name:
    William
    Vehicle:
    2020 TRD Off-Road
    DashCam
    Would someone with a short bed third Gen and a topper be able to measure the distance from the center of the hub to the fender for me? I'm trying to figure out if the 2" lift quoted is for third or second gens
     

Products Discussed in

To Top