

-
Welcome to Tacoma World!
You are currently viewing as a guest! To get full-access, you need to register for a FREE account.
As a registered member, you’ll be able to:- Participate in all Tacoma discussion topics
- Communicate privately with other Tacoma owners from around the world
- Post your own photos in our Members Gallery
- Access all special features of the site
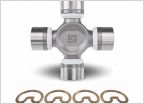 No grease zerks after ujoint recall
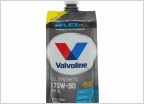 Diff fluid change question
 Transmission problem?
 Recovery Points
 Accessory lights on single add a fuse?
OEM Rear Bumper Replacement & Frame/Hitch Rehab.........??
Discussion in '2nd Gen. Tacomas (2005-2015)' started by Crow Horse, Jun 19, 2024.


