

-
Welcome to Tacoma World!
You are currently viewing as a guest! To get full-access, you need to register for a FREE account.
As a registered member, you’ll be able to:- Participate in all Tacoma discussion topics
- Communicate privately with other Tacoma owners from around the world
- Post your own photos in our Members Gallery
- Access all special features of the site
 Best Cement touch up paint
 Roof rack holes are all filled with silicone, any recommendations on removing it?
 TPMS question
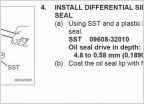 Front right axle seal part number and tools
 Because HELLA Horns
 Coming up on 30k Maintenance
3rd Gen Spoofer Development for ADD and Transfer Case Actuators
Discussion in '3rd Gen. Tacomas (2016-2023)' started by BLtheP, Sep 7, 2024.
Page 2 of 4
Page 2 of 4
Products Discussed in


