

-
Welcome to Tacoma World!
You are currently viewing as a guest! To get full-access, you need to register for a FREE account.
As a registered member, you’ll be able to:- Participate in all Tacoma discussion topics
- Communicate privately with other Tacoma owners from around the world
- Post your own photos in our Members Gallery
- Access all special features of the site
 Tool for installing rivet nuts, nutserts rivnuts, etc
 Power Washer Guide?
 Best adhesive for attaching rubber sheet to plywood
 High torque or mid torque
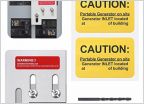 Transfer panel/Generator
 Oil pan drain bolt repair
The Oh Crap, I acquired a non-titled, homebuilt trailer thread
Discussion in 'Garage / Workshop' started by soundman98, Jan 6, 2024.
Page 3 of 3
Page 3 of 3
Products Discussed in


