

-
Welcome to Tacoma World!
You are currently viewing as a guest! To get full-access, you need to register for a FREE account.
As a registered member, you’ll be able to:- Participate in all Tacoma discussion topics
- Communicate privately with other Tacoma owners from around the world
- Post your own photos in our Members Gallery
- Access all special features of the site
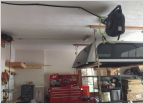 How Do You Store Your Cap/Topper?
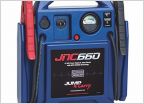 Portable Jump Starters
 My two old Makita friends (9.6V and 7.2V Drills)
 Rolling toolbox recommendations
 DIY Bookshelves
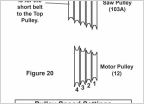 7/8" bore 4-step pulley... Unicorn?
Total Chaos Stock Length LCAs Half-Time Report - May interest the LT guys too.
Discussion in 'Garage / Workshop' started by HBMurphy, Dec 7, 2012.


