

-
Welcome to Tacoma World!
You are currently viewing as a guest! To get full-access, you need to register for a FREE account.
As a registered member, you’ll be able to:- Participate in all Tacoma discussion topics
- Communicate privately with other Tacoma owners from around the world
- Post your own photos in our Members Gallery
- Access all special features of the site
Quick Links: Shocks (advice please)
  Bolt Size to Use with Puller, to Remove Crankshaft Timing Sprocket on 3.4L V6 5VZ-FE?
  2 questions, 1 post. Remote Car Starter and Power locks.
  Tacoma Headlight Suggestions
  Aluminum coolant overflow tank... Whos swapped out the plastic one?
 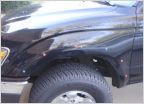 Help: Removing Fender Flares
1996 unused for 4 years
Discussion in '1st Gen. Tacomas (1995-2004)' started by Elow007, Oct 28, 2015.
Page 2 of 3
Page 2 of 3


