1. Welcome to Tacoma World!

    You are currently viewing as a guest! To get full-access, you need to register for a FREE account.

    As a registered member, you’ll be able to:
    • Participate in all Tacoma discussion topics
    • Communicate privately with other Tacoma owners from around the world
    • Post your own photos in our Members Gallery
    • Access all special features of the site

1st Gen 5 Lug/2WD Front Suspension Rebuild

Discussion in '5 Lug' started by xeno100, Apr 30, 2021.

  1. Apr 30, 2021 at 11:12 PM
    #1
    xeno100

    xeno100 [OP] New Member

    Joined:
    Apr 26, 2021
    Member:
    #363933
    Messages:
    4
    Gender:
    Male
    Vehicle:
    2000 Toyota Tacoma Extended Cab 2WD 5 Lug
    Hi all, I'm doing a semi front suspension rebuild and figured I would post some info and pictures to hopefully help anyone who is looking to do some work on their truck since there isn't much info out there on 5 luggers. Truck has 265,000 miles and I believe on the original ball joints and control arm bushings.

    Parts I'm changing are:
    • Front upper and lower control arms with Moog control arms (RK642949, RK642948, RK623055, RK623054)
    • Upper and Lower balls joints with Toyota OEM
    • Strut Bar bushing (Prothane 18-1202-BL)
    • Front and Rear shocks with KYB (KG5538, KG4752)
    • Front Sway Bar Bushings with Energy Suspension (8.5123G)
    Torque Specs:

    Started by pressure washing to make everything as clean as possible

    Didn't get pictures but I removed the tied rod end and the upper and lower ball joints with a tied rod puller I rented at Autozone and also used a hammer on the knuckle.
    I then removed the sway bar end links and the sway bar itself.


    Removed the shocks by removing the bottom two bolts and top nut.

    Next is the most dangerous part as removing the lower control arm and strut bar require compressing the spring. I compressed the spring using strut compressors I rented from Autozone as well. To make it slightly easier I used a jack under the lower control arm an lifted it up. I'd go back and forth between lifting with the jack and compressing the spring. I took my time on this as compressed springs are no joke. Once the spring is compressed enough you can pull it off the control arm.

    With the spring off you can remove the strut bar bolt. This is torqued really high, over 200 ft-lbs. Then loosen the control arm bolt and remove both the control arm and strut bar.


    Didn't get pictures of this but I removed the upper control arms by removing the two bolts running through the cross shaft and into the frame. I loosened these bolts from the engine bay. You'll have to move the air box out of the way to have access tot eh passenger side bolts. These were hard to break free so I used a box wrench and a rod over it to add leverage. Be careful as there are likely shims in between the frame and the cross shaft. Keep track of which ones go where.

    With the strut bar removed I heated the rubber using a propane torch, hit the center metal piece out with hammer and then used a saw saw and hand blade to cut the bushing housing being careful not to cut into the strut bar itself. Chiseled out the bushing housing with a hammer and flat head screw driver. Then greased and put the prothane poly bushings.


    Installation:

    Installation was the reverse. The hardest part for me was mounting the lower control arm with the spring on and the strut bar. This took some time as you have to mess around with jacking up the spring and lower control arm until you are able to fit the strut bar in place.

    Note: be careful with the front shock bolts that hold the shocks to the lower control arm. I over tightened one of then and striped the threads. Had to tap in a size higher bolt which proved to be its own problem.

    Last to go was the sway bar. I would probably tighten the lower and upper control arm bushing bolts before putting the sway bar as the sway bar in place does not allow you to fit a breaker bar to tighten the strut bar bolt to the frame.

    To tighten the lower and upper control arm bushing bolts I put the tires back on and lowered the truck to have the suspension under load. It might be easier to do this wit the tires off and two jacks or jack stands under each lower control arm. Just make sure you have jacks right under the frame as well for extra safety.

    Rear shocks were probably the easiest to remove and install. Just two bolts and then twist the shock back and forth until the bushings slide out.

    Also decided to do the outer tie rods. These were done quick. Used a sharpie to mark where the previous lock nut and threads lined up. Then removed and added some Moog greasable tied rods and lined up as best as I could. Greased with Lucas X-Tra heavy duty grease.


    There was no grease included with the energy suspension bushings for the sway bar so I used Napa Sylglide which works great

    This was the first time doing this level of suspension work and on a truck. Took a lot longer than I anticipated. Will take it to get aligned shortly and hoping the new control arm bushings last.

    Picture of the old ball joint.

    Alignment: alignment was quite off after the suspension work. Camber was quite off as I could tell my wheel was cambered in. All well after some shim placement and toe adjustment.
     
    Last edited: May 10, 2021
    domzee, 5LugCowboy, pedrotaco and 5 others like this.
  2. May 3, 2021 at 2:21 PM
    #2
    Fredfifty

    Fredfifty Back in a Mini

    Joined:
    Jan 21, 2015
    Member:
    #146926
    Messages:
    824
    Gender:
    Male
    First Name:
    Dave
    Big Island - SF Bay Area
    Vehicle:
    99 5 Lug V6
    DJM 3/4 DJM UCA BJ FLIP CALMAX SHOCKS POLYURETHANE SWAY BAR BUSHINGS POLYURETHANE UCA BUMPSTOPS ROLLED FENDERS DJM 4 INCH ANGLED BLOCKS (STEEL) MINI C-NOTCH FROM ROHDE FABRICATIONS MJBTACO LOWPRO BUMPSTOPS CALMAX SHOCKS ROLLED FENDERS
    nice you went oem ball joints..i went a1 auto ball joints all four for like 50 bucks (crossing my fingers) been good so far but i will get those oem BJ's soon. can you post torque down on those bolts? and that reminds me i need to change my strut bar bushing as well
     
    xeno100[OP] likes this.
  3. May 4, 2021 at 6:30 AM
    #3
    NMTOY

    NMTOY Well-Known Member

    Joined:
    Dec 11, 2020
    Member:
    #349348
    Messages:
    55
    Gender:
    Male
    First Name:
    Rob
    Vehicle:
    1998 Dark green 2wd extra cab Tacoma V6, auto
    Clear corner and marker lights, 1997 Cobra wheels, KYB shocks, Powerstop rotors and pads
    Nice write up! I'm getting ready to do this soon.
     
    xeno100[OP] likes this.
  4. May 6, 2021 at 8:20 AM
    #4
    Fantastic11

    Fantastic11 Well-Known Member

    Joined:
    Feb 9, 2021
    Member:
    #355606
    Messages:
    227
    Vehicle:
    1997 3.4L 4WD / 1996 3.4L 5-Lug
    I had a hell of a time compressing the spring on mine too. I used the compressing tool that goes on the inside of the spring. I figured since that's what they used in the FSM, it would be the best way, but it was a bitch to get the tool in the right spot, and then trying to get the tool out once the tension was let off the spring. I'm used to working on Macphersons so that was the first time trying it that way. Nice job on everything, man!
     
    xeno100[OP] likes this.
  5. May 9, 2021 at 8:48 AM
    #5
    xeno100

    xeno100 [OP] New Member

    Joined:
    Apr 26, 2021
    Member:
    #363933
    Messages:
    4
    Gender:
    Male
    Vehicle:
    2000 Toyota Tacoma Extended Cab 2WD 5 Lug
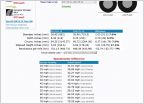
    Hope they last for you! I added the torque specs sheets I used to the top of the post. Even without a press the strut bar bushings weren't that bad to remove. Just took time and patience. Hope the new poly bushings last and don't squeak.
     
    dasitmane420 likes this.
  6. Jul 3, 2021 at 1:37 PM
    #6
    dasitmane420

    dasitmane420 Member

    Joined:
    Jun 22, 2021
    Member:
    #369299
    Messages:
    10
    Gender:
    Male
    How are you liking those KYB front shocks vs. your original? Any discernable differences? Thinking of doing something very similar to you, but Fox 2.0 rear shocks.

    Excellent, extremely helpful thread and thank you so much for the pictures. You're making it a lot easier for guys like me.
     
  7. Jul 3, 2021 at 10:02 PM
    #7
    xeno100

    xeno100 [OP] New Member

    Joined:
    Apr 26, 2021
    Member:
    #363933
    Messages:
    4
    Gender:
    Male
    Vehicle:
    2000 Toyota Tacoma Extended Cab 2WD 5 Lug
    They are pretty good. They are stiffer than the old OEM style Gabriel shocks that were on there. You will feel more of the bumps but it's not unbearable, at least to me. I enjoy the sportier feel they provide and the ride is not as bouncy as it was with the old ones. Best of luck with the swap. It was my first time doing this level of suspension work and it was frustrating at times and took longer than I thought it was going to but it worked out in the end. It definitely can be done at home.
     
    dasitmane420[QUOTED] likes this.
  8. Aug 18, 2021 at 9:59 PM
    #8
    Cj3waker

    Cj3waker Active Member

    Joined:
    Jul 17, 2021
    Member:
    #371540
    Messages:
    43
    Awesome thread, will be doing the same thing very soon. Are you happy with the Moog LCAs? And was ES80309 the tie rod end kit you used?
     
    dasitmane420 likes this.
  9. Aug 20, 2021 at 6:08 AM
    #9
    xeno100

    xeno100 [OP] New Member

    Joined:
    Apr 26, 2021
    Member:
    #363933
    Messages:
    4
    Gender:
    Male
    Vehicle:
    2000 Toyota Tacoma Extended Cab 2WD 5 Lug
    So far so good with the Moog LCAs and the UCAs. Hoping they last a long time. The truck did need to have the camber adjusted a bit as the wheels were tilted inwards after the job and the rest of the alignment was really thrown off as you can see from the picture. Assume because the new control arms weren't exact to the oem ones. Just needed more shims but as long as you get a good alignment after it should be no problem. And yes that's the tie rod part number. The tie rod threads start a little different in relation to the oem tie rods so counting the number of turns when you remove the old ones won't give you the most accurate alignment when installing the new Moog ones. Better to mark the threads where the old ones end or count how many threads are exposed so you can get the new tie rods as close to how they were.
     
    dasitmane420 likes this.
  10. Nov 22, 2021 at 2:48 PM
    #10
    pedrotaco

    pedrotaco New Member

    Joined:
    Aug 23, 2021
    Member:
    #375076
    Messages:
    1
    Gender:
    Male
    Vehicle:
    1999 Tacoma ExtraCab
    Great post, I went through a similar suspension rebuild when my LBJ decided to shear in half as I was puling into my drive way. Similar to you, after finishing everything, my camber is quite off. Obvious positive camber from a cursory visual inspection. Did you do the shimming yourself to adjust the camber? I've called a few places to get it aligned, but they all say they don't do shim adjustments for alignments. :confused:

    Any pointers on how to do camber and toe adjustment at home?
     
    dasitmane420 likes this.
  11. Dec 2, 2021 at 11:19 AM
    #11
    pwrslide2

    pwrslide2 Well-Known Member

    Joined:
    Dec 2, 2019
    Member:
    #312277
    Messages:
    155
    Gender:
    Male
    AZ
    Vehicle:
    07' 2.7 2wd auto
    In process
    awesome list. I need one for 2nd gen
     
  12. Dec 20, 2021 at 1:56 PM
    #12
    aroma

    aroma Well-Known Member

    Joined:
    Sep 7, 2018
    Member:
    #265529
    Messages:
    765
    Gender:
    Male
    Snottsdale AZ
    Thank you for this! Merry Christmas.
     
    dasitmane420 likes this.
  13. Mar 25, 2023 at 1:52 AM
    #13
    ReconYote77

    ReconYote77 Member

    Joined:
    Feb 3, 2023
    Member:
    #417097
    Messages:
    12
    Gender:
    Male
    First Name:
    Daniel
    Vehicle:
    2017 Tacoma Dbl cab TRD OR, 1998 gen 4runner limited, 1996 Toyota Tacoma 2wd 5 lug
    3rd gen Taco: 1.5" strut spacer HPS silicone intake tube (Red) K&N Drop-in 1.25" Wheel Spacer Airaid throttle body spacer Runner: JBA UCA, Solo motorsports LCA, Freedom Offroad 1"-4" coilovers adjusted .75", .75" spacer (3-4" overall) 33x18 Goodyear duratracs, Tundra brakes, Panhard correction, Overland Customs Forged ball joint Sway bar links, Poly bushings all around. Roof rack.....Lit up like a Christmas tree. Taco: stock.... 30" cheapo mud tires, no cat. 1.5 daystar front level spacer. Custom headache rack with light bar.
    Awesome write up, I just did everything you did on the front end, except my sway bar and strut bar bushings but I'll do those next. I also put a daystar 1.5" leveling spacer in the front and it made it sit really nice and clear my 235/75r15s much better. The spacer also stiffened the spring a bit so it corners and rides better it use to be too soft in the front. I went with Bilsteins and love them so far very smooth and soak up big hits well. It doesnt even feel like the same truck. I have a little wobble at freeway speeds. Thinking the strut bar bushings are a major factor there I just got the polyurethane ones but javent done it yet. The rear is so stiff. I have helper springs, the springs look really flat.
     
    Last edited: Mar 25, 2023
  14. Nov 13, 2023 at 6:01 PM
    #14
    JustADriver

    JustADriver Well-Known Member

    Joined:
    Mar 27, 2011
    Member:
    #53838
    Messages:
    582
    Gender:
    Male
    Vehicle:
    1996 Tacoma 3.4L V6 2WD 5-lug AT 5VZ-FE
    @xeno100 Is the bracket welded to the strut bar? I have been trying to find an answer on this. Very few people have this model. I'm trying to remove the pressed in bolts and bracket to replace the strut bar without removing the coil spring, and I'm unsure how hard I should be trying to pound it off.
     

Products Discussed in

To Top