

-
Welcome to Tacoma World!
You are currently viewing as a guest! To get full-access, you need to register for a FREE account.
As a registered member, you’ll be able to:- Participate in all Tacoma discussion topics
- Communicate privately with other Tacoma owners from around the world
- Post your own photos in our Members Gallery
- Access all special features of the site
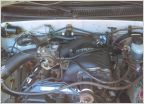 Spark plugs for my Supercharged TOY
 01 Tacoma regular cab
 Light Bar Behind Valence
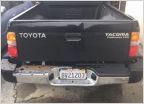 Trouble finding replacement for rear bumper. 2003 PreRunner SR5. HELP :/
 Need a tail gate handle with lock where do i find one
 What oil and filter to use on 1998 2.4L
2002 Double Cab Frame Rehab
Discussion in '1st Gen. Tacomas (1995-2004)' started by gzig5, Aug 11, 2022.
Page 1 of 2
Page 1 of 2


