1. Welcome to Tacoma World!

    You are currently viewing as a guest! To get full-access, you need to register for a FREE account.

    As a registered member, you’ll be able to:
    • Participate in all Tacoma discussion topics
    • Communicate privately with other Tacoma owners from around the world
    • Post your own photos in our Members Gallery
    • Access all special features of the site

2nd gen Tacoma light and wiring question

Discussion in '2nd Gen. Tacomas (2005-2015)' started by Sen_San_Sai, Jul 15, 2020.

  1. Jul 15, 2020 at 12:49 PM
    #1
    Sen_San_Sai

    Sen_San_Sai [OP] Member

    Joined:
    Jul 15, 2020
    Member:
    #334559
    Messages:
    13
    Gender:
    Male
    Vehicle:
    2015 White 4D Short bed SR5 Pre-Runner Tacoma
    -2” spacer lift -voodoo 18” aluminum bed rack (40lbs) -caliraised Ditch lights -stainless steel brush guard -husky floor liner -glove box organizer -center console organizer
    Good afternoon everyone,

    I am new to the site here and I was hoping to find some guidance as to how some of you manage your wiring for your light bar, ditch lights, bed lights etc and where you have the buttons placed for all of them inside the cab.

    I’m looking into getting the Caliraised premium roof rack pretty soon

    https://caliraisedled.com/collectio...cts/2005-2020-toyota-tacoma-premium-roof-rack

    and I’d like to see if there is a good way to manage the wiring and have it so that the 360* lights have individual switches.
    1 for the light bar
    1 for drive side lights
    1 for passengers side lights
    And
    1 for bed lights

    total of 4 individual buttons, switches etc
    I already have my ditch lights on my truck going to one of the empty slots but for what I’m trying to do there has to be an easier way of managing it all right?

    thank you in advance! If possible please provide part # links, YouTube videos anything. Really trying to avoid having to drop more $ into a shop to have them do it if I can just knock it out myself.
     
  2. Jul 16, 2020 at 3:30 AM
    #2
    Coma_Overload

    Coma_Overload Active Member

    Joined:
    Jul 9, 2020
    Member:
    #333958
    Messages:
    38
    Gender:
    Male
    Pensacola, Florida
    Vehicle:
    2013 Tacoma TRD Off Road 4x4
    Fender Flares, Bumper Light Bar, Ditch Lights, Auxbeam 8 Control Switch, TRD Pro Grille, RetraxMax Tonneau Cover, 35s, RTT, Yakima HD rack, Road Shower, Fuel/Water containers, MaxTrax, Wet Okole Seat Covers
    I just bought the Cali Raised 8 switch control panel. Only $190. Way cheaper than the switch pro. Right now I have my LED bumper light bar and ditch lights on it. Once I get my led light bar and 360 lighting from cali raised, I am going to throw it on that switchIng unit. I just wired it to my center console going through the firewall and under the carpet.

    It’s pretty easy. I can take pictures for you tomorrow and drop you some layman instructions that will make it easy. Pretty much all you have to do is cut the wire with the light plug on it from the harness, slap on a terminal lug and connect it to the switch panel. Make sure you run the proper fuse for how many amps your pulling. Then, run the fuse splitter through the firewall and plug it in to a higher amp fuse location(I’ll let you know what what i am using, it does matter because you don’t want it always on) finally, Connect switch panel to battery.

    When I do the roof lighting I’ll let you know how I do it. The harnesses from Cali raised are a lot Beefer then they need to be (depending on what your installing). You can cut the bulky wire, splice in a smaller gauge and run it down the window shield weather stripping for better aesthetics. That’s what I plan on doing.

    I had a hard time finding anything that specifically worked with their harnesses and connecting them to a control panel plus the control panel instructions are as bad as they get.

    My switch set up/soon to be

    1 led light bar
    1 ditch lights
    1 led bumper
    3 for 360° lighting (left, Right, and rear)
     
    sanchez and Sen_San_Sai[OP] like this.
  3. Jul 16, 2020 at 12:53 PM
    #3
    Sen_San_Sai

    Sen_San_Sai [OP] Member

    Joined:
    Jul 15, 2020
    Member:
    #334559
    Messages:
    13
    Gender:
    Male
    Vehicle:
    2015 White 4D Short bed SR5 Pre-Runner Tacoma
    -2” spacer lift -voodoo 18” aluminum bed rack (40lbs) -caliraised Ditch lights -stainless steel brush guard -husky floor liner -glove box organizer -center console organizer
    I’d really appreciate it if you could keep me updated on how your process goes! From what it sounds like you’re going for the same set up as myself. Let me know what steps you take and what parts you end up buying chances are I’ll be following closely behind you in the build.

    The part I get really confused on is the fuse, fuse splitter, and higher amp fuse so if you could when you do your set up could you take some pictures as well if that isn’t to much to ask for? I just need an idea of how it all goes together and how to wire it all up.

    thank you in advance and good luck on your build! I’m looking forward to seeing how it turns out!
     
    00kelso and sanchez like this.
  4. Jul 16, 2020 at 4:56 PM
    #4
    Coma_Overload

    Coma_Overload Active Member

    Joined:
    Jul 9, 2020
    Member:
    #333958
    Messages:
    38
    Gender:
    Male
    Pensacola, Florida
    Vehicle:
    2013 Tacoma TRD Off Road 4x4
    Fender Flares, Bumper Light Bar, Ditch Lights, Auxbeam 8 Control Switch, TRD Pro Grille, RetraxMax Tonneau Cover, 35s, RTT, Yakima HD rack, Road Shower, Fuel/Water containers, MaxTrax, Wet Okole Seat Covers

    Yeah, that part had me too. Here’s what I did (ignore the wiring mess. I’m going to clean it up once I get it all installed)


    I’ll send you more once it’s done and I get the rack installed.

    29C16C8D-8B49-4919-9008-AD706620FF74.jpg
    2AF81EFF-77E0-48C7-AFCD-7EA64D6D94A1.jpg
    2F00ACFC-1C60-4CC1-B702-A122CD5A851F.jpg
     
    SlickFly and 00kelso like this.
  5. Jul 17, 2020 at 12:49 PM
    #5
    CaliRaisedLed

    CaliRaisedLed Well-Known Member Vendor

    Joined:
    Apr 23, 2015
    Member:
    #153803
    Messages:
    8,281
    Gender:
    Male
    First Name:
    Jake
    Texas (DFW)
    Please let me know me to know if you have any questions.
     
    Sen_San_Sai[OP] likes this.
  6. Aug 13, 2020 at 4:19 PM
    #6
    00kelso

    00kelso New Member

    Joined:
    Mar 17, 2020
    Member:
    #322356
    Messages:
    1
    Gender:
    Male
    Vehicle:
    2015 Toyota TRD OFF ROAD
    Coma_overload I’d really appreciate any info on how you mounted your switch housing into your center console, it looks clean! I got my Cali Raised 8 switch this week and their instructions are lack luster at best! I’ve looked everywhere for any information and this is the closest I’ve come thus far. So far not impressed with Cali Raised..., the could at the very least have an install video!
     
  7. Aug 14, 2020 at 3:45 AM
    #7
    Coma_Overload

    Coma_Overload Active Member

    Joined:
    Jul 9, 2020
    Member:
    #333958
    Messages:
    38
    Gender:
    Male
    Pensacola, Florida
    Vehicle:
    2013 Tacoma TRD Off Road 4x4
    Fender Flares, Bumper Light Bar, Ditch Lights, Auxbeam 8 Control Switch, TRD Pro Grille, RetraxMax Tonneau Cover, 35s, RTT, Yakima HD rack, Road Shower, Fuel/Water containers, MaxTrax, Wet Okole Seat Covers

    DM’d you. There is definitely a lot more to it then the one picture of the schematic that’s for sure.
     
    Gunshot-6A likes this.
  8. Aug 14, 2020 at 2:27 PM
    #8
    Sen_San_Sai

    Sen_San_Sai [OP] Member

    Joined:
    Jul 15, 2020
    Member:
    #334559
    Messages:
    13
    Gender:
    Male
    Vehicle:
    2015 White 4D Short bed SR5 Pre-Runner Tacoma
    -2” spacer lift -voodoo 18” aluminum bed rack (40lbs) -caliraised Ditch lights -stainless steel brush guard -husky floor liner -glove box organizer -center console organizer
    @Coma_Overload and @00kelso anything you guys are able to figure out could you post your wiring and solutions on this thread as well? I recently just purchased my Caliraised roof rack with 360* lighting and switch board. So I will soon be in the same boat as you guys so any information I can get before it comes in will be a big help! Thanks guys
     
  9. Aug 14, 2020 at 2:34 PM
    #9
    Gunshot-6A

    Gunshot-6A Prime Beef

    Joined:
    Dec 29, 2009
    Member:
    #28389
    Messages:
    23,589
    Gender:
    Male
    First Name:
    Conner
    Everett, WA
    Vehicle:
    '15 TRDOR / '17 Africa Twin
    Switchpro and Prinsu guy here, but same thing basically.

    For the wiring from the controller to the lights, you can either run a length up the edge of the windshield/gutter channel or your can go down along the frame and then up between the bed and the cab. I did it both ways because I got a lot of stuff.

    You can see the tape still holding down the grey wire while the silicone firms up. It's not in your line of sight in the driver seat, and it really doesnt stand out if you do a tidy job while outside the vehicle.

    20181215_171227 (1).jpg
     
  10. Aug 15, 2020 at 1:23 AM
    #10
    Coma_Overload

    Coma_Overload Active Member

    Joined:
    Jul 9, 2020
    Member:
    #333958
    Messages:
    38
    Gender:
    Male
    Pensacola, Florida
    Vehicle:
    2013 Tacoma TRD Off Road 4x4
    Fender Flares, Bumper Light Bar, Ditch Lights, Auxbeam 8 Control Switch, TRD Pro Grille, RetraxMax Tonneau Cover, 35s, RTT, Yakima HD rack, Road Shower, Fuel/Water containers, MaxTrax, Wet Okole Seat Covers
    Edited Message to 00kelso:

    I didn’t find a video. Installing everything was easy until I got to that switch panel.

    Easy things first I hooked the battery Terminals directly to the battery. Then I ran the black braided wire through the firewall and ran it behind the gas pedal and tucked it under the carpet and then just tucked it under the center console. I popped off the center console trim piece and set the switch where I wanted it, roughly lined up where the power supply Wire would lay the flattest and drilled A whole for it to go through.

    If i remember correctly am pretty sure I loosely placed the long, 1/2”x3” (guesstimate, bracket down on the top of the console panel for mounting and then used the Holes in the mounting bar to drill some pilot holes. I then screwed those directly into the back of the switching panel. Holding it in place if that makes any sense.

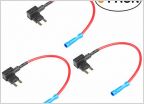
    As for the Wiring, The little red wire I ran through my firewall As well. (There is areally small grommet that is unused that you can use for both wires). I thenconnected it by crimp to a fuse tap onthe inside fuse panel. Just install the fuse tap like I have in the picture. You can get them at autozone.

    Then I just used the schematic to organize what lights I wanted on what switch.


    I would send you better pics but I am away from for a couple weeks. If I remember when I get back I will. Just DM me.

    idk of any of this helps. It was a nightmare that took me a long ass time but it’s pretty easy once you figure it out


    I also bought some extra plug connectors from Amazon. I am going to splice these in so i can just unplug the 360° lighting and light bar If I need to remove the rack for some reason. This way I don’t have to cut all the wires.
     
  11. Sep 8, 2020 at 6:25 PM
    #11
    Coma_Overload

    Coma_Overload Active Member

    Joined:
    Jul 9, 2020
    Member:
    #333958
    Messages:
    38
    Gender:
    Male
    Pensacola, Florida
    Vehicle:
    2013 Tacoma TRD Off Road 4x4
    Fender Flares, Bumper Light Bar, Ditch Lights, Auxbeam 8 Control Switch, TRD Pro Grille, RetraxMax Tonneau Cover, 35s, RTT, Yakima HD rack, Road Shower, Fuel/Water containers, MaxTrax, Wet Okole Seat Covers

    Sorry it took so long to get back to you. I didn’t forget. Just been busy With deployments and what not. Here are some images of what the install of my 360° lighting looks like now that it’s finally installed.

    I had some 1/4” tubing to tuck the wires in and it is tucked where my weather stripping was. Then on both sides of my window I have it tucked. One side had the LED light bar and side pods, the other has the cargo lights and other side pods. I also bought the pigtails shown below to make splicing it in easier. It also gives me the option to remove the rack if I need to. The pigtails on Amazon are perfect and beat paying the $14.99 caliraise charges. They also don’t have a single side option like that either.

    I think it came out pretty clean myself.

    Also, watch your hardware from Caliraised. ALL of mine rusted like crazy. I guess their manufacture sent them all non stainless hardware that got mixed in. Idk if I believe that since ALL of my hardware was bad but just contact them and they will send you some new ones if you have issues. Make sure you ask for a specific amount. I need like 24 bolts and washers and they sent me like 12 so It took like a month until it was all swapped out. Still have rusty hardware but it’s not visible.

    I know the photos aren’t that good. Sorry about that. If you have any questions, let me know

    2C488581-7F59-49BA-AFD6-AFB15423824C.jpg
    01A39A88-4E61-45BA-B1E8-FE60111E612B.jpg
    E393E14B-6330-4596-98A4-7AF36C4AC463.jpg
    869CF40E-5943-4E85-A66C-7E089ED9586C.jpg
     
  12. Sep 18, 2020 at 7:41 AM
    #12
    Sen_San_Sai

    Sen_San_Sai [OP] Member

    Joined:
    Jul 15, 2020
    Member:
    #334559
    Messages:
    13
    Gender:
    Male
    Vehicle:
    2015 White 4D Short bed SR5 Pre-Runner Tacoma
    -2” spacer lift -voodoo 18” aluminum bed rack (40lbs) -caliraised Ditch lights -stainless steel brush guard -husky floor liner -glove box organizer -center console organizer
    Just a little update on my end guys. I finally got my roof rack delivered. Shipping took longer than expected because they ran out of the 360 lighting and they decided to hold off on sending it till they got a new shipment in. But after some time it finally made its way here! I’ll try and tackle the install this weekend wish me luck with all the wires, if I have any issues come up or questions I’ll hit you guys up

    CB4D975B-FFAC-4E92-A883-AAA948386AC9.jpg
     
    sentientprogram likes this.
  13. Sep 18, 2020 at 2:02 PM
    #13
    Coma_Overload

    Coma_Overload Active Member

    Joined:
    Jul 9, 2020
    Member:
    #333958
    Messages:
    38
    Gender:
    Male
    Pensacola, Florida
    Vehicle:
    2013 Tacoma TRD Off Road 4x4
    Fender Flares, Bumper Light Bar, Ditch Lights, Auxbeam 8 Control Switch, TRD Pro Grille, RetraxMax Tonneau Cover, 35s, RTT, Yakima HD rack, Road Shower, Fuel/Water containers, MaxTrax, Wet Okole Seat Covers

    Good luck! Putting the rack together and install is kind of a pain. Just timely. Nothing difficult. Make sure you don’t over tighten the wind fairing like I did. I tightened it enough to move firmly from the center but remember, you will be raising and lowering it from the edges. So my word of advice, tighten it enough to where you can easily move it up and down from one end or the other. I didn’t realize how tight I had it until I installed it and it’s impossible to adjust once installed unless you unassembled it.

    Also, the left side of my fairing rubs like crazy and is extremely difficult to raise and lower due to it binding on the rack. Not sure if this is manufacture error or install error. Might have happened when centering on my roof. Just be cautious of that. Try to work all the bugs out on the ground during install.
     

    Attached Files:

Products Discussed in

To Top