

-
Welcome to Tacoma World!
You are currently viewing as a guest! To get full-access, you need to register for a FREE account.
As a registered member, you’ll be able to:- Participate in all Tacoma discussion topics
- Communicate privately with other Tacoma owners from around the world
- Post your own photos in our Members Gallery
- Access all special features of the site
 FS: Kicker Tweeter Upgrade
 FS (SoCal): Partout Prinsu, Magnuson Supercharger, Retrofit Headlights, More
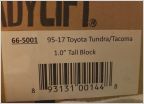 1" Rear block lift
 Switch Pro SP-9100
 [RI] For Sale: 2x 1/4" Tacoma lean spacers
3rd Gen Tacoma Power Folding Mirrors
Discussion in '3rd Gen Tacoma Parts Marketplace (2016-2023)' started by KTJO 4x4, Mar 2, 2019.
- Thread Status:
- Not open for further replies.
Page 42 of 47
Page 42 of 47
- Thread Status:
- Not open for further replies.

