1. Welcome to Tacoma World!

    You are currently viewing as a guest! To get full-access, you need to register for a FREE account.

    As a registered member, you’ll be able to:
    • Participate in all Tacoma discussion topics
    • Communicate privately with other Tacoma owners from around the world
    • Post your own photos in our Members Gallery
    • Access all special features of the site
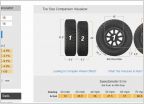
~$60 INboard air with optional automatic deflation and inflation

Discussion in 'Wheels & Tires' started by trdo-r, Jul 14, 2022.

  1. Jul 14, 2022 at 3:12 PM
    #1
    trdo-r

    trdo-r [OP] Well-Known Member

    Joined:
    Apr 24, 2020
    Member:
    #325671
    Messages:
    137
    Gender:
    Male
    Vehicle:
    17 TRD Off-Road
    This is a write up for a truck mounted air distribution system designed to be as affordable and tough as possible. I need a way to equalize, air down, and air up without fuss. It's trivial to expand the system with gauges, permanent on board air, and tanks, but my needs don't call for any of that. I want to keep my Viair 85P portable and it has a trustworthy gauge so that saves a good bit of cost and leak potential. If the system suffers a complete failure I can still use the compressor on each tire at a time. I can also either pull close to others who need air or take the compressor to them.

    Knowing that all tires were equal when last topped up can help you monitor slow leaks and also allows you to steal some air from other tires to fill a low one in a pinch when a compressor is not available.

    I use the word "inboard" like a boat would and put all quantities in (parentheses), don't get uptight about it.

    DESIGN SCHEMATIC


    TIRES -white rectangle symbol-
    I designed for (4) tires but you can adjust as you like.


    INPUTS/OUTPUTS -red circle symbol-. My design includes (2) input/output locations. These can be mounted anywhere but I wanted (2) and prefer them at the front and near the rear. The rear location could be next to the trailer wire plugs but I'm installing mine in the left in-bed box. Eventually I will mount and power the compressor here in a relatively secure but easily removable way. I want (2) locations for flexibility like pulling up to my shop and topping up at the front, potentially safer air ups on the side of a highway, and when using the optional deflate/inflate process below.

    TOTAL REQUIRED QUANTITY (2)
    LINK FOR REFERENCE This link is for a (2) pack so only buy (1)
    LINK FOR REFERENCE This one is for a (10) pack so only buy (1)

    1/4" 50' AIR HOSE -green line-
    Any standard 1/4" air hose will work. Tacomas need a 50' length. This can be adjusted for other vehicles.


    TOTAL REQUIRED QUANTITY (1)
    LINK FOR REFERENCE This link is for 50' which will have some left over depending on how you route yours.

    BRASS 1/4" BARBED 4 WAY FITTING -white plus symbol-
    These include hose clamps which I highly recommend.


    TOTAL REQUIRED QUANTITY (2)
    LINK FOR REFERENCE This link is for quantity (2) so only buy (1)

    LOCKING AIR CHUCKS -blue "x" symbol-
    These are 1/4" barbed on one end and lock to standard Schrader valves.


    TOTAL REQUIRED QUANTITY (4)
    LINK FOR REFERENCE This link is for (2) so buy (2). Make sure you end up with (4) chucks.

    OPTIONAL DEFLATE/INFLATE
    This part is pretty exciting. The auto deflators you can preset look like a nice option but it seems difficult to get them all set the same. Worry no more! With this setup you can set (1) for normal highway pressure, (1) one for standard air down, (1) for extra low air down, (1) for front air down and (1) for rear air down, etc. as you like. Most kits come in packs of (4) so you have (4) options without having to adjust presets. This system automatically equalizes your pressures so you can use a single air down tool to make them all the same OR you could chuck (2) tires at a time and use the respective air down tool for e.g. front vs rear. When it's time to air up you install the air down tool preset for highway pressure on either input/output valve and put air into the other. When the air down tool starts dumping air you just turn off the compressor, remove the air town tool, and you're done! That airs up all tires at once to the same pressure with no risk of over pressure.

    REFERENCE LINK These are 6-30PSI which won't work for all tires' highway pressures. I'm planning to swap to pizza cutters soon at 45PSI but for airing down these should work great.

    INSTALL PICS
    I haven't installed this yet so good luck.
    :anonymous:
    This is an idea I want to have worked out but can't yet spend anything on due to other projects and home improvement.

    One obvious item not addressed is how to store the chuck ends when not in use. My plan is to cable manage everything cleanly and the last couple of feet will be held to the frame or body using bailing wire until I find a nice metal clip.

    ALTERNATE IDEAS:
    - Additional chuck for helping others. You may prefer to have a universal chuck on a long hose for this one.

    - If you don't want multiple inputs/outputs you can replace either of the 4 way brass pieces with a 3 way tee and remove (1) set of input/output hardware.

    - With a small adjustment to the hardware you can use the existing terminations on the linked air hose. Amazon isn't the best source for these components but I chose it for accessibility to the masses. In Amazon's context it costs about the same to buy (1) as to buy many so this isn't much of a cost savings unless you're willing to use a little brain and shop elsewhere.

    - It may be possible to simplify the design and slightly lower cost by replacing the input/outputs with short "valve extension" hoses. I can't find any that state the ID of the hose so they may or may not work.

    - Add pressure switches and lights so you know you're at various target pressures.

    - Add additional chucks in the bed for bike tires.

    - On board water tanks.

    - Air tools if you have a tank.

    - Snow blower if you have a tank.

    Thanks for reading and please give helpful feedback on anything I missed or could do better. If anyone knows of a reasonably priced Schrader valve to 1/4" barbed adapter let me know.

    I would especially like to see install pics if others beat me to it. :boink:
     
To Top