

-
Welcome to Tacoma World!
You are currently viewing as a guest! To get full-access, you need to register for a FREE account.
As a registered member, you’ll be able to:- Participate in all Tacoma discussion topics
- Communicate privately with other Tacoma owners from around the world
- Post your own photos in our Members Gallery
- Access all special features of the site
 Recovery points
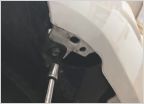 Front Body Mount Noise Fix - That noise may not be your leaf springs
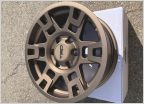 Anyone running the new(ish) bronze 4Runner wheels?
 Correct Bilstein 5100 part number for 2016-2018
 Rear Diff oil, Synthetic or conventional?
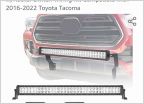 Dasen led light bar
Archive Hanger Install Assistance/Motivation
Discussion in '3rd Gen. Tacomas (2016-2023)' started by CAG Gonzo, Apr 5, 2020.
Page 4 of 5
Page 4 of 5


