

-
Welcome to Tacoma World!
You are currently viewing as a guest! To get full-access, you need to register for a FREE account.
As a registered member, you’ll be able to:- Participate in all Tacoma discussion topics
- Communicate privately with other Tacoma owners from around the world
- Post your own photos in our Members Gallery
- Access all special features of the site
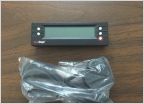 FS/FT: Scangauge II/27W LED squares
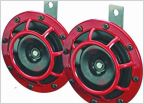 Floor mats, horns, tie-down loop
 SOLD: Brand New OME Lift - $750
 ATO Hi-Lift Mount, TRD Air Filter, Spare Tire Lock
BenWA's 2005+ Power Sliding Rear Window Quick Install Kit
Discussion in '2nd Gen Tacoma Parts Marketplace (2005-2015)' started by BenWA, Aug 13, 2011.
Page 62 of 92
Page 62 of 92

