1. Welcome to Tacoma World!

    You are currently viewing as a guest! To get full-access, you need to register for a FREE account.

    As a registered member, you’ll be able to:
    • Participate in all Tacoma discussion topics
    • Communicate privately with other Tacoma owners from around the world
    • Post your own photos in our Members Gallery
    • Access all special features of the site

Blower High Speed Relay Mod (Prevent Blower Switch Failure)

Discussion in '2nd Gen. Tacomas (2005-2015)' started by Dm93, Mar 11, 2024.

  1. Mar 11, 2024 at 8:43 PM
    #1
    Dm93

    Dm93 [OP] Test Don't Guess

    Joined:
    Mar 3, 2015
    Member:
    #150066
    Messages:
    12,710
    Gender:
    Male
    Texas
    Vehicle:
    2014 DC OR 6spd 4x4
    Predator tube steps, Ranch Hand grill guard, Magnaflow CatBack exhaust, Toyota tool box & bed mat, 2LO Module by @Up2NoGood, Rearview Compass/Temp Mirror, Tune by @JustDSM.
    Having found my blower switch is starting to show signs of the high speed terminal getting hot I've come up with a mod to prevent this common issue of the blower switch melting the terminal for the high blower speed by running the ground through a relay directly to ground instead of through the switch.

    On high the blower draws around 18-20 amps which is alot to run through a small switch.

    Example of what early signs of the switch overheating look like:
    20240309_085247.jpg

    20240309_085234.jpg

    Do this mod at your own risk, if you mis-wire something or use inferior parts you could damage something or end up with some melted wires.

    This mod will not address the issue of the blower resistor and/or blower motor connector melting but those are relatively inexpensive and easy fixes should they be needed whereas the switch and it's pigtail are not easy to get or cheap.

    Time required: 1-2 hrs

    Tools Needed:

    10mm socket & ratchet or 10mm wrench
    Wire cutter
    Wire stripper
    Crimping tool
    Very small flat blade screwdriver
    Butane lighter or other heat source
    Cap light or other light source (optional)
    Soldering iron (optional)

    Supplies Needed:

    Electrical tape
    A few zip ties
    3x 12-10 Ga (Yellow) Butt connectors (preferably heat seal type) or solder and heat shrink if you prefer to solder
    1x 12-10 Ga (Yellow) 1/4 in ring terminal
    A couple pieces of heat shrink (one aprox 5/16 in dia and one aprox 3/16 in dia)
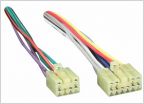
    1x 5 pin relay connector with 12 Ga wires (Standard Motor Products HP3810 or equivalent)
    1x 5 pin 30A Bosch style relay (Standard Motor Products RY116T or equivalent)


    Start by removing the glovebox and floor duct to the left of the glovebox for visibility, the vent can be a bit tricky to remove but a little wiggling gets it free.
    [​IMG]


    Unplug the blower & resistor (circled in red), remove the wire from the white clip (circled in green) by unlatching it, and remove the black wire retainer (circled in orange) by pressing the tabs in with a screwdriver or other suitable tool.

    Blower Connectors Edit.jpg


    Untape the section of blower and resistor harness circled in red (you may want to wear some gloves to do this as the tape Toyota uses is very sticky and gooey).

    Blower harness edit.jpg


    Cut the White/Blue wire that goes to the blower resistor near the spot shown.

    20240311_182955.jpg


    Slide the small piece of heat shrink over the wire on dash harness side and use your heat source to shrink it then pinch the end shut while it's still warm to seal it.

    20240311_183125.jpg


    Here's the relay connector for reference, the pins are also labeled on most Bosch style relays.
    The wire colors I'll be using match the connector I have but wire colors may vary so be sure your using the right pin on your relay.

    Relay Connector.jpg


    Crimp the ring terminal onto Pin 87 (Yellow) of the relay connector and attach it to the stud behind the upper right corner of the glovebox as shown.

    20240311_191246.jpg


    Using a butt connector connect Pin 87a (Orange) of the relay to the White/Blue wire coming from the blower resistor and seal it (always make sure to give butt connectors a good tug after you crimp them but before you seal them to make sure the crimp is good and the wire doesn't pull out).

    20240311_183444.jpg


    Cut the White/Blue wire about 2 inches from the blower connector.

    Connect the end coming from the dash side of the harness to Pin 85 (Blue) of the relay connector.

    20240311_183803.jpg


    Connect the White/Blue wire at the blower connector to Pin 30 (Red) of the relay connector.

    Using a small screwdriver carefully pry out the latch on the blower connector.

    20240311_190004.jpg


    Using a mini screwdriver or other suitable tool carefully push back the tab (circled in red) to release the Black/Yellow wire terminal from the connector.

    Blower Connector edit.jpg


    Carefully strip a small section of insulation off of the Black/Yellow wire (take care to not cut any strands of the wire) a couple inches away from the blower connector and connect Pin 86 (Green) of the relay connector to the Black/Yellow wire as shown. I soldered mine but it would probably be fine without it as the relay draws very low current.

    20240311_185318.jpg


    Slide the larger piece of heatshrink over the wires and seal it. Re-install the pin into the connector and insert the latch, it should look like this when you are done.

    20240311_190034.jpg


    Plug your blower motor and resistor back in and test everything, if it's good then re-tape all the wiring and put it back in the proper places.

    20240311_191225.jpg


    Tuck the relay up next to the harness by the PCM and secure it with a zip tie.

    20240311_191250.jpg


    Re-install the floor duct & glovebox and your done, now when the blower switch is on high ground will be supplied through the relay instead of the switch.


    Here's a wiring diagram of the mod.

    Blower High Speed Relay Mod Wiring.jpg
     
  2. Mar 11, 2024 at 8:50 PM
    #2
    TnShooter

    TnShooter The TacomaWorld Stray

    Joined:
    Sep 2, 2010
    Member:
    #42625
    Messages:
    20,865
    Gender:
    Male
    First Name:
    Deogee
    Vehicle:
    07' TRD Off-Road, Auto
    STOCK
    Nice work.

    Thanks for the excellent DIY :thumbsup:
     
    Dm93[OP] likes this.
  3. Mar 13, 2024 at 9:34 AM
    #3
    Jimmyh

    Jimmyh Well-Known Member

    Joined:
    May 16, 2012
    Member:
    #78991
    Messages:
    14,203
    Gender:
    Male
    SC
    Vehicle:
    2012 Prerunner SR5

    Ditto. !!!
     
    TnShooter[QUOTED] likes this.
  4. Jun 8, 2024 at 2:22 PM
    #4
    maineah

    maineah Well-Known Member

    Joined:
    Mar 24, 2011
    Member:
    #53641
    Messages:
    6,776
    Gender:
    Male
    First Name:
    Tim
    Maine
    Vehicle:
    4X4 SR5 V6 6spd
    The burnt connectors are from a weak connection it's not caused by the blower. With the industry trying to save money cheap and easy to install and plug in it's not just a Tacoma issue. In the winter more than anything my heater is on full speed ahead kind ah gets that way up north. The various speeds are controlled by the resistors for each speed, the resistor resistance is what lowers the speed, the greater the resistance the slower the speed.
     
    caribe makaira likes this.

Products Discussed in

To Top