

-
Welcome to Tacoma World!
You are currently viewing as a guest! To get full-access, you need to register for a FREE account.
As a registered member, you’ll be able to:- Participate in all Tacoma discussion topics
- Communicate privately with other Tacoma owners from around the world
- Post your own photos in our Members Gallery
- Access all special features of the site
 Sun visor won't stay flush
 Winterizing Mods for 2nd Gen
 2006 Tacoma 4.0 V6 what head bolts to use
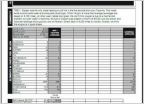 Blackstone Oil Report - 4.0L Penn Plat. 5w-30
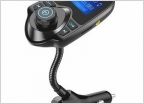 Hmmm, Stereo and/or Driving light upgrade?
 Scuff panel removal
Body Lift
Discussion in '2nd Gen. Tacomas (2005-2015)' started by LAMCKMA007, Nov 17, 2019.
- Thread Status:
- Not open for further replies.
Page 1 of 2
Page 1 of 2
- Thread Status:
- Not open for further replies.


