1. Welcome to Tacoma World!

    You are currently viewing as a guest! To get full-access, you need to register for a FREE account.

    As a registered member, you’ll be able to:
    • Participate in all Tacoma discussion topics
    • Communicate privately with other Tacoma owners from around the world
    • Post your own photos in our Members Gallery
    • Access all special features of the site

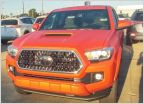
Build Write Up... 33's on Fox 2.5's in front & Fox 2.0's in back w/ Icon 1.5" AAL

Discussion in '3rd Gen. Tacomas (2016-2023)' started by wretnuh, Oct 9, 2023.

  1. Oct 9, 2023 at 2:28 AM
    #1
    wretnuh

    wretnuh [OP] Member

    Joined:
    Sep 6, 2023
    Member:
    #432951
    Messages:
    9
    Gender:
    Male
    Purpose of this post:
    For people like me that have a stock 3rd gen DCSD (dual cab standard bed) and are looking to fit 33's with Fox's and have 100's of questions. It was overwhelming for me when I first started to look into this, and I am hoping that this post will, at the very least, help 1 person and answer some of their questions. Please take everything I say with a grain of salt as YMMV & I am by no means a trained professional. This is my first time installing any type of suspension, and all of my knowledge (or lack thereof) comes from here (TW) & YouTube.

    Build specs:
    285/70/17 BFG KO2's
    Black Rhino Shogun 17x8.5 -10mm offset 4.36" backspacing
    Fox 2.5's w/ non-adjustable reservoirs up front
    Fox 2.0's w/ non-adjustable reservoirs in back
    Icon 1.5" AAL
    JBA high caster UCA's (non-heavy duty)

    Mentality behind doing the install myself:
    1. I wanted the challenge.
    2. I don't trust anyone when it comes to me & my families safety. Suspension upgrades, when failing, can be catastrophic. Being that this is my daily, and often times I have me, my S/O, and my two kids in the truck with me, I wasn't going to let some kid that graduated high school last year that doesn't give two ****'s be in control of our livelihood. This is not meant as a slight on any specific shops/shop tech's, but instead, personal accountability.
    3. No one will care as much about the torque specs, painting exposed metal, and the overall outcome of the install itself as much as you will. Hate to be cliche, but if you want it done right, you have to do it yourself.

    Install/build notes:
    1. Yes, you can fit 33's w/ a 2" lift, but do expect to cut some fenders &/or have a shop do a cab mount chop (CMC). The backspacing & offset of your wheels is critical. Sticking to +-10MM offset should give you the appropriate amount of backspacing, but be sure to check your UCA companies recommended specs before purchasing your wheels.
    2. The UCA upgrade will be one of the most annoying aspects of the install due to extracting and reinstallation of the through bolt. Some will suggest cutting the bolt and installing a new one from the rear side, but the critics of that method claim that in the event that the nut does come loose, gravity will cause your through bolt to fall out and that would be very, very bad. So, to be safe, stick to installing it as you found it.
    3. Follow the Fox application guide for actual lift height, not what vendors claim that you can achieve w/ specific suspension kits. This is due to most vendors listing their suspension kits as "'05+" when really the 3rd gen Tacoma's are already an inch higher than the 2nd gen's. This leads to some sites claiming that you can get 3" (bc you can get 3" w/ a 2nd gen) out of a lift kit when in reality you will only be able to get 2" on a 3rd gen.
    4. Purchase an angle grinder, you're going to need it for the AAL & for the respective trimming of your fenders post-install. Also, you're going to need a heat gun to push back some of the wheel well as well.
    5. Ensure you have all your torque specs figured out before the install.
    6. Have some black spray paint at hand so that you can spray any bare metal that you may expose. For me & my install, this came in handy when installing the AAL & the UCA after having to bend some of the fenders to get the through bolt out.
    7. An extra set of hands is not required, but would come in handy in a few parts of the install.
    8. Start with the rear, then move on to the front. The rear side is much easier than the front and will instill the appropriate level of confidence needed to begin the front side.
    9. To address the notorious "taco lean", adjust your driver side coil overs to have 5 threads more showing than your passenger side. This, in my application, was enough to level out the front side.
    10. I did adjust the preload of the CO's myself with some "heavy duty" spring compressors off of Amazon. While I was successful in doing this myself, I would advise against it. All of my preload adjustments were made off-truck pre-install.
    11. 21 threads showing on my driver side CO, 16 showing on my passenger side.
    12. Youtube all steps of your install before beginning to ensure that your have the appropriate tools. The extra tools that I ended up having to purchase after beginning my install were a torque wrench that went up to 120 ft. lbs (for AAL U-bolts), an extra deep 22mm socket (for AAL U-bolt nuts), & a 22mm wrench (for JBA ball joint as you must hold it with pliers of some sort when tightening). Other than those, it's just tools that any respectable garage should already have.
    13. Supposedly you can in fact fit a 33" spare under the bed, but this is something that I have yet to attempt to do myself. I plan on doing this sometime soon.
    14. After having completed the install, get your alignment done by a shop that deals with lifted trucks. I have read stories of others that have taken it to a regular old franchised tire shops and have had a terrible experience. So, to save yourself having to get your alignment done more than once ($$), just take it to a shop that knows what they are doing. If your UCA's came with an alignment print out for the tech to follow, be sure to bring that with you to show to the shop.
    15. Use loctite. Failure is not an option on these components as it could end up being catastrophic & potentially lethal.
    16. Mark your bolts/nuts/etc. with a paint pen so that you are able to visually check them for your first few hundred miles in case they come loose.
    17. Re-tighten everything (even if they don't look like they came loose) after a few hundred miles post install.
    18. While measuring your trucks total lift right after completing your install is probably going to be one of the first things you're going to want to do, don't. Drive it around for a few miles first, it is going to settle and lower a considerable amount (as a matter of fact, I am not even sure if my suspension is done settling yet).

    Pre-install measurements:
    Center of wheel to fender:
    Driver front: 20.25"
    Driver rear: 21.25"
    Passenger front: 20.25"
    Passenger rear: 21.25"

    Ground to fender:
    Driver front: 34.25"
    Driver rear: 34.9"
    Passenger front: 34.25"
    Passenger rear: 34.9"

    Post-install measurements:
    Center of wheel to fender:
    Driver front: 21.75"
    Driver rear: 22.5"
    Passenger front: 21.75"
    Passenger rear: 22.5"

    Ground to fender:
    Driver front: 37.5"
    Driver rear: 38.75"
    Passenger front: 37.5"
    Passenger rear: 38.75"

    Disclosures:
    1. I have only just barely finished my install and have only driven <100 miles on it. It may all fall apart tomorrow, but after having done the install myself, I am confident that I have torqued everything down according to the manufacturers torque recommendations and therefor should not encounter any type of failures outside of manufacturing issues.
    2. I have not yet gotten my alignment done, but (amazingly) it drives better than it did pre-install. This is not to say that I am not going to get an alignment done, but none of the shops that I will take it too have had an opening for me to take it in yet. Will be getting it done this week.

    Let me know if you have any questions and I will try my best to answer them. But again, I am just a beginner in this whole aftermarket suspension world...

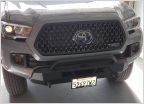
    IMG_3151.jpg
     
  2. Oct 9, 2023 at 3:54 AM
    #2
    OBXPaul

    OBXPaul Just do what you say you're going to do!

    Joined:
    Mar 22, 2016
    Member:
    #182025
    Messages:
    532
    Gender:
    Male
    First Name:
    Paul
    Kill Devil Hills, NC (Outer Banks)
    Vehicle:
    2016 Black Tacoma Limited, 1983 Blue Deluxe Pickup
    1983 restoration in progress, major mods so far new 6" lift and 35" Mickey Thompsons.
    Thanks for the write up, very thorough and detailed, I'm sure it will help many others.
     
    wretnuh[OP] likes this.
  3. Nov 17, 2023 at 7:45 PM
    #3
    GunSlinger116

    GunSlinger116 Well-Known Member

    Joined:
    Nov 21, 2022
    Member:
    #411199
    Messages:
    97
    Gender:
    Male
    Vehicle:
    Metallic Grey Tacoma
    Truck turned out great man! Nice work and solid write up.
     
    wretnuh[OP] likes this.

Products Discussed in

To Top