1. Welcome to Tacoma World!

    You are currently viewing as a guest! To get full-access, you need to register for a FREE account.

    As a registered member, you’ll be able to:
    • Participate in all Tacoma discussion topics
    • Communicate privately with other Tacoma owners from around the world
    • Post your own photos in our Members Gallery
    • Access all special features of the site

Can I wire 3 pressure switches to one circuit?

Discussion in 'Lighting' started by locster, Jan 14, 2018.

  1. Jan 14, 2018 at 8:17 PM
    #1
    locster

    locster [OP] Well-Known Member

    Joined:
    Jul 10, 2014
    Member:
    #133656
    Messages:
    980
    Gender:
    Male
    First Name:
    Luke
    Orange County, CA
    Vehicle:
    2014 DCSB 4x4
    I have an LED strip in my camper shell and want to control it with 3 pressure switches, one at each window. Can that be done? What would the wiring diagram look like?
     
  2. Jan 14, 2018 at 8:45 PM
    #2
    joes06tacoma

    joes06tacoma Well-Known Member

    Joined:
    Jan 1, 2010
    Member:
    #28588
    Messages:
    3,183
    Gender:
    Male
    First Name:
    Joe
    Central Coast, CA
    Vehicle:
    06 4x4 Off Road Access Cab v6 6spd
    LEER Shell with dome lights operated with 3 way switches, aux backup lights with relay and 3 position switch, modified wiring to compass/temp display and clock to include switch that disables dimming function (poor man's DRL solution), Scan Gauge 2
    So if you open any one door the lights come on? And if you close them all the lights go off? Or is it more complex than that?
     
  3. Jan 14, 2018 at 8:57 PM
    #3
    locster

    locster [OP] Well-Known Member

    Joined:
    Jul 10, 2014
    Member:
    #133656
    Messages:
    980
    Gender:
    Male
    First Name:
    Luke
    Orange County, CA
    Vehicle:
    2014 DCSB 4x4
    On when any door is opened, off when all are closed.
     
  4. Jan 14, 2018 at 9:03 PM
    #4
    bjmoose

    bjmoose Bullwinkle J. Moose

    Joined:
    Aug 31, 2010
    Member:
    #42529
    Messages:
    6,009
    Gender:
    Male
    First Name:
    Steve
    San Jose CA
    Vehicle:
    '11 Std Cab 4x4 5sp
    OME suspension, ARB Air Lockers, CBI/Relentless/Pelfrey armor, HAM radio
    Start with 12v positive.
    Go thru fuse.
    Terminate at your LED light.

    Don't ground yet.

    Now, create three separate ground wires, in parallel, from the negative terminal of the LED light.

    Put a pressure switch in each of them.

    Terminate each of those at ground.

    Clicking any switch completes the circuit. But having more than one switch open doesn't create any problems.
     
    locster[OP] likes this.
  5. Jan 14, 2018 at 9:05 PM
    #5
    joes06tacoma

    joes06tacoma Well-Known Member

    Joined:
    Jan 1, 2010
    Member:
    #28588
    Messages:
    3,183
    Gender:
    Male
    First Name:
    Joe
    Central Coast, CA
    Vehicle:
    06 4x4 Off Road Access Cab v6 6spd
    LEER Shell with dome lights operated with 3 way switches, aux backup lights with relay and 3 position switch, modified wiring to compass/temp display and clock to include switch that disables dimming function (poor man's DRL solution), Scan Gauge 2
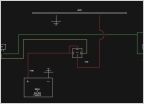
    I'm no good at drawing wiring schematics, but found this online. L1 would be battery positive, L2 would be ground, put your lights in place of "siren" and it should work as you describe. Should also have a fuse in the battery positive wire, as close to battery as possible.


    [​IMG]
     
    locster[OP] likes this.
  6. Jan 14, 2018 at 9:06 PM
    #6
    joes06tacoma

    joes06tacoma Well-Known Member

    Joined:
    Jan 1, 2010
    Member:
    #28588
    Messages:
    3,183
    Gender:
    Male
    First Name:
    Joe
    Central Coast, CA
    Vehicle:
    06 4x4 Off Road Access Cab v6 6spd
    LEER Shell with dome lights operated with 3 way switches, aux backup lights with relay and 3 position switch, modified wiring to compass/temp display and clock to include switch that disables dimming function (poor man's DRL solution), Scan Gauge 2
    This is a better way of doing it. Putting the switch on the ground side means less wire to run.
     
    VE7OSR likes this.
  7. Jan 14, 2018 at 9:11 PM
    #7
    VE7OSR

    VE7OSR нет войне

    Joined:
    Dec 12, 2011
    Member:
    #68608
    Messages:
    5,798
    Gender:
    Male
    First Name:
    Rob II
    Okanagan, Canada
    Vehicle:
    05 DCLB TRD Sport
    Armour: All-Pro Skid plates - IFS, transmission, and transfer case. Pelfreybilt rear standard plate bumper, Metal Tech Sliders w/ kickout and dimple die filler plates. Front Suspension: OME 885 + NitroCharger 9000 shocks + 1/2" spacers for a 3" lift. Superbumps replacing stock bumpstops. Camburg ball joint UCA SS braid brake lines Future: ADS Extended length, extended length UCA BJ to increase droop capability Rear Suspension: All-Pro Expedition rear leafs, Walker Evans 27" rear shocks, extended rear brake lines (Wheelers Offroad), U -bolt flip kit, rear Timbren bumpstops. Future: Hammer Hangers, Shock relocate, ADS 12" or 14" shock. Interior: Weatherteck floor liners - front, Wet Okoles- front, ScanGauge, LED interior & map lights. Power moonroof. Exterior: Raider Cobra canopy, retrofit headlight by Insight, LED bulbs all around, modified flasher unit for LEDs. Rear diff breather mod. Front diff vibe problem, driver's side needle bearing replaced with ECGS bushing. yet to install: HID Blazer Fog Retrofit, LED Flood & Spot, + switches, fuse panel. swaybar relocate blocks (build my own)
    except the metal frame of each window in a canopy/ camper shell may not be grounded because the canopy is typically fiberglass, so you would still need the ground wire to each window.
     
    joes06tacoma likes this.
  8. Jan 14, 2018 at 11:44 PM
    #8
    locster

    locster [OP] Well-Known Member

    Joined:
    Jul 10, 2014
    Member:
    #133656
    Messages:
    980
    Gender:
    Male
    First Name:
    Luke
    Orange County, CA
    Vehicle:
    2014 DCSB 4x4
    Thank you gentlemen. I will give this a shot.
     

Products Discussed in

To Top