

-
Welcome to Tacoma World!
You are currently viewing as a guest! To get full-access, you need to register for a FREE account.
As a registered member, you’ll be able to:- Participate in all Tacoma discussion topics
- Communicate privately with other Tacoma owners from around the world
- Post your own photos in our Members Gallery
- Access all special features of the site
 Any interest in a dash cam group buy?
 I need some Odyssey batteries and a Switch Pro 9100
 Vantrue N3 Touch Screen Dual Dash Cam Group Buy
 Spiker Engineering Ultimate Lift Hood Strut Black Friday Sale!
 **CLOSED**Magnaflow - Group Buy**
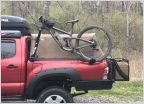 *Feeler* 3rd Gen SideRide Bike Mounts
CLOSED - The Retrofit Source GB
Discussion in 'Automotive Group Buys' started by TRSAndrew, Feb 11, 2013.
Page 46 of 290
Page 46 of 290


