

-
Welcome to Tacoma World!
You are currently viewing as a guest! To get full-access, you need to register for a FREE account.
As a registered member, you’ll be able to:- Participate in all Tacoma discussion topics
- Communicate privately with other Tacoma owners from around the world
- Post your own photos in our Members Gallery
- Access all special features of the site
 Fast Charging adapters
 Mud flaps for offset tires
 [Help] Aftermarket Wheel Lugs
 Need Some help deciding on the First two mods to my Tacoma OR
 DIY glove box organizer + interior must haves
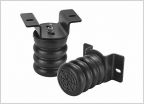 Air bags for my 2018 off road? Yes? No?
Dobinsons 2016-2023 Taco Suspension Options
Discussion in '3rd Gen. Tacomas (2016-2023)' started by Crikeymike, Feb 7, 2017.
Page 31 of 95
Page 31 of 95
Products Discussed in


