

-
Welcome to Tacoma World!
You are currently viewing as a guest! To get full-access, you need to register for a FREE account.
As a registered member, you’ll be able to:- Participate in all Tacoma discussion topics
- Communicate privately with other Tacoma owners from around the world
- Post your own photos in our Members Gallery
- Access all special features of the site
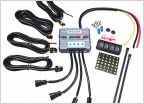 Wireless accessories controller
 Navigation map update
 Highbeam Upgrade
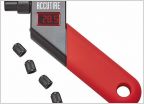 TPMS vs Manual Air Pressure Gauge
 Anyone seen Valve Cover Oil Cap Breather that are made for Toyota Trucks?
 My first "mods" after buying a 3rd gen
Dual Battery set up, Offgrid-engineering, Adventure Ready or ???
Discussion in '3rd Gen. Tacomas (2016-2023)' started by YOTA 4X4, Feb 27, 2018.
Page 9 of 9
Page 9 of 9

