1. Welcome to Tacoma World!

    You are currently viewing as a guest! To get full-access, you need to register for a FREE account.

    As a registered member, you’ll be able to:
    • Participate in all Tacoma discussion topics
    • Communicate privately with other Tacoma owners from around the world
    • Post your own photos in our Members Gallery
    • Access all special features of the site

Dusty's Old Guy Build - 2014 Extended Cab

Discussion in '2nd Gen. Builds (2005-2015)' started by Dusty1, Jan 25, 2016.

  1. Jan 25, 2016 at 10:03 AM
    #1
    Dusty1

    Dusty1 [OP] Member

    Joined:
    Jun 8, 2014
    Member:
    #131509
    Messages:
    13
    Gender:
    Male
    First Name:
    Greg
    So Cal
    Vehicle:
    2014 4X4 Access Cab
    Shell, Storage Boxes
    This is my first post to this forum. I am a retired engineer on my 3rd Toyota truck. (maybe we should start a geezers group?) My first was in '74, a used Hilux. Sold it to my brother at about 100,000 miles, he put another 100,000 on it. My second was a new Tacoma in '82. Put about 120,000 on it before I had to upgrade (downgrade ?) to a family van. This is about my new 2014 Tacoma 4X4. Being retired (and the genetic defect of being an engineer) I have plenty of time to work on the truck. I love getting out in the desert and exploring/camping, so this is no Mall Crawler. I don't mind it looking pretty, but nothing goes on unless it is useful and necessary.
    As Purchased 1.jpg
    As Purchased 2.jpg

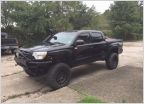
    This is as purchased. Not the fanciest model available, but not the lowest either. It took about 5 months to find a 4X4 Extended Cab in Brown. Probably less than 2 or 3 percent of production. Most in this area are white double cabs. (probably to compete against SUV market)
    Tacoma 2.jpg
    Tacoma 1.jpg
    Tacoma Rear.jpg
    I added a SnugTop (I like the way it integrates with the look of the vehicle). It has the roof rack option, so I can add the rack when I need it, but keep it clean when I don't. (improves gas mileage) I will detail the cab an bed changes in further posts.
     
    Last edited: Jan 25, 2016
    Nate87 likes this.
  2. Jan 25, 2016 at 10:13 AM
    #2
    Nate87

    Nate87 Well-Known Member

    Joined:
    May 7, 2013
    Member:
    #103748
    Messages:
    751
    Gender:
    Male
    First Name:
    Nate
    CONUS
    Vehicle:
    2013 AC TRD OR
    You are off to a good start! The AC pyrite mica is the best looking Tacoma! I also had to search around for about 3+ months to find mine. Worth the wait!
     
  3. Jan 25, 2016 at 11:31 AM
    #3
    Zac of all trades

    Zac of all trades FWP Fabrication Vendor

    Joined:
    Jun 9, 2015
    Member:
    #157073
    Messages:
    8,877
    Gender:
    Male
    First Name:
    Zac
    fwpfab.com
    Vehicle:
    2013 4x4 Locked DCLB
    886/5100s/AAL/UCAs/360 armor/RTT/295 17s
  4. Jan 25, 2016 at 12:53 PM
    #4
    Dusty1

    Dusty1 [OP] Member

    Joined:
    Jun 8, 2014
    Member:
    #131509
    Messages:
    13
    Gender:
    Male
    First Name:
    Greg
    So Cal
    Vehicle:
    2014 4X4 Access Cab
    Shell, Storage Boxes
    Maybe we should start a pyrite Mica AC thread? Can't be many of them out there.
    As you can see by the photos, I don't like a lot of advertising. The TRD decals were the first to go, then the chrome doodads on the tailgate. All that's left is the Tacoma on each door. I also stripped off the SnugTop logos. If anyone wants me to advertise their product, they can pay me.
     
    Zac of all trades likes this.
  5. Jan 25, 2016 at 12:58 PM
    #5
    vrod671

    vrod671 The Okayest Member

    Joined:
    Nov 25, 2012
    Member:
    #91817
    Messages:
    15,626
    Gender:
    Male
    First Name:
    Brandon
    Vehicle:
    2022 TRD Sport
    Stock
    welcome!
     
  6. Jan 25, 2016 at 2:31 PM
    #6
    Dusty1

    Dusty1 [OP] Member

    Joined:
    Jun 8, 2014
    Member:
    #131509
    Messages:
    13
    Gender:
    Male
    First Name:
    Greg
    So Cal
    Vehicle:
    2014 4X4 Access Cab
    Shell, Storage Boxes
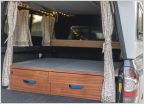
    Having the Engineer defect, I can't own something without disassembling it almost immediately. Being retired, I don't have a lot of people to drive around. (My wife has a car for that) I was more interested in having in cab storage more than back seats, but I wanted a 6 foot bed. Hence the Access Cab Choice. So the first thing to go was all the rear seat parts. (no better than a Mini rear seat) I stripped out everything that wasn't absolutely necessary. Including the seat belts. (anyone interested in buying the parts?) I enjoy woodworking, so what I made was this:Frame for storage 1.jpg
    Poplar is cheep and easy to work with. Using an industrial adhesive, I covered it with black carpet, and made some covers to go with it. This is how it turned out:

    Cab Storage 2.jpg

    Cab Storage 3.jpg

    Cab Storage 4.jpg
    As you can see, there is plenty of room to carry the stuff you should have with you, without having it rattling around underfoot. There is now plenty of room for Ice Chests, Totes etc on a nice flat cargo space. I realized that the D-Rings from the bed area have the same thread as the seat belt bolts, so I ordered some extras and put them were the seat belt used to be. On the front of the box, I bolted down some Tie Down Strip. There is now plenty of ways to tie cargo down for those rough and rocky trips.D Ring 1.jpg

    D Ring 2.jpg

    Cab Storage Detail 2.jpg
    That's enough for now! More later.

    Cab Storage Detail 1.jpg
     
  7. Jan 25, 2016 at 2:33 PM
    #7
    vrod671

    vrod671 The Okayest Member

    Joined:
    Nov 25, 2012
    Member:
    #91817
    Messages:
    15,626
    Gender:
    Male
    First Name:
    Brandon
    Vehicle:
    2022 TRD Sport
    Stock
    great use of space :thumbsup:
     
  8. Jan 25, 2016 at 3:02 PM
    #8
    Zac of all trades

    Zac of all trades FWP Fabrication Vendor

    Joined:
    Jun 9, 2015
    Member:
    #157073
    Messages:
    8,877
    Gender:
    Male
    First Name:
    Zac
    fwpfab.com
    Vehicle:
    2013 4x4 Locked DCLB
    886/5100s/AAL/UCAs/360 armor/RTT/295 17s
    Yeah I like what you did there! And good to know about the d-rings and seat belts being the same thread.
     
  9. Jan 30, 2016 at 2:35 PM
    #9
    Dusty1

    Dusty1 [OP] Member

    Joined:
    Jun 8, 2014
    Member:
    #131509
    Messages:
    13
    Gender:
    Male
    First Name:
    Greg
    So Cal
    Vehicle:
    2014 4X4 Access Cab
    Shell, Storage Boxes
    I hat stuff rattling around in the truck. It sounds bad, makes it hard to find, and can cause a lot of wear. Here is a cute trick I came up with:Box in place.jpg
    I keep a tote behind the back seat to throw stuff in I may need that trip. However, I hated having it slide around. So I attached the self stick hook side of velcro on the bottom 4 corners:
    Tote Box 1.jpg
    Now it stays where I put it and won't slide around. However, with a gentle pull, it comes right out. The velcro is available in most hardware stores!
     
    DrFunker and vistacruiser like this.
  10. Feb 10, 2016 at 10:16 AM
    #10
    vistacruiser

    vistacruiser New Member

    Joined:
    Feb 9, 2016
    Member:
    #177650
    Messages:
    1
    Gender:
    Male
    First Name:
    Joe
    Vehicle:
    2012 TRD Off Road DCSB
    Love the cubbies behind the seat. Looks awesome.
     
  11. Apr 15, 2016 at 2:10 AM
    #11
    DrFunker

    DrFunker Well-Known Member

    Joined:
    Feb 3, 2014
    Member:
    #122158
    Messages:
    42,919
    Hi Greg @Dusty1 . What is the awning set up you are using?
     
  12. Apr 15, 2016 at 2:14 AM
    #12
    jwctaco

    jwctaco Retired, going slow in the fast lane

    Joined:
    Sep 5, 2015
    Member:
    #163478
    Messages:
    10,032
    Gender:
    Male
    First Name:
    Jim
    SW Michigan
    Vehicle:
    23’ T4R
    Nice job,great use of space.
     
    DrFunker likes this.
  13. Apr 15, 2016 at 7:00 AM
    #13
    Over da Hill

    Over da Hill "Roads...where we're going we don't need roads"

    Joined:
    Jan 2, 2015
    Member:
    #145416
    Messages:
    4,487
    Gender:
    Male
    First Name:
    Johnny
    SoCal
    Vehicle:
    15 Black Taco 4WD DC SB SC
    Supercharger, Icon stage 3 suspension, Pelfreybilt Armor, All-Pro Sliders & Leaf Pack, 17 inch Black Rhino Sidewinder wheels, 33 inch Toyo tires, Rigid Lighting, SPod,
    Looking good!
     
  14. Oct 29, 2016 at 5:11 PM
    #14
    Dusty1

    Dusty1 [OP] Member

    Joined:
    Jun 8, 2014
    Member:
    #131509
    Messages:
    13
    Gender:
    Male
    First Name:
    Greg
    So Cal
    Vehicle:
    2014 4X4 Access Cab
    Shell, Storage Boxes
    Mobtown 1.jpg Mobtown 2.jpg Mobtown 3.jpg Mobtown 4.jpg

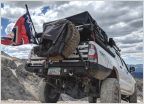
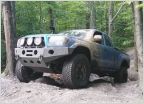
    I decided on the Mobtown Offroad recovery bar because it wasn't so in your face. If you leave all of the bumper cover intact, only then hitch receiver and shackle points are visible. However, I removed (with a hacksaw) the center portion of the cover and replaces it with a few pieces of steel which I fabricated. I removed all of he aluminum bumper parts which include supports for the bumper cover. Although I removed the center section, I had to make supports for the outboard corners of the cover and fender.
    I was impressed with the quality and sturdiness of the Mobtown part.
    In the third picture, you can still see the aluminum bumper (covered in black duct tape). I left it in place until I fabricated the steel parts.

    I also added a jumper connector wired directly to the battery.
     
  15. Oct 29, 2016 at 5:13 PM
    #15
    Dusty1

    Dusty1 [OP] Member

    Joined:
    Jun 8, 2014
    Member:
    #131509
    Messages:
    13
    Gender:
    Male
    First Name:
    Greg
    So Cal
    Vehicle:
    2014 4X4 Access Cab
    Shell, Storage Boxes
    Pismo Sand 3.jpg

    The part protruding from the bumper cover is a high amp switch for the jumper connector.
     
    jwctaco likes this.
  16. Oct 29, 2016 at 5:27 PM
    #16
    Dusty1

    Dusty1 [OP] Member

    Joined:
    Jun 8, 2014
    Member:
    #131509
    Messages:
    13
    Gender:
    Male
    First Name:
    Greg
    So Cal
    Vehicle:
    2014 4X4 Access Cab
    Shell, Storage Boxes
    Bed Left 1.jpg Bed Left 2.jpg Bed Left 3.jpg Bed Power Panel.jpg Bed Right 1.jpg

    These are a few pix of the interior of the Bed/Shell. All was made with aircraft ply covered in carpet. It was attached to the interior using threaded inserts in the fiberglass body of the truck bed. I will post more of the completed interior later.

    Bed Right 1.jpg
     
    jwctaco likes this.

Products Discussed in

To Top