1. Welcome to Tacoma World!

    You are currently viewing as a guest! To get full-access, you need to register for a FREE account.

    As a registered member, you’ll be able to:
    • Participate in all Tacoma discussion topics
    • Communicate privately with other Tacoma owners from around the world
    • Post your own photos in our Members Gallery
    • Access all special features of the site

Feeler: BHLM / Morimoto DS2 Projector / Clear Lens

Discussion in 'Buy / Sell / Trade' started by Muy Grande, Apr 21, 2011.

  1. May 1, 2011 at 5:48 PM
    #81
    Razorecko

    Razorecko Well-Known Member

    Joined:
    Jun 7, 2009
    Member:
    #18125
    Messages:
    1,692
    Gender:
    Male
    Vehicle:
    '09 Pyrite DCLB TRD Supercharged
    I just missed the delivery this saturday as I was out of the house. Going to pick them from the post office tomorrow morning. I'll post a pic up when I get them up. I'll have to post up a pic of the differece in beam strength going from ebay projector to an actual projector.
     
    This site contains affiliate links for which the site may be compensated.
    #81
  2. May 1, 2011 at 6:18 PM
    #82
    Muy Grande

    Muy Grande [OP] Well-Known Member

    Joined:
    Feb 26, 2009
    Member:
    #14111
    Messages:
    1,400
    Gender:
    Male
    First Name:
    John
    Dallas, TX; RGV, TX
    Vehicle:
    06 DC TRD
    Suspension: DHoes up front, Dakar and OME out back. Audio: Alpine w205 w/ pair of Alpine Amps, Image Dynamic 6.5 Component Speakers up front and Image Dynamic Subs in the Back. Armor: ARB Bull Bar, Rocktek rear bumper and custom rock sliders. Other: Rigid Industries LED Light Bar, Platinum DieHard Battery, BlueSea Fuse Block, rear lights, bed lights, leds inside.

    Sounds great, and let me know what you think about the work. I won't take it personal if you completely expected something else. Since I'm making a few more I wanna make sure I get this right. :D

    Remember you'll have to do a little bit of adjusting. But that's the easy part. And please keep some tape on the lights during the install, they can easily get scratched during the install on the bottom part of the bumper.
     
    This site contains affiliate links for which the site may be compensated.
    #82
  3. May 2, 2011 at 8:13 AM
    #83
    Razorecko

    Razorecko Well-Known Member

    Joined:
    Jun 7, 2009
    Member:
    #18125
    Messages:
    1,692
    Gender:
    Male
    Vehicle:
    '09 Pyrite DCLB TRD Supercharged
    Crap.

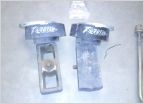
    Got the headlights, they look great...excepppptttttt..

    [​IMG]

    Now i have to unpeel the lense, Is it held togethor just by silicone ? Do i bake it in less heat since its silicone or is it the same 300F and than throw in for 10min ? lol, i hope i dont screw this up
     
  4. May 2, 2011 at 8:40 AM
    #84
    Muy Grande

    Muy Grande [OP] Well-Known Member

    Joined:
    Feb 26, 2009
    Member:
    #14111
    Messages:
    1,400
    Gender:
    Male
    First Name:
    John
    Dallas, TX; RGV, TX
    Vehicle:
    06 DC TRD
    Suspension: DHoes up front, Dakar and OME out back. Audio: Alpine w205 w/ pair of Alpine Amps, Image Dynamic 6.5 Component Speakers up front and Image Dynamic Subs in the Back. Armor: ARB Bull Bar, Rocktek rear bumper and custom rock sliders. Other: Rigid Industries LED Light Bar, Platinum DieHard Battery, BlueSea Fuse Block, rear lights, bed lights, leds inside.
    That is not good. Looks like it was banged around so much it made them loose. If you look closely the shroud has a black ring that just snaps into place. You can send it back to me and I'll paying shipping to and from and get it done or I can guide through the process. It's as easy as opening the headlight and snapping back on.

    Lesson learned here.....I will apply some glue to the inner rings so that this wont happen again.

    This really sucks. It takes alot to for those rings to come off because they snap in. Now I'm wondering if maybe it broke the ring during shipping. :(
     
  5. May 2, 2011 at 8:42 AM
    #85
    Muy Grande

    Muy Grande [OP] Well-Known Member

    Joined:
    Feb 26, 2009
    Member:
    #14111
    Messages:
    1,400
    Gender:
    Male
    First Name:
    John
    Dallas, TX; RGV, TX
    Vehicle:
    06 DC TRD
    Suspension: DHoes up front, Dakar and OME out back. Audio: Alpine w205 w/ pair of Alpine Amps, Image Dynamic 6.5 Component Speakers up front and Image Dynamic Subs in the Back. Armor: ARB Bull Bar, Rocktek rear bumper and custom rock sliders. Other: Rigid Industries LED Light Bar, Platinum DieHard Battery, BlueSea Fuse Block, rear lights, bed lights, leds inside.
    How does the other headlight look?
     
  6. May 2, 2011 at 8:45 AM
    #86
    Razorecko

    Razorecko Well-Known Member

    Joined:
    Jun 7, 2009
    Member:
    #18125
    Messages:
    1,692
    Gender:
    Male
    Vehicle:
    '09 Pyrite DCLB TRD Supercharged
    If you could guide me that'd be great. It should take less heat to get it apart i'm presuming. I just have a month old son in the house so my time is really limited and sending them back and forth i'm not sure if i'll get around to putting them in for a while in that scenario. The ring is intact. The problem was the shipping. You had them packaged great except you had nothing in there to absorb 'shock' from handling. I'd say either use the air filled large pocket stuffing or use a tone of crinkled up newspaper along with what you had it shipped in. Also a dab of silicone on each of the ring tabs would help it from happening again. Headlights outside of that look great. That crack in the corner will easily cover up with my eyelids so thats a non-issue. Quick question, where does that black/red small plug go ? the one that comes from the outside bottom of the boot
     
  7. May 2, 2011 at 8:50 AM
    #87
    schiz94

    schiz94 Thread Jacker

    Joined:
    May 26, 2009
    Member:
    #17674
    Messages:
    4,236
    Gender:
    Male
    First Name:
    Caleb
    Bellingham,WA
    Vehicle:
    08 Tacoma Reg Cab
    Morimoto Projector Retrofit, alpine cda-105,Wheelskins leather wheel cover, wet okoles,5% tint on back and 24% on front two windows,Debadged tailgate,custom sockmonkey centercap decals, xr rims pced gloss black.
    to prevent this from happening again op. Use a 5 minute epoxy when attaching the shrouds to the projectors. And let them cure. Takes a bit longer but ensures this will never happen
     
  8. May 2, 2011 at 9:07 AM
    #88
    Razorecko

    Razorecko Well-Known Member

    Joined:
    Jun 7, 2009
    Member:
    #18125
    Messages:
    1,692
    Gender:
    Male
    Vehicle:
    '09 Pyrite DCLB TRD Supercharged
    ^ when you re-open a lense that has silicone do you still use the 300F/ @10 min bake time or is it less since its silicone you're dealing with now
     
  9. May 2, 2011 at 9:08 AM
    #89
    Muy Grande

    Muy Grande [OP] Well-Known Member

    Joined:
    Feb 26, 2009
    Member:
    #14111
    Messages:
    1,400
    Gender:
    Male
    First Name:
    John
    Dallas, TX; RGV, TX
    Vehicle:
    06 DC TRD
    Suspension: DHoes up front, Dakar and OME out back. Audio: Alpine w205 w/ pair of Alpine Amps, Image Dynamic 6.5 Component Speakers up front and Image Dynamic Subs in the Back. Armor: ARB Bull Bar, Rocktek rear bumper and custom rock sliders. Other: Rigid Industries LED Light Bar, Platinum DieHard Battery, BlueSea Fuse Block, rear lights, bed lights, leds inside.
    Ok, here is what you do.......

    1. Prep the headlight for the oven - take bulbs out, small plastic pieces off, and remove the screws that hold it together.

    2. Pre-heat oven to 300. Once the oven is ready....has been pre-heated - TURN it Off.

    3. Place your headlights on a piece of cardboard in the oven and make sure you have enough clearance on the bottom and the top of the oven (you don't want to burn the housing of the headlight).

    4. Set your timer for 10 mins (leave the headlight in the oven w/ the oven turned off for 10 mins).

    5. Once the time is up get a good sized Flat Head Screw driver and start prying the bottom corner piece of the headlight (where the grill and mounting tabs are at). Just pry open until you can use your hands and seperate the lens from the housing.

    6. You should now have access to the inside. At this time you can align the Shroud and snap back on or like you mentioned take a little bit of glue and place some on the snap ring and snap it back on.

    7. Follow the same steps as above for removal of the headlight ( pre- heat and turn off the oven). And place the housing with the shroud in the oven for 5 mins - just want to get the glue warm.

    8. Take it out and place the lense on the housing.

    9. Press firmly, I would take some pliers (wrap the teeth with some tape) and press firmly around the edge to make sure the lense is seated within the housing. Put the screws back on and apply some clear silicone around the edges and you should be done.

    The Red and Black small plug are for the motorized projector.....if you ever upgrade to the Morimoto Ballast you can plug and play to have hi/low capabilities. It's pre-wired for that.

    Sorry about this, It's a bummer!
     
  10. May 2, 2011 at 9:17 AM
    #90
    Muy Grande

    Muy Grande [OP] Well-Known Member

    Joined:
    Feb 26, 2009
    Member:
    #14111
    Messages:
    1,400
    Gender:
    Male
    First Name:
    John
    Dallas, TX; RGV, TX
    Vehicle:
    06 DC TRD
    Suspension: DHoes up front, Dakar and OME out back. Audio: Alpine w205 w/ pair of Alpine Amps, Image Dynamic 6.5 Component Speakers up front and Image Dynamic Subs in the Back. Armor: ARB Bull Bar, Rocktek rear bumper and custom rock sliders. Other: Rigid Industries LED Light Bar, Platinum DieHard Battery, BlueSea Fuse Block, rear lights, bed lights, leds inside.
    Noted.....this step will be used. I did use some automotive glue on the black ring to the Shroud........but not the black ring to the projector. This was the weakness in the chain. :eek:
     
  11. May 2, 2011 at 11:57 AM
    #91
    Razorecko

    Razorecko Well-Known Member

    Joined:
    Jun 7, 2009
    Member:
    #18125
    Messages:
    1,692
    Gender:
    Male
    Vehicle:
    '09 Pyrite DCLB TRD Supercharged
    K-update. We're good. I baked, it fixed the shroud with adhesive and put it back togethor. I gotta pick up some black silicone later to re-do the outer seal. ( I like to use black roofing silicone, really durable stuff ) than hopefully today or tomorrow I might get to putting them in and testing them out making sure the other shroud doesn't fall off, lol. Outside of that I would do it all over again, the price is great and they are a great looking set of headlights. They'll look great with my 'mean' style pyrite eyelids
     
  12. May 2, 2011 at 12:30 PM
    #92
    Muy Grande

    Muy Grande [OP] Well-Known Member

    Joined:
    Feb 26, 2009
    Member:
    #14111
    Messages:
    1,400
    Gender:
    Male
    First Name:
    John
    Dallas, TX; RGV, TX
    Vehicle:
    06 DC TRD
    Suspension: DHoes up front, Dakar and OME out back. Audio: Alpine w205 w/ pair of Alpine Amps, Image Dynamic 6.5 Component Speakers up front and Image Dynamic Subs in the Back. Armor: ARB Bull Bar, Rocktek rear bumper and custom rock sliders. Other: Rigid Industries LED Light Bar, Platinum DieHard Battery, BlueSea Fuse Block, rear lights, bed lights, leds inside.
    Glad it worked out......I really wanna see what they look like on your truck. So please post up some pics.....hopefully there are no more hicups.
     
  13. May 2, 2011 at 12:56 PM
    #93
    Razorecko

    Razorecko Well-Known Member

    Joined:
    Jun 7, 2009
    Member:
    #18125
    Messages:
    1,692
    Gender:
    Male
    Vehicle:
    '09 Pyrite DCLB TRD Supercharged
    Hey for the price i have 0 qualms :D. Especially since you can't find the clear sidemarkers w/out cracking open an ebay set. As soon as they're in I'll post up pics
     
    This site contains affiliate links for which the site may be compensated.
    #93
  14. May 3, 2011 at 9:40 AM
    #94
    Muy Grande

    Muy Grande [OP] Well-Known Member

    Joined:
    Feb 26, 2009
    Member:
    #14111
    Messages:
    1,400
    Gender:
    Male
    First Name:
    John
    Dallas, TX; RGV, TX
    Vehicle:
    06 DC TRD
    Suspension: DHoes up front, Dakar and OME out back. Audio: Alpine w205 w/ pair of Alpine Amps, Image Dynamic 6.5 Component Speakers up front and Image Dynamic Subs in the Back. Armor: ARB Bull Bar, Rocktek rear bumper and custom rock sliders. Other: Rigid Industries LED Light Bar, Platinum DieHard Battery, BlueSea Fuse Block, rear lights, bed lights, leds inside.
    Yota 4.0 I finished up your set last night. I put some extra glue on the shroud to keep them from falling off. And shook them around as a test. I think they'll hold up.

    Anyways, I've got to do the water test today or tomorrow. I'll post up some pics tonight. :D
     
  15. May 3, 2011 at 9:57 AM
    #95
    bobby15

    bobby15 Well-Known Member

    Joined:
    Oct 4, 2009
    Member:
    #23794
    Messages:
    423
    Gender:
    Male
    SoCal
    Vehicle:
    09 DC LB 4x4 magnetic grey tacoma
    Hey John just wondering if you received my headlights yet ?
     
  16. May 3, 2011 at 10:53 AM
    #96
    Muy Grande

    Muy Grande [OP] Well-Known Member

    Joined:
    Feb 26, 2009
    Member:
    #14111
    Messages:
    1,400
    Gender:
    Male
    First Name:
    John
    Dallas, TX; RGV, TX
    Vehicle:
    06 DC TRD
    Suspension: DHoes up front, Dakar and OME out back. Audio: Alpine w205 w/ pair of Alpine Amps, Image Dynamic 6.5 Component Speakers up front and Image Dynamic Subs in the Back. Armor: ARB Bull Bar, Rocktek rear bumper and custom rock sliders. Other: Rigid Industries LED Light Bar, Platinum DieHard Battery, BlueSea Fuse Block, rear lights, bed lights, leds inside.
    Not yet.......
     
  17. May 3, 2011 at 8:48 PM
    #97
    Muy Grande

    Muy Grande [OP] Well-Known Member

    Joined:
    Feb 26, 2009
    Member:
    #14111
    Messages:
    1,400
    Gender:
    Male
    First Name:
    John
    Dallas, TX; RGV, TX
    Vehicle:
    06 DC TRD
    Suspension: DHoes up front, Dakar and OME out back. Audio: Alpine w205 w/ pair of Alpine Amps, Image Dynamic 6.5 Component Speakers up front and Image Dynamic Subs in the Back. Armor: ARB Bull Bar, Rocktek rear bumper and custom rock sliders. Other: Rigid Industries LED Light Bar, Platinum DieHard Battery, BlueSea Fuse Block, rear lights, bed lights, leds inside.
    Here are a few color combos.

    Murdered Out - Black Bowl and Black Shroud

    Standard Euro - Chrome Bowl and Chrome Shroud

    Special - Black Bowl and Chrome Shroud

    Just want to post so pics. Still working on these guys. Bobby I haven't received the headlights.......

    Three Amigos.jpg
    Murdered Out.jpg
    Standard Euro.jpg
    Special.jpg
     
  18. May 4, 2011 at 12:05 AM
    #98
    bobby15

    bobby15 Well-Known Member

    Joined:
    Oct 4, 2009
    Member:
    #23794
    Messages:
    423
    Gender:
    Male
    SoCal
    Vehicle:
    09 DC LB 4x4 magnetic grey tacoma

    I'll check the tracking number and see that status on them.. should be there any day now.
     
  19. May 4, 2011 at 12:17 AM
    #99
    bobby15

    bobby15 Well-Known Member

    Joined:
    Oct 4, 2009
    Member:
    #23794
    Messages:
    423
    Gender:
    Male
    SoCal
    Vehicle:
    09 DC LB 4x4 magnetic grey tacoma
    Ok according to what UPS says, you should be recieving the package some time today!
     
  20. May 4, 2011 at 10:13 AM
    #100
    FamouzStarz

    FamouzStarz The illest taco

    Joined:
    Oct 22, 2007
    Member:
    #3168
    Messages:
    4,383
    Gender:
    Male
    505
    Vehicle:
    21 TRD PRO
    ICON Build and then some
    so what a special euro be? chrome bowl black shroud? thats a combo i want to see! im ready to pull the trigger on a set
     

Products Discussed in

To Top