1. Welcome to Tacoma World!

    You are currently viewing as a guest! To get full-access, you need to register for a FREE account.

    As a registered member, you’ll be able to:
    • Participate in all Tacoma discussion topics
    • Communicate privately with other Tacoma owners from around the world
    • Post your own photos in our Members Gallery
    • Access all special features of the site
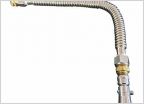
Garage Door Remote Mod

Discussion in '3rd Gen. Tacomas (2016-2023)' started by fillsrunner4, Jan 26, 2018.

  1. Jan 26, 2018 at 9:35 PM
    #1
    fillsrunner4

    fillsrunner4 [OP] Active Member

    Joined:
    Jan 17, 2018
    Member:
    #241543
    Messages:
    42
    Gender:
    Male
    First Name:
    Fill
    Sammamish, Wa
    Vehicle:
    3rd gen Tacoma TRD Sport (Hers) 3rd gen 4Runner(Mine)
    Ok so many have asked for more info regarding this mod I’ve done with using an ordinary garage door remote and turning it into a “homelink” style switch in the wife’s 3rd gen Tacoma. There is already a little info out there regarding this mod but figured I’d share what I did in the case it helps you decide and understand how to get it done.

    This mod is very simple but do keep in mind will be different for everyone when it comes to the style remote clicker you have but concept is the same throughout. There is also more ways to wire but this is the basic way to turn any garage door remote into a functional push button switch that looks like it came direct from the factory.

    Parts needed:
    Current garage door remote
    Wire (of course)
    Assortment of connectors your choice
    Misc tools you’ll figure those out
    Place to mount the switch (if no slots available)
    The rest just look at the pics

    Process:
    Open remote and find the switch. In my image the switch is #1
    30394CCA-3C29-473C-B199-C4E9ABBD4863.jpg

    Switch #1 is circled in red that’s what I will tap into
    6B6D4D49-158F-4FAA-AFA7-08068A7CF5D8.jpg

    Flip over circuit board and locate pins to solder leads to. Can figure this out by using an insulated handled screwdriver and touching/jumping two prongs at a time till it opens your garage door. Can also be found easily if you know how to read a circuit board but if you have zero clue what you are looking at here’s a pic of the two prongs i soldered leads off to give you an idea.
    78C5A9EF-1488-4C69-BDEB-3CB963990E0F.jpg

    Next solder your new leads. (Watch YouTube if you don’t know how to solder)
    36045130-FE52-4AD2-B42D-1848C6153E84.jpg

    I used hot glue to keep the wires tight and in place (not thatbit needs it) i just did because I’m ocd and felt like it you don’t have to
    CD3953E0-9AAC-4E03-A9B7-C560F9EED16D.jpg

    I used a file to create a slot for the wires to exit the remote
    E3B604BF-0360-4499-AAA7-2E18BA3ADC23.jpg

    I glued some magnets to the remote to keep in place. I will be mounting this remote behind the upper console. Could use Velcro but felt magnets are better for this in my case
    DC062EB1-477F-4795-97E8-E755ADC78982.jpg

    My AOB (air on board) Momentary switch came in
    Link to there site
    https://www.aironboard.com/online/catalogsearch/result/?q=Garage
    2AD09081-6274-419F-B794-E98FA91BAF2B.jpg

    I used the blue one to match interior lighting and that’s the smaller style switch in the Tacoma’s

    (must use a momentary style switch) doesn’t have to be AOB but be sure it’s momentary. The switch came in so had to bench test.
    Keep in mind it doesn’t matter which way you wire the two leads red or green can be either way. (Red and green wires come off the AOB switch plug included with the switch sold by AOB)

    The blue is positive to the battery and the black ground. (The blue and black only control the light in the switch and will not harm nor affect the 3V battery inside the garage remote) I’ve tested this and AOB states this in the wiring schematic
    BC25B0B2-F4DB-4D6F-94BC-203EC0C0043D.jpg

    Next I ordered a switch panel that fit in the upper console. My wife’s rig didn’t have any open slots plus the upper console is the perfect spot for this switch. Can mount anywhere you like but make sure your remote has a good line between it and the garage door. More stuff in front of it probably won’t help if your remote isn’t very powerful.
    I ordered the switch panel from shapeways 3D printed. Link is below. Shipping was quick price was good enough and no complaints. Do keep in mind it’s not an exact color match for the black interior but it’s close enough. If this bothers you you can always paint it.
    https://www.shapeways.com/shops/mrphixit
    192381D9-15E1-495F-BC4C-BC9B8796A905.jpg
    0ABD5A96-FA76-4F65-9DDB-4EC2541BC10C.jpg

    Next remove the upper console. Pry at the four corners and gently remove. This is very easy but know the console will fall pretty quickly so be ready to catch it lol. Quick side note if you haven’t already upgraded to LED lighting interior I don’t know what to tell ya either lol DO IT!!!
    65F4ADCF-C1A0-469D-9CD2-FA69CB81FE1C.jpg

    Once the console is down pop out the section you are to remove in order to install the new switch panel. Pretty straight forward it’s held in by some plastic tabs
    7CFF0AA2-A7AC-4B24-AB6F-D3C393860E4B.jpg

    Install the new piece same it’s straight forward only goes in one way
    D3FD125D-FF64-4169-AAE8-461C44FEE557.jpg

    Behind the console is already prepped for these kinda switches why toyota didn’t already have the console switch panel installed with some plugs is beyond me but is what it is.
    Thankfully no cutting is involved for this one. If you don’t have a moon roof keep in mind if you want to add a switch to that panel cutting into the console and more intensive process will be involved (look back at the shapeway link for those instructions) For just the center section not much is needed
    D88A996F-8C8E-4153-8EE7-012F2D02540E.jpg

    Now here’s the fun part (very simple but remember it might be different in your rig.)
    I already have a switch for the traction control which is illuminated at night so a perfect place to splice in the AOB Garage switches light controls. After doing some probing with the volt meter I found which wire controls the light for that switch when headlights are on. In my case the red/white is the positive and the black was ground.
    I spliced the blue wire from the AOB switch which is the positive. And spliced the black to black for the ground. (Be sure you extensively test and make sure before you commit to tapping into these wires)
    E12B16D0-B8DD-4830-933D-A694DD867F83.jpg

    Now I positioned the remote (put where you want it that’s best for your situation) There is ample room above the overhead console perfect for this type of remote. Again it’s held by magnets
    03129306-03F9-40FA-BE89-D21B2FC0DC1B.jpg

    Finish any loose ends do some testing and off ya go
    I needed a slot to put my beat-sonic front camera switch so that slot in the image isn’t empty like the pic shows
    351854A7-DD35-4E2B-9C02-4309D1ADFE75.jpg

    So there it is. Very simple and I hope easy to follow. There are other ways to do this mod and I’m sure someone is gonna say I’m dumb or blah blah blah for taking this much time doing it “this way” but I don’t care and keep that to yourself and don’t troll this thread
    If you have any questions, just ask em I’d be glad to give my input and help you if needed. Thanks and enjoy.
     

    Attached Files:

    Last edited: Jan 26, 2018
    Kefka, 23 SR5 LB, ljerr2 and 73 others like this.
  2. Jan 26, 2018 at 9:58 PM
    #2
    slowpoke16taco

    slowpoke16taco Well-Known Member

    Joined:
    Jul 14, 2017
    Member:
    #224021
    Messages:
    465
    Gender:
    Male
    First Name:
    Jayson
    SoCal
    Vehicle:
    2016 MGM TRDOR DCSB
    Stock, but not stock (but stock)
    This is why I love TW. :thumbsup:
     
  3. Jan 27, 2018 at 6:21 AM
    #3
    1bad2k

    1bad2k Well-Known Member

    Joined:
    Aug 9, 2009
    Member:
    #20889
    Messages:
    3,527
    Gender:
    Male
    Lone Star State
    Vehicle:
    2017 Tacoma TRD PRO
    Very cool and clean set up! I was actually planning to do something like this until a couple months ago o realized my truck had homelink. Only took me over a year to notice it :eek:
     
  4. Jan 27, 2018 at 6:40 AM
    #4
    LostHusker

    LostHusker Just one day at a time

    Joined:
    May 14, 2017
    Member:
    #218979
    Messages:
    27,023
    Gender:
    Male
    First Name:
    Mark
    South, TX
    Vehicle:
    2021 F150, 2015 T4R
    So great wright up OP and now you have given me more information on things that I have already thought about. Question though since you have seen the overhead console open do you think there would be enough room to run wires from there back down towards the center console area? I have envisioned moving some buttons from the center console to this area so that I can put acc switches there, or vise versa, thoughts?
     
  5. Jan 27, 2018 at 8:37 AM
    #5
    fillsrunner4

    fillsrunner4 [OP] Active Member

    Joined:
    Jan 17, 2018
    Member:
    #241543
    Messages:
    42
    Gender:
    Male
    First Name:
    Fill
    Sammamish, Wa
    Vehicle:
    3rd gen Tacoma TRD Sport (Hers) 3rd gen 4Runner(Mine)
    That’s funny. Wish this one had homelink from the beginning
     
    1bad2k[QUOTED] likes this.
  6. Jan 27, 2018 at 8:39 AM
    #6
    fillsrunner4

    fillsrunner4 [OP] Active Member

    Joined:
    Jan 17, 2018
    Member:
    #241543
    Messages:
    42
    Gender:
    Male
    First Name:
    Fill
    Sammamish, Wa
    Vehicle:
    3rd gen Tacoma TRD Sport (Hers) 3rd gen 4Runner(Mine)
    There’s plenty of room to run wires.. can route them down the a pillar easily as well. Plenty of room :)
     
    LostHusker[QUOTED] likes this.
  7. Jan 27, 2018 at 8:39 AM
    #7
    LostHusker

    LostHusker Just one day at a time

    Joined:
    May 14, 2017
    Member:
    #218979
    Messages:
    27,023
    Gender:
    Male
    First Name:
    Mark
    South, TX
    Vehicle:
    2021 F150, 2015 T4R
    Figured as much, appreciate the information.
     
  8. Jan 27, 2018 at 9:18 AM
    #8
    Reedld

    Reedld Well-Known Member

    Joined:
    Dec 17, 2017
    Member:
    #238712
    Messages:
    175
    Gender:
    Male
    First Name:
    Leon
    Painted Post NY
    Vehicle:
    2022 DCSB Tacoma Army Green TRD Sport
    Very nice mod! I may do this in my 78 TA! Thanks for sharing!
     
    fillsrunner4[OP] likes this.
  9. Jan 27, 2018 at 12:07 PM
    #9
    eldedo

    eldedo voted most likely eaten by a bear

    Joined:
    Dec 14, 2015
    Member:
    #172201
    Messages:
    1,820
    Gender:
    Male
    Mojave Desert
    Vehicle:
    '16 DCSBOR 4X4
    2888/5100/Dakars 285's/Camburgs
    nice job, take it one step further and find a 78XX voltage regulator and remove the coin cell(s)....not sure if its a 1.5 or 3v setup.
     
    tonered and fillsrunner4[OP] like this.
  10. Jan 27, 2018 at 1:00 PM
    #10
    fillsrunner4

    fillsrunner4 [OP] Active Member

    Joined:
    Jan 17, 2018
    Member:
    #241543
    Messages:
    42
    Gender:
    Male
    First Name:
    Fill
    Sammamish, Wa
    Vehicle:
    3rd gen Tacoma TRD Sport (Hers) 3rd gen 4Runner(Mine)
    Thought about it but doesn’t really matter to much as it’s very easy to access if needed. Definitely contemplated it lol
     
    tonered likes this.
  11. Jan 27, 2018 at 10:27 PM
    #11
    phdog

    phdog Well-Known Member

    Joined:
    Jun 27, 2017
    Member:
    #222534
    Messages:
    1,236
    Gender:
    Male
    First Name:
    Jim
    Northern Colorado
    Vehicle:
    2017 TRD Off Road
    w/Super Terrific Happy Hour Mod
    Zero dollars, zero parts, 8 second install.

    [​IMG]
     
  12. Jan 28, 2018 at 6:31 AM
    #12
    RushT

    RushT Amateur Everythingist

    Joined:
    Dec 10, 2017
    Member:
    #238171
    Messages:
    5,510
    Gender:
    Male
    North Texas
    Vehicle:
    '18 DCSB TRDOR Inferno
    Where's the fun in that?
     
  13. Jan 28, 2018 at 6:33 AM
    #13
    phdog

    phdog Well-Known Member

    Joined:
    Jun 27, 2017
    Member:
    #222534
    Messages:
    1,236
    Gender:
    Male
    First Name:
    Jim
    Northern Colorado
    Vehicle:
    2017 TRD Off Road
    w/Super Terrific Happy Hour Mod
    The time and money I saved I went and had some fun.
     
    jkshel24 likes this.
  14. Jan 28, 2018 at 9:03 AM
    #14
    fillsrunner4

    fillsrunner4 [OP] Active Member

    Joined:
    Jan 17, 2018
    Member:
    #241543
    Messages:
    42
    Gender:
    Male
    First Name:
    Fill
    Sammamish, Wa
    Vehicle:
    3rd gen Tacoma TRD Sport (Hers) 3rd gen 4Runner(Mine)
    Un originality is boring to me and ugly

    8 second install? Rookie only take 2 seconds to do that install
     
    Last edited: Jan 28, 2018
  15. Jan 28, 2018 at 9:07 AM
    #15
    fillsrunner4

    fillsrunner4 [OP] Active Member

    Joined:
    Jan 17, 2018
    Member:
    #241543
    Messages:
    42
    Gender:
    Male
    First Name:
    Fill
    Sammamish, Wa
    Vehicle:
    3rd gen Tacoma TRD Sport (Hers) 3rd gen 4Runner(Mine)
    Fun as in trolling threads? sounds fun Cost me $20 and took less than an hour to do. I waist more time on the toilet. If $20 breaks your bank I feel sorry for ya. I’m sure we could walk around your ride and point out many a waisted time and dollars. To each their own I guess. Enjoy your way while others enjoy theirs. Living life correcting and smartassing others to me is a large waist of time.
     
  16. Jan 28, 2018 at 9:26 AM
    #16
    phdog

    phdog Well-Known Member

    Joined:
    Jun 27, 2017
    Member:
    #222534
    Messages:
    1,236
    Gender:
    Male
    First Name:
    Jim
    Northern Colorado
    Vehicle:
    2017 TRD Off Road
    w/Super Terrific Happy Hour Mod
    Who's trolling. I'm just offering a different perspective.
     
    fillsrunner4[OP] likes this.
  17. Jan 28, 2018 at 9:33 AM
    #17
    fillsrunner4

    fillsrunner4 [OP] Active Member

    Joined:
    Jan 17, 2018
    Member:
    #241543
    Messages:
    42
    Gender:
    Male
    First Name:
    Fill
    Sammamish, Wa
    Vehicle:
    3rd gen Tacoma TRD Sport (Hers) 3rd gen 4Runner(Mine)
    Think we all know the old clicker in the visor trick lol.
     
  18. Jan 28, 2018 at 10:56 AM
    #18
    RushT

    RushT Amateur Everythingist

    Joined:
    Dec 10, 2017
    Member:
    #238171
    Messages:
    5,510
    Gender:
    Male
    North Texas
    Vehicle:
    '18 DCSB TRDOR Inferno
    Fair enough... different strokes and all. I did that on my FJ, and after a two years of it being there I decided to move it only to discover it had left a huge dent from the clip pressure. I left it there for the next 8 years.
     
    Ballinbosox and fillsrunner4[OP] like this.
  19. Feb 6, 2018 at 8:40 AM
    #19
    CoastieRon

    CoastieRon Hammocking Fool

    Joined:
    Jan 1, 2018
    Member:
    #239946
    Messages:
    2,432
    Gender:
    Male
    First Name:
    Ron
    Nashua
    Vehicle:
    Lil' Silver
    Too much.
    Nice mod!
     
    squatpuke likes this.
  20. Feb 6, 2018 at 4:35 PM
    #20
    roth_nj

    roth_nj Well-Known Member

    Joined:
    Sep 29, 2015
    Member:
    #165396
    Messages:
    558
    Vehicle:
    2017 DCLB trd off-road bbp
    Ok, who wants to help me out with this?

    Cracked my remote open, and instead switches and corresponding posts on the flip side, I have soft buttons and nothing on the other side...

    Should I just solder a lead to the opposing semi circle things?20180206_191706.jpg 20180206_191648.jpg
     
    fillsrunner4[OP] and 11Bguy like this.
To Top