

-
Welcome to Tacoma World!
You are currently viewing as a guest! To get full-access, you need to register for a FREE account.
As a registered member, you’ll be able to:- Participate in all Tacoma discussion topics
- Communicate privately with other Tacoma owners from around the world
- Post your own photos in our Members Gallery
- Access all special features of the site
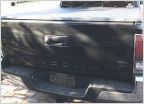 License plate frame and tinted cover
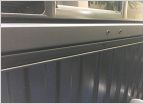 2016 Header Rail
 Wiper blades
 Front door speaker help
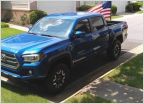 Flag Mounts
 2022 TRD Offroad MT 30k mile fluid changes
Installing Dual Fast Charge USB Ports where wireless charge button is
Discussion in '3rd Gen. Tacomas (2016-2023)' started by Loco_Driver, Sep 29, 2020.
Page 2 of 3
Page 2 of 3
Products Discussed in


