1. Welcome to Tacoma World!

    You are currently viewing as a guest! To get full-access, you need to register for a FREE account.

    As a registered member, you’ll be able to:
    • Participate in all Tacoma discussion topics
    • Communicate privately with other Tacoma owners from around the world
    • Post your own photos in our Members Gallery
    • Access all special features of the site
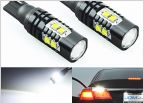
My 2006 Tacoma brake upgrade (EDITED!!)

Discussion in '2nd Gen. Tacomas (2005-2015)' started by DG92071, Feb 14, 2020.

  1. May 1, 2020 at 9:47 AM
    #101
    09TRDSport4x4

    09TRDSport4x4 OCD Approved!

    Joined:
    Oct 13, 2014
    Member:
    #140292
    Messages:
    1,093
    Gender:
    Male
    First Name:
    Nick
    Southwest Ohio
    Here is the MC and Booster in my 2009 TRD Sport:

    [​IMG]

    Like I said, none of those fancy electronics here...
     
    DG92071[OP] likes this.
  2. May 1, 2020 at 9:55 AM
    #102
    racebug68

    racebug68 Well-Known Member

    Joined:
    Apr 8, 2013
    Member:
    #101660
    Messages:
    1,234
    Gender:
    Male
    First Name:
    Travis
    Chandler, AZ
    Vehicle:
    05 DCLB 4x4 TRD SPORT SILVER
    I can't leave anything well enough alone
    ding ding ding, Winner!

    The larger bore master will give the pedal less mechanical advantage over the calipers, requiring more pedal force for same stopping power. It will however move fluid faster, where the pedal may firm up sooner. But that may also be adjustable from the pushrod, not sure.

    The real benefit is more power in the booster, coupled with the master.
     
  3. May 13, 2020 at 12:33 PM
    #103
    sharky9

    sharky9 Active Member

    Joined:
    Oct 25, 2018
    Member:
    #270625
    Messages:
    38
    Gender:
    Male
    First Name:
    Larry
    Vehicle:
    2009 Tacoma TRD Sport
    Pro Comp 6" lift, ProRunner shocks front/back, 35x12.5R18 Pro Comp AT, Method NV 18x9 -12mm wheels, Raptor mesh LED grille, Bushwacker flares
    I tried this same upgrade (Tundra MC and Booster) the last few days on my 2009 TRD Sport and I have serious issues. After bleeding the system with my neighbor, the pedal is extremely firm, but doesn't do much at all. If you don't press down on the pedal most of the way (20 pounds of force my guess) the truck won't even stay stopped at idle speed once put in drive. The truck idles faster (1200-1500 rpm), and after a few minutes of running, the check engine light came on. My ODB reader states the error code is "System too lean - Bank 1".

    Debating on reversing this process and going back to stock....she's too dangerous to drive at this point. The system bled, so I don't think it's a rod length issue? I also read about hooking a hose up to the check valve and doing a blow test to see if airs passes through....it doesn't, so the check valve is good. Any clues?
     
  4. May 13, 2020 at 12:54 PM
    #104
    racebug68

    racebug68 Well-Known Member

    Joined:
    Apr 8, 2013
    Member:
    #101660
    Messages:
    1,234
    Gender:
    Male
    First Name:
    Travis
    Chandler, AZ
    Vehicle:
    05 DCLB 4x4 TRD SPORT SILVER
    I can't leave anything well enough alone
    I'm no brake expert, but I'm curious if you got a used booster from a Tundra. The problem points to a bad booster with a torn diaphragm, where the intake is constantly sucking un-metered air through the booster, which explains the high idle and lean condition. Then since the booster is not under vacuum, there is no power brakes.

    Unhook the hose from the intake manifold, and suck through it. should hold a vacuum I think. and of course you shouldn't be able to blow through, that is what the check valve is for. If you can't hold a vacuum, then possibly ruptured diaphragm in the booster? That can happen from being bad when you got it, or perhaps over extended and broken if the rod is not the right length, when bleeding?

    Did you extend the rod properly to match the length of the original booster? What is the difference in length, something like 1-5/8 or so?
     
    DG92071[OP] likes this.
  5. May 13, 2020 at 1:21 PM
    #105
    sharky9

    sharky9 Active Member

    Joined:
    Oct 25, 2018
    Member:
    #270625
    Messages:
    38
    Gender:
    Male
    First Name:
    Larry
    Vehicle:
    2009 Tacoma TRD Sport
    Pro Comp 6" lift, ProRunner shocks front/back, 35x12.5R18 Pro Comp AT, Method NV 18x9 -12mm wheels, Raptor mesh LED grille, Bushwacker flares
    Yeah, used 2015 (40k miles) from a ebay powerseller with great feedback rating. New boosters are expensive! That thing was tough putting in by myself too...not forward to doing it again but it sounds like that must be the problem. I used an ''all thread" bolt from another MC Tacoma kit that extends the rod to the proper length.....I just eyeballed it side by side, but everything lined up and mounted to the clevis and attach points after I was done without much hassle. The original upgrade kit I bought was from Trail Toys that mounts a GM one-ton MC to the Tundra booster with brackets that mate the Tacoma. I found out the hard way that doesn't work with my Tacoma because the GM-MC is just about 2 inches too long and hits my fuse box - so that's why I turned the page and just bought a Raybestos Tundra MC and kept going with the upgrade, no brackets and such needed since they are genuine Tundra parts.

    I will do that test with the intake hose you mentioned tomorrow morning....and chime back in. Do you have a recommendation for the Booster? I will have to send mine back after removal of course. Just don't want to re-bleed again, I'm hoping I can come up with something that will hold the MC in place and out of the way so I can just do the booster swap if I get another.
     
    Last edited: May 13, 2020
    This site contains affiliate links for which the site may be compensated.
    DG92071[OP] likes this.
  6. May 13, 2020 at 1:32 PM
    #106
    sharky9

    sharky9 Active Member

    Joined:
    Oct 25, 2018
    Member:
    #270625
    Messages:
    38
    Gender:
    Male
    First Name:
    Larry
    Vehicle:
    2009 Tacoma TRD Sport
    Pro Comp 6" lift, ProRunner shocks front/back, 35x12.5R18 Pro Comp AT, Method NV 18x9 -12mm wheels, Raptor mesh LED grille, Bushwacker flares
    And one more question about the manifold hose and suck vacuum process since I have never done that. Do you mean while the engine is running do that, then drop the hose and get into the truck to see if the booster has one 'charge' or not?
     
  7. May 13, 2020 at 1:38 PM
    #107
    racebug68

    racebug68 Well-Known Member

    Joined:
    Apr 8, 2013
    Member:
    #101660
    Messages:
    1,234
    Gender:
    Male
    First Name:
    Travis
    Chandler, AZ
    Vehicle:
    05 DCLB 4x4 TRD SPORT SILVER
    I can't leave anything well enough alone
    I don't have my MC/booster in hand yet, so no recommendations from me. but an auto recycling place, or Ebay, seem to be the places to go. And for the record, I have never tried to test a booster in this way, so I don't really know if it would work. But my understanding is that when the engine runs in high vacuum situations (like idle/decel/light cruise), it pulls vacuum in the booster, which should stay under vacuum even when the engine revs up and is not in vacuum (like WOT situations). So it should hold a vacuum that has been applied to it. If it doesn't, that could mean the diaphragm is torn or the check valve is bad. This is all a static test, engine off btw...

    If anyone else wants to chime in, be my guest and enlighten everyone.
     
    This site contains affiliate links for which the site may be compensated.
    DG92071[OP] likes this.
  8. May 13, 2020 at 3:00 PM
    #108
    sharky9

    sharky9 Active Member

    Joined:
    Oct 25, 2018
    Member:
    #270625
    Messages:
    38
    Gender:
    Male
    First Name:
    Larry
    Vehicle:
    2009 Tacoma TRD Sport
    Pro Comp 6" lift, ProRunner shocks front/back, 35x12.5R18 Pro Comp AT, Method NV 18x9 -12mm wheels, Raptor mesh LED grille, Bushwacker flares
    Oh I forgot to mention, I also did the test where you pump the breaks a few times with the engine off, hold the pedal down, then start the engine. The pedal is suppose to move down a bit more, but nothing changed once the engine started.
     
    DG92071[OP] likes this.
  9. May 13, 2020 at 3:39 PM
    #109
    racebug68

    racebug68 Well-Known Member

    Joined:
    Apr 8, 2013
    Member:
    #101660
    Messages:
    1,234
    Gender:
    Male
    First Name:
    Travis
    Chandler, AZ
    Vehicle:
    05 DCLB 4x4 TRD SPORT SILVER
    I can't leave anything well enough alone
    Didn't think of that test, but yes, that is what is supposed to happen, which is another clue your booster is failed internally.

    Maybe you can get the seller to send another one on your word that this one is defective? When you do the swap, you'd be happy to send back the broken one if he wants it? I think those sellers are keen on keeping up the feedback percentages... and dangling that in front of them might help motivate them?
     
    asudevil and DG92071[OP] like this.
  10. May 13, 2020 at 5:16 PM
    #110
    DG92071

    DG92071 [OP] Well-Known Member

    Joined:
    Nov 29, 2019
    Member:
    #312004
    Messages:
    2,996
    @sharky9 I think @racebug68 nailed it. I'm pretty sure you have a bad booster.

    I got my booster and MC used off of eBay.

    Yes getting that booster in is a tight squeeze but doable without denting the fenderwell.

    I've never had a Toyota brake booster apart but I definitely wouldn't eyeball the actuating rods length. Use a tape measure or a ruler.
     
    This site contains affiliate links for which the site may be compensated.
  11. May 15, 2020 at 12:43 PM
    #111
    sharky9

    sharky9 Active Member

    Joined:
    Oct 25, 2018
    Member:
    #270625
    Messages:
    38
    Gender:
    Male
    First Name:
    Larry
    Vehicle:
    2009 Tacoma TRD Sport
    Pro Comp 6" lift, ProRunner shocks front/back, 35x12.5R18 Pro Comp AT, Method NV 18x9 -12mm wheels, Raptor mesh LED grille, Bushwacker flares
    I'm confused about the rod length process and your comment about not eyeballing it. When I lay both boosters down side by side, I eyeball the length of the rod sticking out of the base, get it about the same (maybe an 1/8 inch off if not exact), then tweak the overall length once under the steering column to expand the rod/clevis attachment to meet the hole that the pin goes in for the pedal assembly. Doing that should have the length at perfect measurement? Remember I am using a coupler and an 'all thread' to extend my bolt/rod on the booster, not welding permanent fixes like others have done.
     
  12. May 15, 2020 at 8:19 PM
    #112
    DG92071

    DG92071 [OP] Well-Known Member

    Joined:
    Nov 29, 2019
    Member:
    #312004
    Messages:
    2,996
    I measured both with a tape measure and made the Tundra rod exactly the same overall length as the Tacomas. Anything other than that I didn't do nor would I try to do. You're playing with how far the rod will, or will not, go into the booster and I'd imagine that your method runs the risk of putting the rod too far into the booster and causing internal damage. The Tacoma booster's rod/yoke doesn't reach the rod's/yoke's hole when the Tacomas pedal is lifted all of the way up so other than measuring the rods lengths I have no clue how'd you know what's the correct length. It's possible your booster was good when you got it according to your install method and just shoved the rod too far into the booster - but that's a guess on my part.
     
  13. May 15, 2020 at 8:34 PM
    #113
    sharky9

    sharky9 Active Member

    Joined:
    Oct 25, 2018
    Member:
    #270625
    Messages:
    38
    Gender:
    Male
    First Name:
    Larry
    Vehicle:
    2009 Tacoma TRD Sport
    Pro Comp 6" lift, ProRunner shocks front/back, 35x12.5R18 Pro Comp AT, Method NV 18x9 -12mm wheels, Raptor mesh LED grille, Bushwacker flares
    Now I'm concerned.....maybe there is a detailed instruction set for this exact step that I have missed....I got the reman'd booster tonight, the bay seller refunded my money completely since he had another fail last week from someone else - no return necessary so I will use it as a core return.
     
    DG92071[OP] likes this.
  14. May 15, 2020 at 11:41 PM
    #114
    sharky9

    sharky9 Active Member

    Joined:
    Oct 25, 2018
    Member:
    #270625
    Messages:
    38
    Gender:
    Male
    First Name:
    Larry
    Vehicle:
    2009 Tacoma TRD Sport
    Pro Comp 6" lift, ProRunner shocks front/back, 35x12.5R18 Pro Comp AT, Method NV 18x9 -12mm wheels, Raptor mesh LED grille, Bushwacker flares
    "The Tacoma booster's rod/yoke doesn't reach the rod's/yoke's hole when the Tacomas pedal is lifted all of the way up" - then how do you mount it to the pedal assembly with the pin if it doesn't reach? I certainly couldn't pull my rod back up to it to make the connection? Not that I remember anyway, regardless, I will make sure the center hole in the clevis at the end is exactly 9 1/4" to the base. I just hope the pin hole is lined up properly.
     
  15. May 16, 2020 at 6:35 AM
    #115
    DG92071

    DG92071 [OP] Well-Known Member

    Joined:
    Nov 29, 2019
    Member:
    #312004
    Messages:
    2,996
    You move the pedal to meet the rod's yoke.
     
  16. May 16, 2020 at 12:34 PM
    #116
    sharky9

    sharky9 Active Member

    Joined:
    Oct 25, 2018
    Member:
    #270625
    Messages:
    38
    Gender:
    Male
    First Name:
    Larry
    Vehicle:
    2009 Tacoma TRD Sport
    Pro Comp 6" lift, ProRunner shocks front/back, 35x12.5R18 Pro Comp AT, Method NV 18x9 -12mm wheels, Raptor mesh LED grille, Bushwacker flares
    Thank you @DG92071 for all of your helpful suggestions and dumbing things down for me when it was necessary! I am happy to say that my Taco is now safe to drive again and with better brake performance on the first pedal push, and my check engine light went off immediately on startup :) Took me about 2.5 hours to do the swap, but since I chose to do longer brake line extensions last week on top of the booster and around, it made pulling the master cylinder up and out of the way to do the booster swap much easier - the brake lines even helped my booster in place in mid-air while I did this swap!

    *History with mine....

    I did the Tundra brake rotors (slotted and holed) and caliper swap last year and it was definitely an upgrade, but the only problem I was getting used to out of habit and every day driving was to pump the brakes once before coming to a stop. That was the upgrade for me....and if you had time to do two pumps, that much better. After a year of doing that though, two weeks ago I decided to do the rest of the system, the Tundra booster and MC swap. Now my pedal on the first push, performs like my stock MC and Booster did with two pushes (one pump and one general press). I'm happy now, but will continue to do my under hood checks every day for the next week - checking for brake fluid leaks. I learned the hard way that my couplers needed to be DAMN tight...because wow did she make a mess last week when I was starting to bleed, whew!

    I will include a picture for people that like to see things....I know the coupling job and brake lines could be better, but it was my first time doing anything with brake lines and flaring! Steep learning curve to say the least!

    My brake line parts came from FedHillUSA.com.....they sell the M12 couplers (inverted flaring) and the M12 nuts (inverted flaring) needed for this without having to do all the typical conversion pipes that local stores sell around here. My local stores only have M12 nuts with bubble flaring.

    [​IMG]
     
    Last edited: May 16, 2020
    DG92071[OP] likes this.
  17. May 16, 2020 at 12:46 PM
    #117
    sharky9

    sharky9 Active Member

    Joined:
    Oct 25, 2018
    Member:
    #270625
    Messages:
    38
    Gender:
    Male
    First Name:
    Larry
    Vehicle:
    2009 Tacoma TRD Sport
    Pro Comp 6" lift, ProRunner shocks front/back, 35x12.5R18 Pro Comp AT, Method NV 18x9 -12mm wheels, Raptor mesh LED grille, Bushwacker flares
    Oh, and I checked the overall length of the bad booster I pulled out this morning. From base to center of clevis hole was 9 5/16...not off by much at all.....totally believe it was a bad booster from the start and nothing I did.....$427 later, AutoZone with next day delivery got me a nice reman'd. Expensive, but oh well, lots of learning I got the past two weekends!
     
    DG92071[OP] likes this.
  18. May 16, 2020 at 1:48 PM
    #118
    No Shoes Nation

    No Shoes Nation Well-Known Member

    Joined:
    Sep 20, 2019
    Member:
    #305845
    Messages:
    906
    Gender:
    Male
    Vehicle:
    2008 Taco SR5 Access Cab 4.0 4x4
    Hmm . . . none as yet, that's why i'm here . . .
    To sharky9, DG92071, and all the other contributors on this subject showing how to get the Tacomas brakes to where they should of been from factory. Nice work on the brake upgrade, booster and MC swap, lines etc.
    Now, is there somewhere or someone who has the complete write up on all that is needed to do this whole project, start to finish, including parts source, without having to go through the many pages of the comments in between the required information.
    Thanks to all.
     
    DG92071[OP] likes this.
  19. May 16, 2020 at 2:03 PM
    #119
    sharky9

    sharky9 Active Member

    Joined:
    Oct 25, 2018
    Member:
    #270625
    Messages:
    38
    Gender:
    Male
    First Name:
    Larry
    Vehicle:
    2009 Tacoma TRD Sport
    Pro Comp 6" lift, ProRunner shocks front/back, 35x12.5R18 Pro Comp AT, Method NV 18x9 -12mm wheels, Raptor mesh LED grille, Bushwacker flares
    Well, your question is divine! Would have helped me out a couple of weeks ago....BUT as I learned with all of my readings....there are two DIFFERENT types of Gen-2 Tacos. There are ones that have smaller M10 lines, and there are ones like mine that has 1/4" M12 lines. As for my Gen-2 2009 TRD Sport, here's what you need:

    - Metric nuts inverted flare 6-pack of 12mm (https://store.fedhillusa.com/14metricbrakelinenuts.aspx)
    - Union/Couplers inverted flare 12mm (https://store.fedhillusa.com/14metricbrakelinenuts.aspx)
    - New brake line to do your coupling, 1/4" (https://store.fedhillusa.com/cnf-4b.aspx)
    - Flaring tool (google any kind or rent/buy at your local AP)
    - Line/Pipe cutter (rent/buy at your local AP)
    - 2015 Tundra MC (https://www.carid.com/raybestos/element3-brake-master-cylinder.html?urlId=10161027)
    - 2015 Tundra Brake Booster (https://www.autozone.com/brakes-and...ke-power-booster-53-3118/153695_1024969_7889O)
    *or go the used route for your booster
    - M10 x 1.25 coupler (to make your Tundra brake rod actuator longer)
    - M10 x 1.25 all thread (to use with the coupler above)
    - M10 locking nuts (to make sure coupler and all thread don't move)
    *note base rod to center of hole in clevis needs to be 9.25 inches. Move nuts and couplers as necessary to achieve the dimension....not difficult at all.

    *another note, the M10 couplers above might be 1.5mm pitch, I don't know. I already had the coupler and all-thread from another kit. Every google search I do for M10 couplers hit at 1.5mm thread pitch, not 1.25mm like I was reading in the forum. Best bet.....take your new booster to the hardware store and say "I need a coupler and a 2-inch all-thread to mate with this actuator rod". Pretty sure your local Ace Hardware will have it!

    There you go! Hope it helps all of my fellow 2009 TRD Sports guys :)
     
    Last edited: May 16, 2020
    eddjaure, Littles, lilgerber and 2 others like this.
  20. May 16, 2020 at 9:35 PM
    #120
    DG92071

    DG92071 [OP] Well-Known Member

    Joined:
    Nov 29, 2019
    Member:
    #312004
    Messages:
    2,996
    Great! @racebug68 diagnosed it for you.

    To me the brake upgrade feels like "that's how it's supposed to be".
     

Products Discussed in

To Top