1. Welcome to Tacoma World!

    You are currently viewing as a guest! To get full-access, you need to register for a FREE account.

    As a registered member, you’ll be able to:
    • Participate in all Tacoma discussion topics
    • Communicate privately with other Tacoma owners from around the world
    • Post your own photos in our Members Gallery
    • Access all special features of the site

My Audio Build

Discussion in 'Audio & Video' started by gkomo, Apr 29, 2016.

  1. May 6, 2016 at 5:15 AM
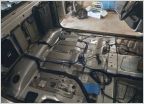
    #21
    solscooter

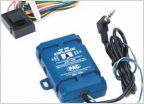
    solscooter Sh!t Outta Luck

    Joined:
    Nov 8, 2015
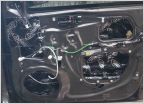
    Member:
    #169056
    Messages:
    1,935
    Gender:
    Male
    First Name:
    Brian
    Minnesota
    Vehicle:
    2016 TRD OR DCSB 4x4
    I used craftsman picks because it was what I had. It took me awhile to get them out as the curve at the end was just a little to much. My family which is much better at dealing with wiring all suggest a dental pick. It will need to have a slight curve at the end to be effective. Something like this:

    http://www.amazon.com/Miller-883-Ta...8&qid=1462536813&sr=8-13&keywords=Dental+pick

    That was just a quick search for the style tip you'd want. I know they are out there cheaper
     
  2. May 6, 2016 at 5:18 AM
    #22
    solscooter

    solscooter Sh!t Outta Luck

    Joined:
    Nov 8, 2015
    Member:
    #169056
    Messages:
    1,935
    Gender:
    Male
    First Name:
    Brian
    Minnesota
    Vehicle:
    2016 TRD OR DCSB 4x4
    Open it up. I know the lc7i has pins that you move to different internal slots depending on your systems needs.
     
  3. May 6, 2016 at 2:26 PM
    #23
    gkomo

    gkomo [OP] Well-Known Member

    Joined:
    Nov 16, 2015
    Member:
    #169821
    Messages:
    2,188
    Gender:
    Male
    San Diego, CA
    Vehicle:
    2014 MGM AC SR5 4x4
    Jesus, got the harness depinned using a modified bobby-pin. I think the key was to be much more gentle with lifting the clip:

    IMG_5663.jpg

    For those following along, the plan is when it's time to install i'll depin those same colored wires from the OEM harness and just plug them into this harness.
     
  4. May 6, 2016 at 2:59 PM
    #24
    solscooter

    solscooter Sh!t Outta Luck

    Joined:
    Nov 8, 2015
    Member:
    #169056
    Messages:
    1,935
    Gender:
    Male
    First Name:
    Brian
    Minnesota
    Vehicle:
    2016 TRD OR DCSB 4x4
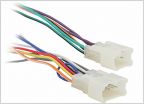
    Dude. That's the Metra harness that plugs into the factory harness. You want the speaker wires from the Metra harness that plugs into the headunit. Unless I'm totally mis-understand what you are trying to do.

    Sorry I didn't notice earlier
     
  5. May 6, 2016 at 3:44 PM
    #25
    zinger

    zinger Well-Known Member

    Joined:
    Oct 6, 2015
    Member:
    #165960
    Messages:
    339
    Gender:
    Male
    Vehicle:
    2016 Silver Sky Tacoma SR5
    Either he used the wrong connector or he plans to use the existing speaker wiring, in that case he'll need another speedwire cable going to the male metra connector.

    To the OP, why did you remove all those wires from the female metra connector? Those wires should remain in there and be spliced into the same colored wires on the male metra connector that plugs into the HU. The female metra connector plugs into the OEM harness connector.
     
  6. May 6, 2016 at 3:55 PM
    #26
    solscooter

    solscooter Sh!t Outta Luck

    Joined:
    Nov 8, 2015
    Member:
    #169056
    Messages:
    1,935
    Gender:
    Male
    First Name:
    Brian
    Minnesota
    Vehicle:
    2016 TRD OR DCSB 4x4
    He's still going to need the wires he removed though if that's the case, right?

    Edit: sorry I didn't read all the way through. Already a few beers into the weekend.
     
  7. May 6, 2016 at 4:06 PM
    #27
    gkomo

    gkomo [OP] Well-Known Member

    Joined:
    Nov 16, 2015
    Member:
    #169821
    Messages:
    2,188
    Gender:
    Male
    San Diego, CA
    Vehicle:
    2014 MGM AC SR5 4x4
    Mother f*cker! I need the male connector don't I? All i'm trying to do is mimic the OEM harness plug, but connect the four speaker wires (grey, grey/black stripe, white, white/black stripe) through the Metra connector to my Speedwire and depin the remaining OEM wires and pin them into the Metra connector. This way i'll achieve what the OEM harness is doing except reroute the speaker wires to my LOC without cutting stock wiring... damnit!

    This one correct?

    http://www.amazon.com/Scosche-Reverse-Harness-1984-Up-Connector/dp/B0007KK2LK/ref=pd_sim_107_1?ie=UTF8&dpID=41Rovx64VXL&dpSrc=sims&preST=_AC_UL160_SR160,160_&refRID=0HFVNXAAWP77BYDBVB2K

    Edit: Okay, learning experience. Put the wrong Metra harness back to normal. Don't think i'll be needing that so that was a waste of $5 and an hour of my time.
     
    Last edited: May 6, 2016
  8. May 6, 2016 at 4:31 PM
    #28
    solscooter

    solscooter Sh!t Outta Luck

    Joined:
    Nov 8, 2015
    Member:
    #169056
    Messages:
    1,935
    Gender:
    Male
    First Name:
    Brian
    Minnesota
    Vehicle:
    2016 TRD OR DCSB 4x4
    Look at the one I soldered in the other thread. That what it needs to look like.

    Yes that's the metra harness you need
     
  9. May 6, 2016 at 4:55 PM
    #29
    solscooter

    solscooter Sh!t Outta Luck

    Joined:
    Nov 8, 2015
    Member:
    #169056
    Messages:
    1,935
    Gender:
    Male
    First Name:
    Brian
    Minnesota
    Vehicle:
    2016 TRD OR DCSB 4x4
  10. May 6, 2016 at 5:28 PM
    #30
    gkomo

    gkomo [OP] Well-Known Member

    Joined:
    Nov 16, 2015
    Member:
    #169821
    Messages:
    2,188
    Gender:
    Male
    San Diego, CA
    Vehicle:
    2014 MGM AC SR5 4x4
    Planning out the layout of all the gear going under my passenger seat. The sub amp going under my drivers seat will take up pretty much all the space so everything else will need to go under the passenger side. Two crossovers, the LOC and the speaker amp. Is it okay to have all these electronics so close together? (white piece of paper represents the speaker amp - Image Dynamics MQ150.2)

    IMG_5664.jpg

    I measured the available space and without taking the seat out it looks to be almost a 12" x 12" space. Obviously things can shift a little to accommodate wiring.
     
  11. May 6, 2016 at 6:37 PM
    #31
    zinger

    zinger Well-Known Member

    Joined:
    Oct 6, 2015
    Member:
    #165960
    Messages:
    339
    Gender:
    Male
    Vehicle:
    2016 Silver Sky Tacoma SR5
    That does seem like a lot to fit under the seat but as long as it fits I don't see any problem.
     
  12. May 7, 2016 at 3:53 AM
    #32
    JasonT87

    JasonT87 Well-Known Member

    Joined:
    Feb 6, 2016
    Member:
    #177280
    Messages:
    1,015
    Gender:
    Male
    First Name:
    Jason
    Southern California
    Vehicle:
    '16 TRD Sport DCSB
    Total Chaos mid-travel front. JD Fab SUA rear.
    Any reason why the LC2i vs the newer models?
     
  13. May 7, 2016 at 8:48 AM
    #33
    gkomo

    gkomo [OP] Well-Known Member

    Joined:
    Nov 16, 2015
    Member:
    #169821
    Messages:
    2,188
    Gender:
    Male
    San Diego, CA
    Vehicle:
    2014 MGM AC SR5 4x4
    There's newer models? I'm just powering front door speakers and a sub so I didn't need the additional channels like the 6 or 7 models if that's what you're referring to.
     
  14. May 7, 2016 at 10:13 AM
    #34
    JasonT87

    JasonT87 Well-Known Member

    Joined:
    Feb 6, 2016
    Member:
    #177280
    Messages:
    1,015
    Gender:
    Male
    First Name:
    Jason
    Southern California
    Vehicle:
    '16 TRD Sport DCSB
    Total Chaos mid-travel front. JD Fab SUA rear.
    Ok yeah that's what I was referring to. Thanks
     
  15. May 8, 2016 at 7:19 PM
    #35
    gkomo

    gkomo [OP] Well-Known Member

    Joined:
    Nov 16, 2015
    Member:
    #169821
    Messages:
    2,188
    Gender:
    Male
    San Diego, CA
    Vehicle:
    2014 MGM AC SR5 4x4
    Was a sort of productive weekend:

    Again, I ordered the wrong parts. The Metra door speaker adapters were for the REAR speakers, not front... so obviously they didn't fit. So, I fabbed up some of my own:

    IMG_5680.jpg

    Gotta get creative when you lack the proper tools!

    Got the ID door speakers installed using the Metra wire adapters for the doors. This is just a temporary solution until I have to hard wire everything from the amp. Full install won't be for a little bit while I gather all the necessary parts:

    IMG_5681.jpg

    Did the poor mans sound deadening on the doors. Used Frost King (as shown in another thread) HVAC duct matting. Most of the material was put inside the doors, but some surrounding the speaker as well. I decided against ripping off the factory moisture barrier. After listening to the speakers at full bass and turned up loud it actually sounds pretty good. Can't wait to hear them with the amp pushing the power!

    IMG_5682.jpg

    And lastly, fabbed up the tweeter mounts as well.

    IMG_5683.jpg
     
    Last edited: May 9, 2016
  16. May 9, 2016 at 6:24 AM
    #36
    rob feature

    rob feature Tacos!

    Joined:
    Aug 10, 2011
    Member:
    #61468
    Messages:
    1,796
    Gender:
    Male
    Colorado
    Vehicle:
    2003 4x4 V6 X-Cab SR5
    Shocks. Pegs. Lucky.
    Coming along nicely. Boy that's a lot of work having to saw with a drill though.

    FWIW, that Frost King stuff isn't a CLD (Constrained Layer Damper) - what you want to tame vibrations. It's an insulator at best and would need close to 100% coverage to be effective. Many even use layers of the stuff. So it probably isn't doing much for you just stuck to parts of your door panels and may get in the way of a proper treatment down the road as you'd need to get all that back off (not easy with this stuff I hear). I think you'd notice a difference if you stripped the whole truck and laid it everywhere possible - doors too. But just here and there you may be spinning your wheels with that stuff. Even then if you put down 100% without a CLD, you're only shushing the vibrations a bit. They're still there. A good CLD (with only ~25% coverage) will mostly if not completely make these vibrations a non-issue. There are lots of places in car audio where you can 'beat the system', but unfortunately damping isn't one of 'em.

    Frost King itself, when asked about installation in a vehicle, writes This product is made to insulate duct work in a home and I would not recommend using it on a vehicle of any kind. My understanding is that it releases a rather strong scent (unknown chemicals!) when heated as well and has a low upper thermal limit and may get messy in the Summer.

    If it were me, I'd skip any further installation of that stuff and get some decent CLD as a first step. Barrier layers of MLV (mass-loaded vinyl) and CCF (closed-cell foam) over that will be the most effective approach.

    Edit: Lots of bad information out there on CLD, damping, deadening, etc. If you have the time, reading this thread could benefit you a lot.
     
    Last edited: May 9, 2016
    gkomo[OP] likes this.
  17. May 9, 2016 at 7:54 AM
    #37
    gkomo

    gkomo [OP] Well-Known Member

    Joined:
    Nov 16, 2015
    Member:
    #169821
    Messages:
    2,188
    Gender:
    Male
    San Diego, CA
    Vehicle:
    2014 MGM AC SR5 4x4
    Thanks for the heads up. I can revisit the door treatments when I have to take everything apart again for the real install.
     
  18. May 9, 2016 at 6:20 PM
    #38
    gkomo

    gkomo [OP] Well-Known Member

    Joined:
    Nov 16, 2015
    Member:
    #169821
    Messages:
    2,188
    Gender:
    Male
    San Diego, CA
    Vehicle:
    2014 MGM AC SR5 4x4
    Spent some time today trying to get some of the wiring in place. Any tips/tricks to snaking a wire through the door grommets? ...gave up trying for now, lol.

    Edit 1: thank you ********* for the YouTube video. They suggest undoing the grommets from the door so you can straighten it out better as well as spraying some silicon spray down in there, makes sense.

    Edit 2: Doors are wired. The silicon spray is a must! Made everything slide through so much easier. BTW, passenger side is waaaay easier, much less connectors/wires in the way of the opening (inside the cab).
     
    Last edited: May 9, 2016
    Man of Steel TRD likes this.
  19. May 9, 2016 at 6:22 PM
    #39
    rob feature

    rob feature Tacos!

    Joined:
    Aug 10, 2011
    Member:
    #61468
    Messages:
    1,796
    Gender:
    Male
    Colorado
    Vehicle:
    2003 4x4 V6 X-Cab SR5
    Shocks. Pegs. Lucky.
    I've been lucky with a coat hanger before. Nothin' but hands required on the 1st gen :D
     
  20. May 9, 2016 at 7:43 PM
    #40
    Man of Steel TRD

    Man of Steel TRD Ignorance is the new normal

    Joined:
    Mar 1, 2016
    Member:
    #179879
    Messages:
    4,834
    Gender:
    Male
    First Name:
    Jeremy
    Gilbert, AZ
    Vehicle:
    2021 Ram Limited Night Edition, 91 300ZXTT, 90 Toyota Pickup ECLB
    Tow package, LED interior lighting, led low beams, led fog lights, led licence plate lights, OEM bed mat, OEM mud flaps, OEM chrome raised tailgate letter inserts, nerf bars, AVS ventshades. Complete Kicker audio system (4 channel amp, mids and tweets in the front, 2 ways in the back, 2 10 inch comp rt subs, Zxsum8, alpine pdx 1.600 boxes and amp rack by Mr Marv), Pop & Lock, Mobtown locking bed storage doors, Bilstein 5100s, Katzkin Leather interior, Redline Hoodstruts, Backflip.
    Hey everyone, I found this video on the forum, think it might help with wiring with the discussed harnesses.
    https://youtu.be/-GWSJjKXurk
     
    gkomo[OP] likes this.
To Top