

-
Welcome to Tacoma World!
You are currently viewing as a guest! To get full-access, you need to register for a FREE account.
As a registered member, you’ll be able to:- Participate in all Tacoma discussion topics
- Communicate privately with other Tacoma owners from around the world
- Post your own photos in our Members Gallery
- Access all special features of the site
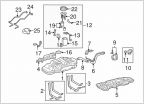 Gas Cap doesn't seal anymore?
 Anyone have this hitch :: Tyger Auto TG-HC3T0068 Class 3 Trailer Hitch Combo with 2" Receiver
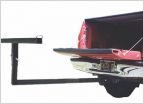 Kayak transportation
 Cb radio settup
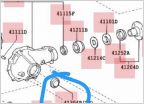 Some questions about diff seals
New AC condenser replacement tips?
Discussion in '2nd Gen. Tacomas (2005-2015)' started by JimNH, Jun 10, 2017.
Page 2 of 5
Page 2 of 5

