1. Welcome to Tacoma World!

    You are currently viewing as a guest! To get full-access, you need to register for a FREE account.

    As a registered member, you’ll be able to:
    • Participate in all Tacoma discussion topics
    • Communicate privately with other Tacoma owners from around the world
    • Post your own photos in our Members Gallery
    • Access all special features of the site

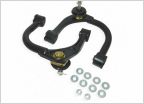
New Bushings for Light Racing UCA's.

Discussion in 'Suspension' started by pAP, Mar 9, 2012.

  1. Jun 27, 2012 at 7:43 PM
    #101
    92LandCruiser

    92LandCruiser Well-Known Member

    Joined:
    Feb 20, 2010
    Member:
    #31761
    Messages:
    8,317
    Gender:
    Male
    Nevada
    Vehicle:
    80 series Land Cruiser
    Cummins, tons, 40s
    It sounds like double post! yeaahhhh

    lol, you can delete the first, click edit and then delete

    :p :)

    not that it matters, sorry for the useless post, carry on!
     
  2. Aug 14, 2012 at 10:24 AM
    #102
    Bama_TACO

    Bama_TACO ROLL TIDE!!!!!!!

    Joined:
    Aug 3, 2010
    Member:
    #41157
    Messages:
    1,011
    Gender:
    Male
    Winfield, AL
    Vehicle:
    2006 PreRunner Double Cab TRD SPORT
    Did anyone notice any difference in the ride after installing the new bushings? I'm currently running the rubber bushings but they aren't torn or anything. I've been thinking of switching to the spec ride bushings.
     
  3. Aug 18, 2012 at 12:13 PM
    #103
    OH-MAN

    OH-MAN Well-Known Member

    Joined:
    Apr 23, 2009
    Member:
    #16324
    Messages:
    2,305
    Gender:
    Male
    First Name:
    Steve
    Sunny Az.
    Vehicle:
    10 4X4 O.R. White
    TRD skid painted black,
  4. Aug 25, 2012 at 4:50 PM
    #104
    CrackerJackMack

    CrackerJackMack First class awesome

    Joined:
    Nov 16, 2011
    Member:
    #67132
    Messages:
    541
    Gender:
    Male
    First Name:
    Kevin
    Dallas, TX
    Vehicle:
    10 4x4 SR5 TRDoff
    [​IMG]

    This repairable?

    IMG_20120825_181621_654.jpg
    IMG_20120825_181536_778.jpg
     
  5. Aug 26, 2012 at 6:08 AM
    #105
    DR Da_da

    DR Da_da Infrequent Member

    Joined:
    Aug 28, 2010
    Member:
    #42390
    Messages:
    396
    Gender:
    Male
    Alabama
    Vehicle:
    '06 4x4 V6 TRD Offroad auto access cab
    ToyTec ultimate lift, LR UCAs, TRD gen 1 CAI, TRD cat-back, bull bar, anytime fog lights, lighted 4x4 switch, factory SS step tubes, factory interior lighting package, factory VIP 3200 alarm, FJ TRD center caps, rear diff breather relocate, tint, bug deflector, Weather Tech liners
    I'll let you know in the next few days. I did the same exact thing to mine. I took it slow with a pneumatic hack saw, and then a small handheld hack saw, and still managed to cut into the arms in the same place. I work with some sharp folks and most said to simply fill the grooves with JB Weld and sand smooth. Even our resident welder said it's too small to even worry about filling in. I didn't cut into the welds, and it's not going to take much of a load (I'm not going to huck my truck off some ramp), so it should be good.

    Any metalurgists like to chime in?
     
  6. Aug 26, 2012 at 10:52 AM
    #106
    92LandCruiser

    92LandCruiser Well-Known Member

    Joined:
    Feb 20, 2010
    Member:
    #31761
    Messages:
    8,317
    Gender:
    Male
    Nevada
    Vehicle:
    80 series Land Cruiser
    Cummins, tons, 40s
    My thoughts exactly.
     
  7. Aug 26, 2012 at 6:17 PM
    #107
    CrackerJackMack

    CrackerJackMack First class awesome

    Joined:
    Nov 16, 2011
    Member:
    #67132
    Messages:
    541
    Gender:
    Male
    First Name:
    Kevin
    Dallas, TX
    Vehicle:
    10 4x4 SR5 TRDoff

    Thanks. I'll go pick some up here in a few days then. I got so disheartened by my misguided hand that I didn't even work on the other arm. I will go ahead and finish it up while also not trying to repeat the same mistake.
     
  8. Sep 22, 2012 at 1:21 PM
    #108
    CrackerJackMack

    CrackerJackMack First class awesome

    Joined:
    Nov 16, 2011
    Member:
    #67132
    Messages:
    541
    Gender:
    Male
    First Name:
    Kevin
    Dallas, TX
    Vehicle:
    10 4x4 SR5 TRDoff
    How my JBwelds came out:

    IMG_20120922_131717_077.jpg
    IMG_20120922_131731_162.jpg
    IMG_20120922_132045_345.jpg
    IMG_20120922_132106_347.jpg


    The installation:

    IMG_20120922_145145_198.jpg
    IMG_20120922_145204_734.jpg
    IMG_20120922_145223_023.jpg


    And when I learned I used the wrong paint to re-finish the arms:

    IMG_20120922_145622_957.jpg
    IMG_20120922_145721_199.jpg
     
  9. Sep 22, 2012 at 1:32 PM
    #109
    OH-MAN

    OH-MAN Well-Known Member

    Joined:
    Apr 23, 2009
    Member:
    #16324
    Messages:
    2,305
    Gender:
    Male
    First Name:
    Steve
    Sunny Az.
    Vehicle:
    10 4X4 O.R. White
    TRD skid painted black,
    Man I am glad to see it worked for your install.
    I destroyed two of the new bushings trying to install them.
    Tore the rim off of them even using plenty of soapy water.
    Plan B is in the thinking process!!!
     
  10. Sep 22, 2012 at 2:22 PM
    #110
    CrackerJackMack

    CrackerJackMack First class awesome

    Joined:
    Nov 16, 2011
    Member:
    #67132
    Messages:
    541
    Gender:
    Male
    First Name:
    Kevin
    Dallas, TX
    Vehicle:
    10 4x4 SR5 TRDoff
    Soapy water? Hell, I just used dove soap and nothing else.
     
  11. Sep 22, 2012 at 2:25 PM
    #111
    OZ-T

    OZ-T You are going backwards

    Joined:
    Dec 15, 2009
    Member:
    #27584
    Messages:
    50,432
    Gender:
    Male
    First Name:
    Peter North
    British Columbia
    Vehicle:
    Mag Grey 09 Trd Sport DCLB 4x4
    OME 885x , OME shocks and Dakars , Wheelers SuperBumps front and rear , 275/70/17 Hankook ATm , OEM bed mat , Weathertech digifit floor liners , Weathertech in-channel vents , headache rack , Leer 100RCC commercial canopy , TRD bedside decals removed , Devil Horns by Andres , HomerTaco Satoshi
    OME yellow ? What colour and type of paint ?
     
  12. Sep 22, 2012 at 2:33 PM
    #112
    CrackerJackMack

    CrackerJackMack First class awesome

    Joined:
    Nov 16, 2011
    Member:
    #67132
    Messages:
    541
    Gender:
    Male
    First Name:
    Kevin
    Dallas, TX
    Vehicle:
    10 4x4 SR5 TRDoff
    Closest I could find to it, yes. 7747 Sunburst yellow

    Rust-oleum gloss protective enamel - UPC 0 2006 77478 3
     
  13. Sep 22, 2012 at 2:55 PM
    #113
    OZ-T

    OZ-T You are going backwards

    Joined:
    Dec 15, 2009
    Member:
    #27584
    Messages:
    50,432
    Gender:
    Male
    First Name:
    Peter North
    British Columbia
    Vehicle:
    Mag Grey 09 Trd Sport DCLB 4x4
    OME 885x , OME shocks and Dakars , Wheelers SuperBumps front and rear , 275/70/17 Hankook ATm , OEM bed mat , Weathertech digifit floor liners , Weathertech in-channel vents , headache rack , Leer 100RCC commercial canopy , TRD bedside decals removed , Devil Horns by Andres , HomerTaco Satoshi
    Thanks :thumbsup:
     
  14. Sep 22, 2012 at 6:33 PM
    #114
    pAP

    pAP [OP] ==========

    Joined:
    Feb 15, 2011
    Member:
    #51218
    Messages:
    1,561
    Gender:
    Male
    First Name:
    Chris
    NJ
    Vehicle:
    11 Tacoma SR5
    ARB locker and OBA, All Pro front & rear bumper, All Pro IFS skid & modified t-case skid, Custom Trans Skid., 4x Innovations sliders, Custom tire carrier/bed bars, Warn Winch, Fox 2.5" Front coilover, Walker Evans 2.5" rear Shock, All pro Leaf, All Pro U-bolt flip, Baja Designs lights, PIA 510 lights, TRD exhaust cut back, Doug Thorley Pipe Bomb
    Looks great! Glad the job smoothed things out for ya. Can't wait to see some pics with them on the truck.
     
  15. Sep 22, 2012 at 6:41 PM
    #115
    CrackerJackMack

    CrackerJackMack First class awesome

    Joined:
    Nov 16, 2011
    Member:
    #67132
    Messages:
    541
    Gender:
    Male
    First Name:
    Kevin
    Dallas, TX
    Vehicle:
    10 4x4 SR5 TRDoff
    Yeah, I'm just going to strip them again and repaint them. it's like the yellow paint is sitting on top of the primer I wet sanded. Any tips for making the paint attach better or just sand the bad areas and repaint ?
     
  16. Sep 22, 2012 at 7:20 PM
    #116
    pAP

    pAP [OP] ==========

    Joined:
    Feb 15, 2011
    Member:
    #51218
    Messages:
    1,561
    Gender:
    Male
    First Name:
    Chris
    NJ
    Vehicle:
    11 Tacoma SR5
    ARB locker and OBA, All Pro front & rear bumper, All Pro IFS skid & modified t-case skid, Custom Trans Skid., 4x Innovations sliders, Custom tire carrier/bed bars, Warn Winch, Fox 2.5" Front coilover, Walker Evans 2.5" rear Shock, All pro Leaf, All Pro U-bolt flip, Baja Designs lights, PIA 510 lights, TRD exhaust cut back, Doug Thorley Pipe Bomb
    That sux. How long did you let it sit? What's the humidity like?
     
  17. Sep 22, 2012 at 7:23 PM
    #117
    CrackerJackMack

    CrackerJackMack First class awesome

    Joined:
    Nov 16, 2011
    Member:
    #67132
    Messages:
    541
    Gender:
    Male
    First Name:
    Kevin
    Dallas, TX
    Vehicle:
    10 4x4 SR5 TRDoff
    ~20 minutes, I don't think it was too humid. I waited a few days after it had been raining. I'm in Dallas, TX so it doesn't stay humid for long.

    My understanding is they aren't suppose to be sopping wet, just dampen the sand paper, scuff up the arms good, rinse, wait, then paint.
     
  18. Sep 22, 2012 at 7:44 PM
    #118
    pAP

    pAP [OP] ==========

    Joined:
    Feb 15, 2011
    Member:
    #51218
    Messages:
    1,561
    Gender:
    Male
    First Name:
    Chris
    NJ
    Vehicle:
    11 Tacoma SR5
    ARB locker and OBA, All Pro front & rear bumper, All Pro IFS skid & modified t-case skid, Custom Trans Skid., 4x Innovations sliders, Custom tire carrier/bed bars, Warn Winch, Fox 2.5" Front coilover, Walker Evans 2.5" rear Shock, All pro Leaf, All Pro U-bolt flip, Baja Designs lights, PIA 510 lights, TRD exhaust cut back, Doug Thorley Pipe Bomb
    If the paints hardened and just not attaching to the prime, there's an issue with the prime. If the paint is soft, then it's not completely cured yet. That's why I was asking about humidity. That paint doesn't like to dry in humidity and requires a lot more time to harden.
     
  19. Sep 24, 2012 at 6:09 AM
    #119
    CrackerJackMack

    CrackerJackMack First class awesome

    Joined:
    Nov 16, 2011
    Member:
    #67132
    Messages:
    541
    Gender:
    Male
    First Name:
    Kevin
    Dallas, TX
    Vehicle:
    10 4x4 SR5 TRDoff
    I placed them outside all day sunday. You were right, they had not cured fully. I also went out and got some clear coat for extra strength on them. I guess I'll move the installation to next weekend. Clear coat says it takes ~48hours to cure as well so hopefully I can get it all cured by saturday.

    My friend linked me to a kyoto box which I might use for baking the arms (don't want fumes in the house): http://thegoodhuman.com/2009/04/13/my-new-homemade-solar-oven-modeled-after-the-kyoto-box/
     
  20. Jun 6, 2013 at 7:49 AM
    #120
    mclovin

    mclovin chicka chicka, yeah!

    Joined:
    Aug 23, 2011
    Member:
    #62195
    Messages:
    538
    Gender:
    Male
    Biloxi
    Vehicle:
    16 TRD OR DC Barcelona Red
    Prev, 04 Xtra Cab Prerunner, 12 SR5 4x4 AC
    Anyone notice after installing the new bushings, a front end squeak during articulation? I installed them about a month ago and now I have a squeak coming from the front anytime it moves...
     

Products Discussed in

To Top