

-
Welcome to Tacoma World!
You are currently viewing as a guest! To get full-access, you need to register for a FREE account.
As a registered member, you’ll be able to:- Participate in all Tacoma discussion topics
- Communicate privately with other Tacoma owners from around the world
- Post your own photos in our Members Gallery
- Access all special features of the site
 SOLD - 2011-2015 Toyota Tacoma (90975-A2001) - CHROME Front Grill Emblem - NEW!
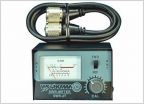 ISO: SWR meter
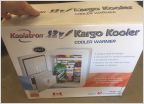 *sold* Koolatron 12v Cooler/Warmer
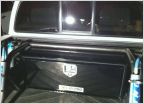 Delta Pro Black 14" Tall x 12" Deep 36" Truck Box
 SOLD_Mods please delete
Onboard Pressurized Water System for the 2005-Current Toyota Tacoma OBW
Discussion in 'Buy / Sell / Trade - Other' started by ProForce, Sep 26, 2016.
Page 9 of 70
Page 9 of 70
Products Discussed in


