

-
Welcome to Tacoma World!
You are currently viewing as a guest! To get full-access, you need to register for a FREE account.
As a registered member, you’ll be able to:- Participate in all Tacoma discussion topics
- Communicate privately with other Tacoma owners from around the world
- Post your own photos in our Members Gallery
- Access all special features of the site
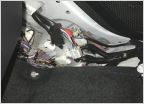 Pop n lock on a 3rd gen with JBL
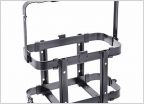 Mounting SmittyBilt Gas Can Holder to Max Modular (Kb Voodoo) Side Panel
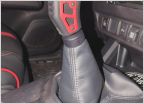 Manual shift knob
 Transfer case?
 Hooking up KC flex ditch lights.
 A few recent upgrades and I’m done for now
Question about Mobtown Bolt on slider install
Discussion in '3rd Gen. Tacomas (2016-2023)' started by Superman, Jun 28, 2018.
Page 4 of 6
Page 4 of 6


